House Grail is reader-supported. When you buy via links on our site, we may earn an affiliate commission at no cost to you. Learn more.
How to Level Your Above Ground Pool (Fast & Easy)
Pete Ortiz
Last updated:
Image Credit: electra, Shutterstock
Leveling the ground for your new above-ground pool may take a little bit of work, but it isn’t hard, and you can accomplish it in just a few steps. Level ground is essential to the structural integrity of your pool and the life span of your liner.
Before You Dig
Before you can get started digging, you are going to need to look into zoning laws, consider safety, and acquire the tools you will need to complete the job.
Zoning
Before you do any work digging, you need to check with your local officials to learn the rules regarding swimming pools in your area. Many times, pool structures need to be certain distances from other structures, and you want to make sure you’re within code, or you can face fines and even be ordered to remove the pool.
Safety
We mention safety this early on because you never know what’s going to be lurking beneath the ground that you dig up. You’re going to need to check with the electric company, the gas company, and with the water company, to make sure no critical lines or wires are running under the area you plan to dig. You can easily get electrocuted or rupture a gas line before you see it. Even if the cables and pipes are deeper than you intend to dig, you do not want to put a pool over them.
Tools and Equipment
Here’s a rough list of tools that you’re going to need to complete the job. There are many substitutions for some of these tools, and it’s fine to use any of them.
Shovel
Rake
1-foot rope
Level
Duct Tape
Drill
¾-inch drill bit
60-inch metal rebar
2×4 half the diameter of your pool
Tamper
Besides the tools listed above, we also recommend some kneepads, plenty of fluids, and some extra help.
Leveling the Ground
Let’s break the process of leveling the ground for your above ground pool into several steps, so it’s easier to follow along.
1. Find the Center of Your Pool
The first thing we need to do is find the center of the pool. Once we know where the center of the pool will be, we will hammer in the 60-inch metal rebar into the ground at that point. You want to make sure the rebar is firmly in place because we’re going be tugging on it for quite a while.
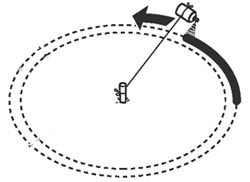
2. Mark the Perimeter
Next, we need the 2×4 that is half the diameter of your pool. If your pool is 18 feet across, you need a 9-foot long 2×4. Drill a hole at one end of the board so you can slide it over the rebar. The board should stand tall and not lay flat. At this point, you should have created something that very much looks like a clock hand.
To help make the board a little bit easier to manage, we like to drill a hole at the other end of the board and attach some twine or rope. Doing so creates a handle we can use to pull the board.
Once the rope is attached, begin marking the perimeter by pushing your shovel into the ground at the edge of the board. Pull the board a few inches in one direction, and push your shovel into the ground at that point as well. Continue to do this every few inches until you get all the way around to where you started. When you have reached the beginning, you have marked your perimeter.
3. Dig Out the Floor
Everything inside the perimeter needs to go, all of the grass and any rocks you can dig out. Dig down fairly deep looking for stones because the water is going to be very heavy, and you don’t want any hidden rocks to penetrate your liner. Remove the grass and the rocks only though, leave the dirt.
When finished with this step, the pool floor should very much resemble the early stages of a new garden.
4. Tamp
With all the grass and rocks removed, it’ll be time to tamp down the ground so you could get a look at how level it is. Take your time tamping, making sure to get all dirt evenly In the perimeter of your pool. When complete, you should notice any indentations in the ground or low spots.
5. Level the Ground
If you have removed a long 2×4 to clean up the grass or tamp the soil, you’ll need to put it back on the piece of rebar and attach your level to the top of the board, so it’s easily read. Just like we did to mark the perimeter, we’re going to drag the board and check to see that it’s level, starting at the lowest point in the perimeter.
We start at the lowest point because it’s better to remove dirt to make a surface level than it is to add it. The weight of the water will often compress the soil more than you think, and the depression will appear again after it’s too late to fix.
Slowly move your way around the entire perimeter removing dirt where it’s not level and tamping. Work from the rebar out to the edge, constantly checking your level. When you reach the beginning, you should have a very level surface with no dips or dents, and the 2×4 should travel the entire perimeter remaining level.
In Conclusion
Congratulations! Your pool floor is now level. If it’s tamped well, you should be able to walk across it without damaging the soil, or leaving indents in the ground. We recommend tamping and working slowly, going around three or four times because this is the only chance you’re going to get to have perfectly level ground.
Don’t remove the rebar yet, or get rid of the 2×4, because you are still going to need them to add the floor sand. On top of this level ground, you will need to add about two inches of pool sand and repeat the leveling process. The sand won’t need nearly as much tamping, but it does require a lot of careful raking. It can be challenging to create 2 inches of level sand, but the tools you have in place will help.
If this article has helped you, please share this guide to leveling your above ground pool fast and easy on Facebook and Twitter.
Pete has been working in the trades since high school, where he first developed a passion for woodworking. Over the years, he has developed a keen interest in a wide variety of DIY projects around the home. Fascinated by all sort of tools, Pete loves reading and writing about all the latest gadgets and accessories that hit the market. His other interests include astronomy, hiking, and fishing.
As the founder of House Grail, Pete's primary goal is to help consumers make educated decisions about DIY projects at home, in the garage, and in the garden.