
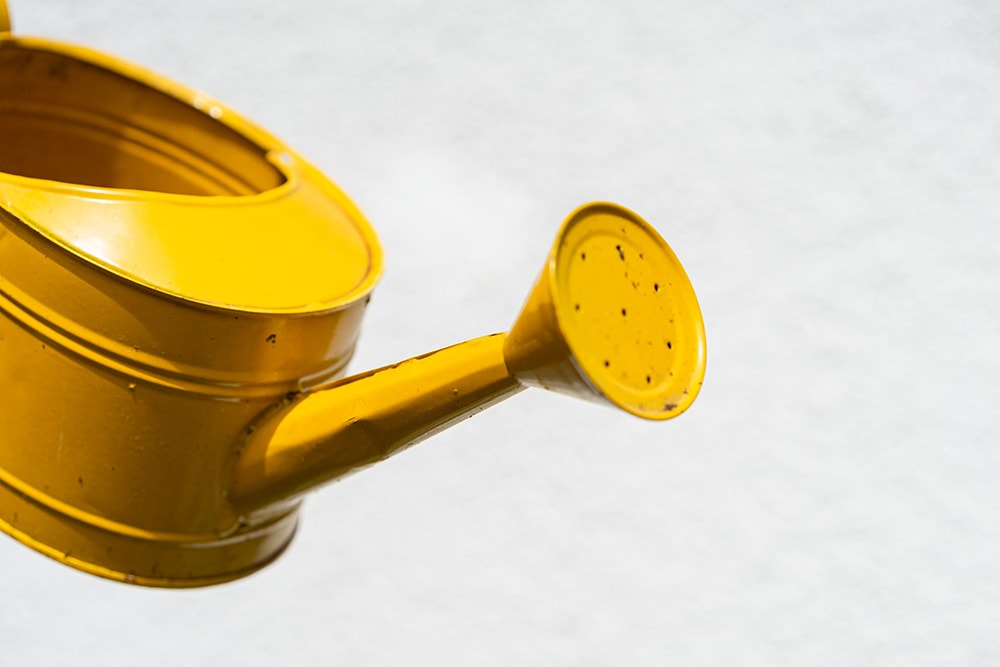
One could argue that no garden can reach its full potential without a watering can. Simple in design, portable, and long-lasting, these containers are perfect for feeding plants of all shapes and sizes. The handle and the funnel make them flexible, maneuverable, and easy to use. Now, watering pots aren’t at all expensive. However, if you’re looking for a specific size or design, it might be a challenge to find.
So, why not try and make your own can? This guide includes nine top-notch and 100% DIY plans that take minimal effort to build. Follow the instructions closely and make sure you have all the necessary materials and tools ready—that’s all you’ll need to start! Pick a plan from the list, free up at least a couple of hours to work on the project, and get to it!

The 9 DIY Watering Can Plans
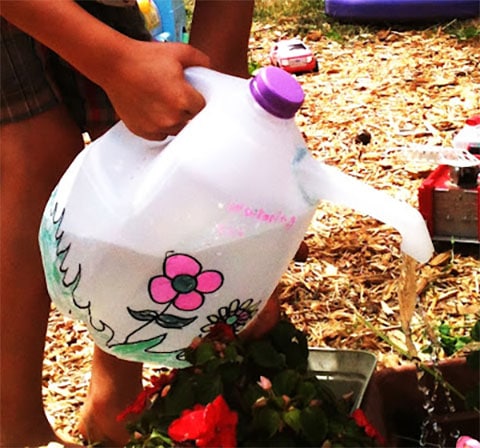
1. Homemade Kid-Size Can by Betty Crocker
| Materials Needed: | Empty container, nails |
| Tools Needed: | Marker, hammer, electric drill with thin bits |
| Difficulty Level: | Easy |
If you like to take care of the garden with the whole family, this homemade kid-size can will be a perfect DIY project. It’s very easy to make. All you’ll need is an empty container, some nails, and a hammer to make holes in the lid. Or, if you have a cordless drill and bits of the right size, just use it instead—that will be quicker and more accurate.
But, before you do any drilling or hammering, don’t forget to mark the spots with a marker. The key here is to pick a container that’s small enough for your kid(s) to handle yet carries enough water for proper gardening. A little squeeze is all it’s going to take to water the plants and flowers! And, you’ll be putting that bottle to good use instead of throwing it away.
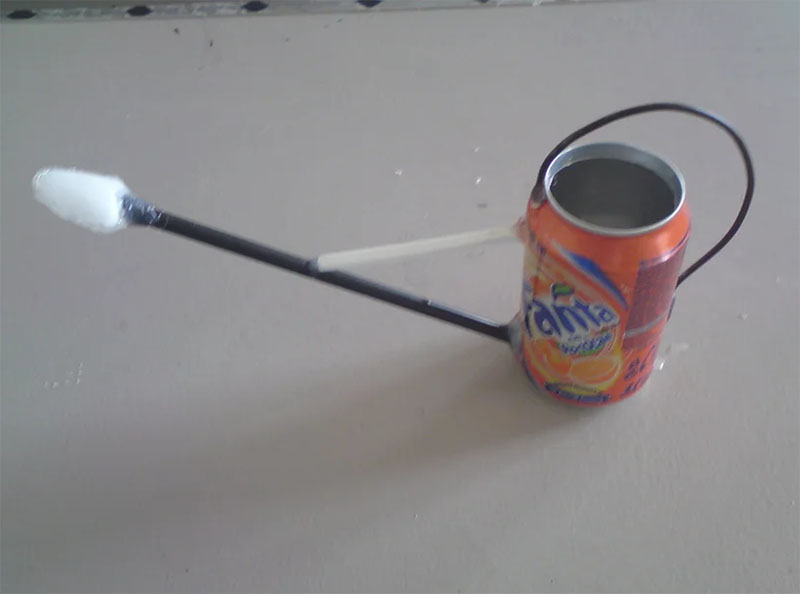
2. Pauls Green Watering Machine by Instructables
| Materials Needed: | Soda can, a set of plastic spoons, a drinking straw, stiff wire |
| Tools Needed: | Drill, wire cutters, pliers, epoxy glue, knife |
| Difficulty Level: | Easy/Moderate |
Are you ready to take our DIY beginnings to the next level? How about this Pauls Green Watering Machine, then? Don’t worry: while it does involve a bit more work than the average watering pot plan, it’s still a very simple project. And, thanks to the long makeshift spout, you’ll be able to water hard-to-reach spots in the garden. All you’ll need to build this can is a soda can (Fanta, Coca-Cola, or any other brand).
Next, get lots of glue, a straw, a set of plastic spoons, and some wire/coat hanger. As for the tools, make sure you have your knife and wire cutters ready. A drill and pliers will also come in handy. The best thing about this plan—there’s a lot of room for improvisation. You can go with a plastic bottle, with a thinner or a wider straw, and use whatever wire or cord that fits.
3. Recycled Watering Jar by The Merry Thought
| Materials Needed: | Old jar, leather strip + lace, paint (optional) |
| Tools Needed: | Cordless drill, leather punch, super glue, paint brush (optional) |
| Difficulty Level: | Easy/Moderate |
Not a big fan of plastic bottles? Try building a recycled watering jar instead! The concept is pretty much the same: you make holes in the lid, use a sturdy enough material for the handle, and get to watering. So, grab an empty jar (if you have many of those, pick the relatively small one, like a pickle jar). As for the handle, leather (a strip and a lace) will be ideal for it.
First, it looks great; second, it won’t hurt your fingers. A leather punch is the best tool for cutting leather; but, a regular knife will work as well. Put the wire through the lace and wrap it around the bottle. To secure it at the bottom of the jar, use super glue and hold it for 1–2 hours. Finishing up, paint the lid to match the jar.
4. Cheap DIY Watering Can by One Creative Mommy
| Materials Needed: | Milk jug, spray paint (optional) |
| Tools Needed: | Cigarette lighter, needle, nails, work gloves |
| Difficulty Level: | Easy |
Got a 1–2-gallon milk jug that you don’t want to throw away but don’t know what to do with? Well, you can always turn it into a cheap DIY watering can! It’s one of the simplest plans on the list. And, as the name suggests, it will cost you practically nothing. The jug already comes with a lid; so, use a cigarette lighter to heat a nail or a needle and push it through the lid to make a dozen holes. The nails should be very thin, though: otherwise, the holes will be bigger than we need them to be.
Oh, and do remember to put work gloves on to protect your fingers! As with other plans, painting is an option, but it’s not necessary. The jug looks decent on its own and will serve you for many years, if not decades.
5. Stylish Plastic Container Can by Home Talk
| Materials Needed: | Plastic bottle, copper pipe, spray paint (optional) |
| Tools Needed: | Hacksaw, glue, protective gloves, marker, adhesive tape (optional) |
| Difficulty Level: | Easy |
Poked lids and caps do a solid job of watering garden plants and flowers. However, you can’t always reach the “hidden corners” with such a watering can, especially if it’s relatively heavy. That won’t be an issue with this stylish plastic container can. While it doesn’t have the longest spout in the world, it will be enough for most watering duties. Find a plastic container with a handle. Next, use a hacksaw to cut a piece of copper pipe (3–4 inches will do).
Cut an “opening” in the cap and attach the pipe with glue. Give it some time to dry, and you’ll have a ready-steady watering can on your hands. As for the stylish part, spray paint and adhesive tape will give you all the creative freedom you need!
6. Simple DIY Garden Can by Dirt Happy
| Materials Needed: | One-gallon jug with a handle, dish soap, vinegar |
| Tools Needed: | Awl, nails/needles, pencil/marker |
| Difficulty Level: | Easy |
Some plastic containers don’t come with a handle; others do, but they still put unnecessary pressure on one of your hands. To avoid that, let’s make this simple DIY garden can. The process is just as straightforward as with all the other recycled plastic bottles and jugs. Only this time around, opt for a rather large jug with a handle on top. This way, you can use both hands (put one at the bottom and grab the handle with the other one) to hold the can at the perfect angle for watering different plants.
You’ll be surprised by how big of a difference this fine little detail makes! To get rid of the label, use a mix of dish soap and vinegar. Finally, if you’re ready to pay a bit extra, buy a stitching awl to make holes in the lid.
7. Full-Fledged Gardening Pot by CreativeEtc
| Materials Needed: | Oil container, plastic bottle, PVC tube, screws, piece of plastic |
| Tools Needed: | Marker, knife, hacksaw, scissor, glue, drill |
| Difficulty Level: | Moderate/Hard |
This right here is the most challenging DIY watering can plan we have for you today. It’s a full-fledged gardening pot with a handle, spout, and above-average water capacity. As always, we begin by picking the right bottle, and for this project, a car oil container is preferred, as it has a handle and can carry enough water. Next, find a much smaller bottle (like from a cleaning product). We’ll cut it in half with a hacksaw and use it as the tip of our spout.
The actual spout is crafted from a PVC tube. To make it look like the real thing and to ensure it won’t fall off, use a piece of flexible plastic to craft a holder for the spout. Just secure it to the container with a screw, and that’s it.
8. Preschool Watering Jug by Preschool Creative Learning
| Materials Needed: | A set of milk bottles, soapy water |
| Tools Needed: | Pocket knife, black marker, hot glue gun, pencil |
| Difficulty Level: | Easy/Moderate |
This preschool watering jug is like the golden middle between the previous DIY plans. For it to work, you’ll need to have two milk bottles. We’ll use one of the jugs as our container and cut off the handle of the second jug: it will serve as the spout. To clean the bottle, use soapy water. Do you have a gluing gun? Don’t heat it too much to avoid damage to the plastic. Essentially, it all comes down to “borrowing” the handle from one jug and sticking it to the other one.
And, instead of painting the whole can with a brush, you could draw something on it with a pencil to give it a unique look.
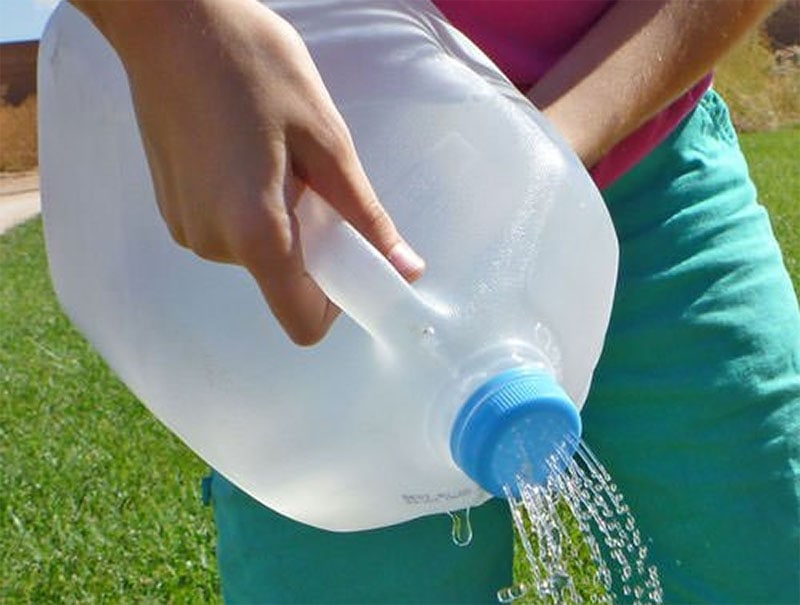
9. Thumb-Controlled Bottle Can by Popsugar

| Materials Needed: | Plastic bottle, cap/top |
| Tools Needed: | Pushpin or thumbtack, hammer |
| Difficulty Level: | Easy |
Jugs, containers, and jars are the most popular pick for a DIY watering pot, yet you can always go with a thumb-controlled bottle can instead. The list of required materials and tools includes a plastic bottle (preferable one with a long neck), a cap, a pushpin, and a hammer. And, it will only take you 5–10 minutes to get this done. The idea is really simple yet effective: use the pushpin to make holes at the bottom of the bottle.
Aim for 15-20 holes, just like a watering can would have. Next, turn the bottle around and push that pin into the cap: use a hammer for that. Then, fill the container with water, put the cap back on, and press on it with your thumb. Lift the finger and the water will flow down from the holes we made earlier.

FAQ: Watering Can Plans
What’s the Right Size for a Watering Can?
The average watering can carries 1–2 gallons of water (which equals 4.5–9 liters), and that’s enough for your daily gardening chores. Smaller cans are made for houseplants that don’t need that much water to flourish. And if you have a large garden in the backyard with lots of shrubs and plants, go for a larger-size pot. Ideally, you should have a couple of these that cater to specific needs.
Mostly made of metal or plastic, watering cans are generally lightweight, easy to use, and take little space to store. Now, a can that holds more than 2 gallons will be heavy and hard to lift (especially with a single hand). That doesn’t mean you can’t (or shouldn’t) use one, of course, but still, do consider the limitations that it comes with.
Are Watering Cans Effective? What Are the Alternatives?
Fun fact: these portable containers have been around for hundreds of years. And, while the core concept is still the same, they have been through many improvements to fit our gardening needs best. So, just how effective are they? Will you be able to adequately water a regular-size garden? Well, if you only have 5–6 plants to take care of, then yes, a watering can will be the perfect “tool” for that.
However, if you have dozens of flowers, bushes, shrubs, and plants that need constant care, you’ll be better off with a hose or a sprinkler. While those do cost much, the price difference will be well worth it. But, again, for “feeding” a couple of small plants (or indoor gardening), watering canisters are just right.
What Makes a Good Watering Can?
Most DIY plans on today’s list are crafted from plastic. The reason: it’s a cheap, widely available, and flexible material. It’s immune to rust but does deteriorate when exposed to UV rays. Galvanized steel is also very strong against corrosion. It’s heavier and more expensive than plastic but still an affordable choice. Stainless steel, in contrast, does cost more, but it’s very reliable and long-lasting.
Glass, ceramic, and stoneware are also an option. However, they’re heavy and break easily. And what about the spout? It can either sprinkle or pour (or both, if there’s a rosette attached). As for the size/length of the spout, the longer it is, the easier it will be to reach every single corner. Finally, if you’re opting for a heavy-duty watering can, it would be best if it had two handles (or, at least, a large single-handle) for ease of use.
Conclusion
Watering cans are the modern-day gardener’s best friend. And they’re fun to build: no need for expensive equipment, academic knowledge, or years of experience with specific tools and materials. Every single DIY plan from today’s list is intuitive and doesn’t take the whole weekend to make. Oh, and don’t be afraid to mess things up once or twice—it’s all part of the deal! The plastic bottles and jars used for these pots are very cheap and easy to get your hands on.
So, put your best effort into it, improvise a bit if you have to, and you’ll soon have an entire line-up of beautiful DIY watering cans at your disposal!
Related Read: The 6 Brilliant DIY Old Fish Tank
Featured Image Credit: Markus Winkler, Unsplash
Contents