House Grail is reader-supported. When you buy via links on our site, we may earn an affiliate commission at no cost to you. Learn more.
How to Clean a Dryer Lint Trap in 8 Simple Steps
Pete Ortiz
Last updated:
Washing machines might have all the attention in the laundry room, but the dryers are just as important. They work by directing hot air into the drum/tumble that moves at high speeds to dry the clothes. These machines have a decent lifespan but do require maintenance. More specifically, we’re talking about the lint trap.
As the name suggests, it holds the lint released by the fabrics. This term describes the tiny textile fibers that cotton, wool, and linen are made up of. Over time, the trap gets clogged with it, which makes the dryer less efficient and (potentially) dangerous. Fortunately, the lint trap can be cleaned. Follow our step-by-step guide, and you’ll be done in less than an hour!
Time Needed
30 minutes (60 with the vent)
Estimated Cost
$20–30 for the materials
Difficulty
Very easy
Photo By: Matt Valentine, Shutterstock
What You’ll Need for the Job
Before you put your gloves on and get ready to tackle the task at hand, make sure you have everything ready. It can be quite a bummer when you’re halfway through the job, only to realize that you don’t have a scrub or towels within reach. Here’s a quick look at all the stuff you’ll need to successfully clean the lint trap:
Tools Required
Materials/Products Required
Laundry brush (nylon)
Laundry detergent
Vacuum (with attachment)
Small bucket of water
A set of gloves
Pack of dry towels
The 8 Steps for Cleaning a Dryer Lint Trap
1. Start by Disconnecting the Dryer
Set the machine to “off” and unplug it from the outlet on the wall. This is more of a precaution, of course: there are no electronic components that might hurt you while you’re busy cleaning the lint. Now, if the dryer was just on and it’s still hot, give it 20–30 minutes to fully cool down. This applies both to electric- and gas-powered units.
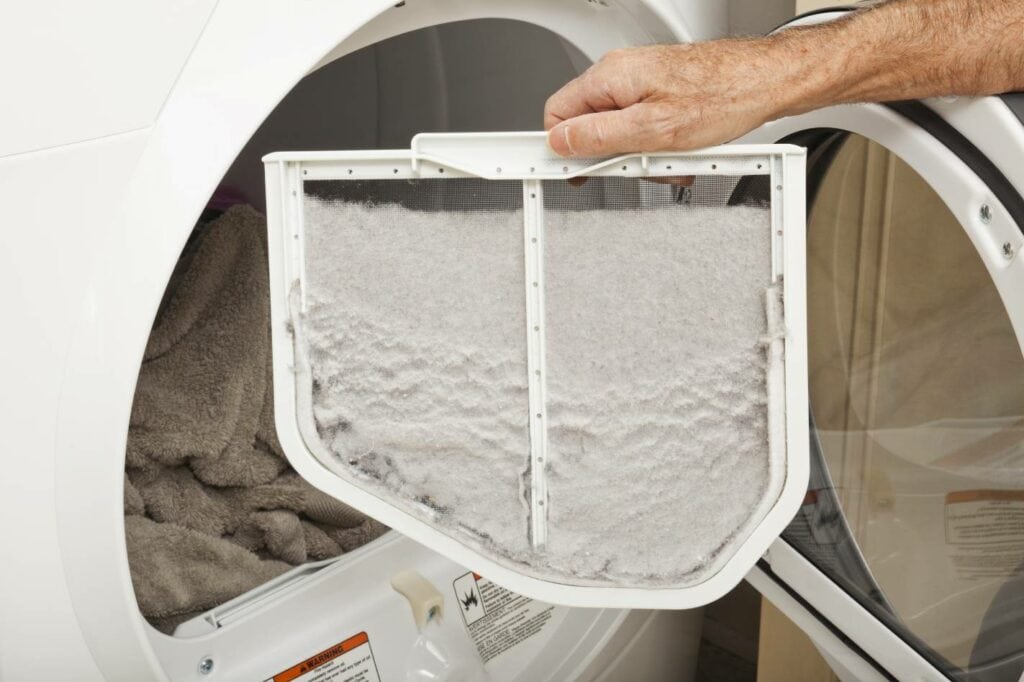
2. Remove the Lint Screen
Depending on the dryer brand, the lint screen might either be located in the front or on the top of the machine. If it’s in the front, all you have to do is open the dryer door and carefully pull the screen up to take it off the dryer. Can’t find it in the front? Then check the top but this time around, drag/pull it towards you. Don’t worry: nothing is holding the lint trap in place, meaning you won’t have to apply much force to remove it.
Photo Credit: David Smart, Shutterstock
3. Grab All the Lint You Can Reach
If it’s been a while since you’ve cleaned the trap, there are going to be lots of tiny fibers all over the screen. So, pick that lint with your fingers. Put all the lint you grab into the trash can. Next, use lukewarm water and some dish soap to clean the screen. Be very thorough and keep rinsing until you can easily see through it.
4. Use a Vacuum to Remove the Rest
Vacuum cleaners are great at sucking in all the dust, pollen, or, as in this case, lint. For the best results, consider ordering a crevice tool. It will cost you $10–15 and do an excellent job of reaching the narrow, tight spaces and corners. Aim the vacuum at the lint trap and make sure you remove every single bit of fabric from it. Don’t rush yourself: instead of cranking the vacuum up to 11, try to be as consistent as possible.
Another great thing about the crevice tool is that it directs the sucking power at one single spot, making it easier to “peel off” the lint. It usually takes 5–10 minutes to get the trap squeaky clean. While you’re at it, use the vacuum to clean the area around the dryer. In this case, the standard nozzle might be more appropriate.
Photo Credit: Benjamin Clapp, Shutterstock
5. Check for Signs of Residue
And that’s what the everyday lint trap cleaning routine looks like. However, it’s also important to remove any chemical buildup you see there. We’re talking about residue from all the cleaning solutions, detergents, and fabric softeners (as liquid/reusable balls) that you’ve been adding to the dryer/washer for the last 6 months or so.
6. Get Rid of the Residue
The best way to remove the residue that sticks to the walls of the lint trap is by using a nylon brush. Grab a bucket full of hot water and put liquid detergent into it (any product from the local store will do). Dip the brush into the water-detergent mix and gently scrub the lint trap with it.
When you’re done, rinse it with lukewarm or hot water and dry the surface with soft and clean towels. Depending on how much residue there is, removing it might take more than some light scrubbing. Don’t be afraid to get in there with the brush. So, just rinse, dry, and repeat until the lint screen looks good as new.
7. Put the Screen Back On
Alright, that sums it up! All that’s left to do is put the lint screen back in. The important thing here is that you align it properly with the dryer and keep pushing it gently until it sits firmly in that opening. Now run the dryer for at least 5–10 minutes to make sure there aren’t any issues with the machine.
Image Credit: Olya Detry, Shutterstock
8. Check on the Dryer Vent
While a properly-maintained trap/screen can easily handle most of the lint, some of it will still make it into the exhaust vent, also known as the dryer vent. If the screen is relatively clean but you’re experiencing slow dry times, lack of airflow, and overall poor performance, that means the problem is with the vent and it needs to be cleaned.
Don’t worry: the process is just as straightforward. Just a quick note: the trap sits right between the drum and the vent. And that’s exactly why the better you take care of it, the less lint will make it into the vent. On average, it is recommended to clean it once every 1–2 years.
Cleaning the Dryer Vent: A Step-By-Step Guide
Are you ready to put some more effort into this and clean the vent and the hoses? Here’s how you do it:
Disconnect the dryer (for safety reasons)
Move the dryer 1–2 feet away from the wall (ask a friend to help you out)
Now that there’s enough space, find the vents on the back of the machine
Do you see the ventilation hose? Remove any tape/clamps that are securing it to the wall
To clean the hose, you’ll need a brush (one with a long handle)
Be thorough and use a vacuum to reach as much lint as possible
Next, go around the house and locate the exterior vent. It shouldn’t be hard to find
Unscrew the cover and clean the ducts with those same tools: brush and vacuum
Finishing up, put everything back together, turn the dryer on, and let it run for 15–20 minutes
What Happens When the Lint Trap Gets Clogged?
The short answer is—nothing good. When the trap is operating like clockwork, it lets the water through freely while keeping all the lint from escaping into the vents. When it’s clogged, the water flow gets disrupted, which immediately affects the performance of the dryer machine. First, it starts taking longer to get the job done (dry the clothes). Second, the electric bills go up.
More importantly, a hammered lint trap in a dryer can lead to a fire/short circuit. That’s why it’s so important to constantly check on the trap and keep it lint-free. When the dryer is abnormally hot to touch, requires more time to dry the clothes, and you detect a strange smell (like something’s burning), that means you’re dealing with a clogged lint trap.
Conclusion
Cleaning the lint trap can be a tedious routine, but it’s a necessary one. If you want to keep the dryer in prime condition, make it last longer, and avoid the risk of a short circuit, you need to do this every time you load the dryer up with wet clothes. The whole thing only takes 30 minutes, but it will give you peace of mind and help avoid a trip to a repair shop.
More good news: to clean the lint trap, you won’t need expensive solutions or tools: just a bucket of water, regular detergent, a brush, and a vacuum. Proper maintenance will take you a long way with any home appliance machine and dryers are no exception to that rule!
Pete has been working in the trades since high school, where he first developed a passion for woodworking. Over the years, he has developed a keen interest in a wide variety of DIY projects around the home. Fascinated by all sort of tools, Pete loves reading and writing about all the latest gadgets and accessories that hit the market. His other interests include astronomy, hiking, and fishing.
As the founder of House Grail, Pete's primary goal is to help consumers make educated decisions about DIY projects at home, in the garage, and in the garden.