
Anyone who owns a car fears having damage done to their vehicle, whether it is to the tires, the painted exterior, or the windows. While some people can replace damaged tires or do a quick paint job on the exterior, it might be a bit harder to deal with a broken side window.
Once you have assessed the damage done and believe you can “survive” without having the car window replaced at this time, you want to start the steps of covering the window up. But how do you get that started?
This article will go over the process of covering a broken car window in four steps.

Materials Needed
To get started, you’ll need the following materials. You can find most of these items around your home, but other items you might need to grab at the store. Make sure everything is ready to go, so you do not need to stop the project halfway through:
- 1-2 plastic garbage bags
- Masking tape
- Vacuum cleaner for cars with vehicle-specific attachments
- Clean microfiber cloth
- Measuring tape
- Scissors
- Work gloves
- Protective eyewear
- Duct tape
- Hammer (optional)
How to Cover a Broken Car Window (5 Steps)
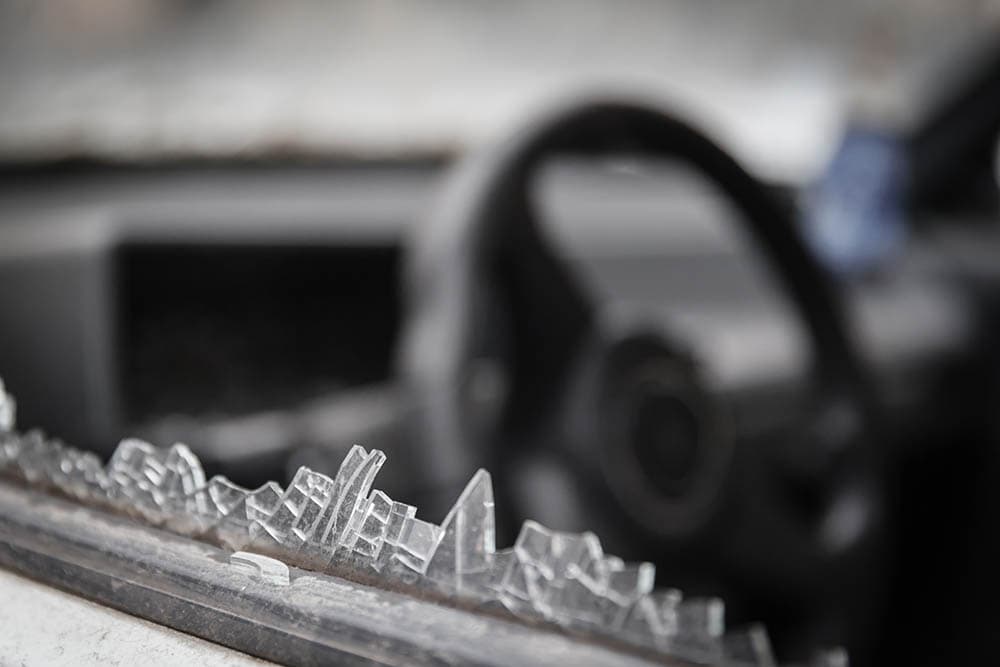
1. Clean Up Broken Glass
First, ensure that the car is free from any broken glass. The best way to clean up any glass from a broken window is by vacuuming it all away. Vacuum your car’s seats, headrests, and carpets so you don’t have dangerous sharp pieces lingering around. You should not skip this procedure because it is critical for your safety to remove any glass fragments before proceeding to the next steps.
2. Clean the Window Frame
Using a few droplets of water, dampen a dry microfiber towel. Gently clean the window frame of any debris. This will guarantee that the tape sticks well to a clean surface. Any bits of dust or dirt will prevent a solid seal. Allow the window frame to dry completely before moving on to the next step.
3. Get the Plastic Bag and the Tape Ready
It is a good idea to measure the window opening before cutting into a sheet of plastic. Once you have measured the dimensions, add an extra inch all around the plastic to make sure you can pull it taut. Cut the piece of plastic and set it aside.
Next, cut at least 10 pieces of tape between 1–2 inches long. Have them ready to grab because you will need to pull the plastic taut and secure it over the window space.
4. Tape the Plastic Bag to the Window Frame
This step needs to be done inside the car. Open the car door and align the sheet of plastic to one of the top window frame corners. You want to have a piece of tape on the plastic sheet and the rubber window seal. This will help secure the sheet.
Once you have taped the first corner of the sheet to the window frame, pull the plastic sheet to the bottom outside corner. Use two pieces of tape to secure the sheet to the bottom corner as you did with the top corner. Ensure the sheet has been pulled taut. Continue taping the other corners until the window frame is completely covered.
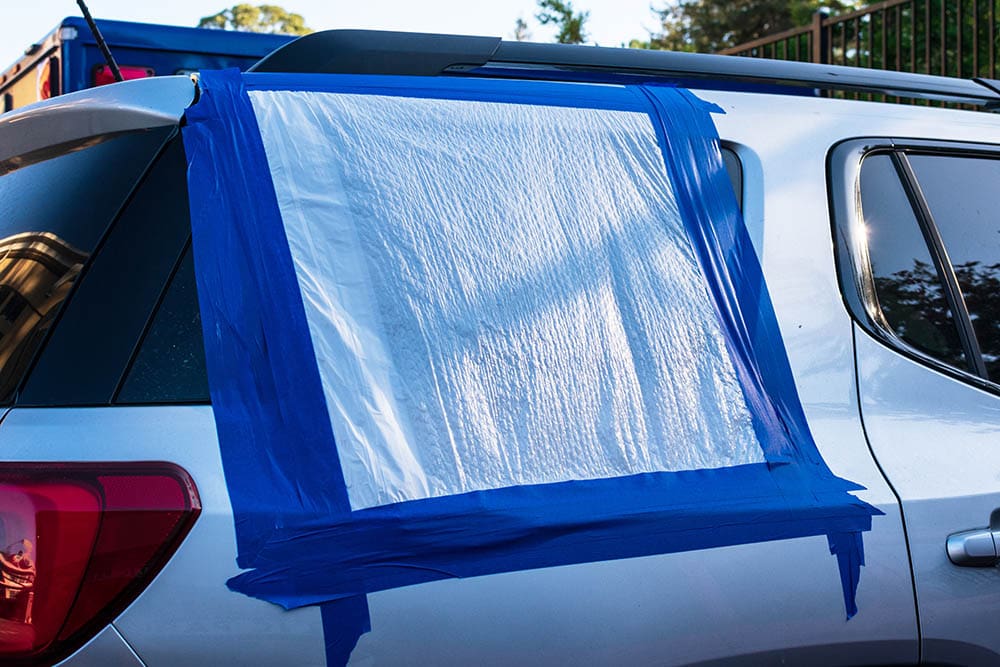
5. Apply a Second Layer of Tape
You should add a second layer of masking tape to be extra cautious. Apply the second layer around the margins, where the first tape ends, in addition to the first layer. This ensures that the tape stays in place. You can use duct tape for the second layer.
If there are spaces between two layers that follow each other, they could act as an entryway for water to seep into your vehicle if it rains; therefore, there shouldn’t be spaces.
Check to see if the tape sags inwards by tapping on it. If it happens, it’s time to tear off the old tape coats and replace them with fresh ones. If the plastic bag remained taut when you tapped it with your fingertips, then you’re good to go.

Reasons to Cover a Broken Window
Car windows are meant to keep the weather out, as well as intruders and harmful debris. A broken car window is an inconvenience that costs money to fix or replace, but it can jeopardize the safety of your vehicle. Water damage leading to corrosion can set in quickly, spreading throughout the car and limiting visibility, as well as destroying electronic components.
Covering a broken window with a temporary fix will preserve the watertight seal of your car until you can get it fixed by a professional or have time to replace the glass yourself.
What Are Some Do’s and Don’ts to Covering a Broken Car Window?
No one expects their car window to break, but unfortunately, it does happen. If it happens to you, be sure to follow these do’s and don’ts to make the process as smooth as possible.
- Wear safety gloves to avoid getting your hands cut by shards of glass.
- Cover the shattered window as soon as you notice it.
- Vacuum the interior of the automobile before putting the tape.
- Applying tape to the outside is not a good idea. It will draw emphasis to the hole and draw extra attention to the damaged glass.
- Remove any glass shards that may have dropped inside before applying the tape. Those fragments can harm the car’s seats and upholstery just as much as they can harm your flesh.
- Covering the window with cardboard is not a good idea. The cardboard is opaque and thus obscures visibility. Also, if it is not properly fastened, it might pose a great threat by flying around. If it rains, it will absorb the moisture and will not dry quickly.
What Other Materials Can I Use to Make a Window Cover?
To cover the window, you can use a crash wrap, a simple plastic bag, or even clear duct tape in addition to the plastic garbage bag. Use anything that will allow you to see through it and does not obstruct your vision.

Conclusion
Though it’s not a permanent fix, following the steps above can help drivers get by until they’re able to schedule an auto glass replacement, which should be done urgently. Remember that using plastic and duct tape creates extra blind spots and risky driving situations, so be sure to take caution when driving with a broken window.
Featured Image Credit: Rawpixel
Contents
