

Whether you just want to preserve some beautiful flowers or you need the petals for a craft, there are several fast and easy ways to dry out flowers. When dried correctly, many flowers will look very similar to how they did before drying. However, if you dry them incorrectly, they can fall apart or lose their coloration.
Of course, the type of flower does matter. Roses are one of the easiest options to dry quickly, and they are used in lots of projects, which is likely why so many people are wondering how to dry roses fast.
However, many of these methods will work for most types of flowers—just be aware that some do not dry as prettily as others.
Here are three of our favorite methods for quickly drying flowers. Unlike traditional drying methods, these take very little time (though often a bit more effort).

The 8 Steps to Dry Flowers Fast Using a Microwave
Using a microwave is often one of the easiest methods for dehydrating flowers. However, it does require silica gel and some very specific instructions to do it correctly. Otherwise, your flowers may burn or even catch on fire.
1. Remove the Blooms
First, you need to remove the actual flower from the stem. This method does not work to dry the stem of the flower—just the bloom portion. While it should work for most types of flowers, it does seem to work best for sturdy flowers such as roses.
You can remove the blooms however you wish. We recommend using scissors or garden clippers. Try to get as close to the bloom as possible.
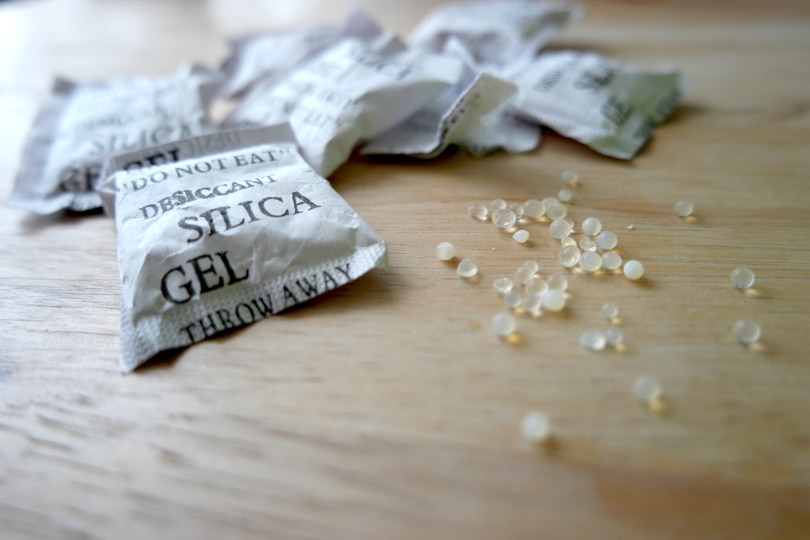
2. Prepare the Silica Gel
For this method to work, you have to use silica gel. Choose a container that is big enough for your flowers and fill the bottom inch or two with silica gel. You can purchase this gel from most stores that carry floral supplies, as it is commonly used to dry flowers.
Once it is used for this purpose, you won’t be able to use the container for food again. Silica gel is toxic if consumed.
3. Place the Flower on the Gel
Next, you’ll need to place the flower onto the gel. You don’t need to push the flowers into the gel. Simply set them on top with the bloom facing up and the remainder of the stem facing down. Keep about an inch of space between each flower.
Tap the sides of the container to allow the gel to settle. The flowers might sink into the gel a little bit, which is okay.
4. Add more Gel
After the flowers have settled, it is time to add more gel. You want the flowers to be covered (or, at least, almost covered). As you’d imagine, tall flowers like roses will require more silica gel than flat flowers. Keep this in mind when purchasing gel for your flowers.
Slowly pour in the gel so that it goes around the petals and into the creases. You don’t want the flowers to be crushed by the gel, however.
5. Microwave the Flowers
Next, you’ll want to microwave the flowers on full heat. Do not cover them. The exact amount of time will depend on the type of flower you’re microwaving, as well as the size of the particular flowers you have.
We recommend starting with one minute and then checking on the flowers. While you will find lots of suggested times online, these aren’t always accurate. You have to consider the wattage of your particular microwave, as well as the size of your particular flowers.
6. Check with a Toothpick
To determine if the flowers have dried or not, we recommend sifting the gel aside and peeking at the petals with a toothpick. The petals should be dry and papery if they are completely dry. The petals will also turn darker and may even look wrinkly.
If the flowers aren’t dry yet, cover them up and microwave them for a bit longer.
7. Let the Container Sit
After the flowers have dried, you’ll need to let them sit in the silica. Cover the container with a lid or improvised covering and wait several hours. Letting them sit overnight is best. This last step ensures that the flowers are completely dry. Some flowers may need to sit for more than 24-hours, such as pansies.
You can’t overdo this step, so err on the side of longer instead of shorter.
8. Remove the Flowers
Once you’ve left the flowers for the appropriate amount of time, it is time to remove them from the gel. To do so, tip the container gently to expose the flower. Then, scoop up the flower gently with your hands. Don’t dry to pull the flower out by the petals, as this will cause them to rip.
Next, you can dust the flower gently with a brush to remove the extra silica. However, this is an optional step. It will depend on the type of flower and how much silica is left behind.

The 5 Steps to Dry Flowers Fast Using an Oven
You can also use an oven to dry flowers, which is likely more traditional. However, this is only recommended for sturdy flowers, as small, delicate flowers will overdry too quickly and become burnt. Furthermore, this method often causes flowers to lose their shape.
1. Preheat Your Oven
Firstly, you’ll need to preheat your oven to the lowest temperature possible. Many ovens will go as low as 150 degrees. However, others may not. Just set the oven as low as it will go.

2. Trim the Blooms
Next, you’ll need to remove the blooms from the stems like in the previous method. You can use clippers or scissors for this process. Preferably, you should get as close to the blooms as possible. This method doesn’t work well on the flower’s stem, so you should remove the stem as completely as possible.
3. Spread the Flowers on an Oven Rack
Using a cool metal rack that is easy to move around, place the flowers onto the rack evenly. Many people like to put a baking rack underneath the rack in case any flowers fall off. Leave at least a finger-length space between each flower to ensure heat circulation. Also, all the blooms should be facing as upward as possible.
4. Bake the Flowers
Because the size and shape of the flower will determine how long it needs to bake, there is not an overarching estimate we can provide. However, we recommend that you check the flowers at least every thirty minutes.
Unlike baking, don’t necessarily worry about opening the door too much. You don’t want the temperature too high, and regularly checking on them can help dissipate the heat a little bit. When the flowers are done, they should turn into a papery texture.
Do not turn up the temperature. Expect to wait between an hour to 3 hours. However, different flowers will get done at different times.

5. Let the Flowers Cool
Now, you should let the flowers cool completely before you touch them. The flowers will be delicate, so you should be very gentle with them. These flowers should have very bright colors, so they are great when used in pieces, such as soap-making and candle-making.
If you don’t use them immediately, you should store them in a box with paper.
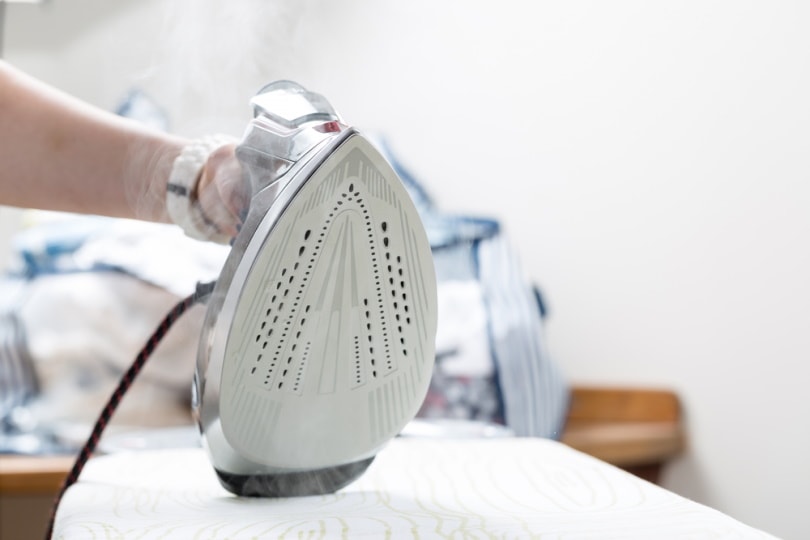
The 7 Steps to Dry Flowers Fast Using an Iron
For very delicate flowers, you can also use an iron to help dry them. However, because this is a pressing method, you cannot use it for roses and similar flowers. Still, this method works well for flowers that cannot go in the oven.
1. Prepare the Flowers
For this method to work, you need to prep the flowers. Cut the blooms off the stems entirely. Alternatively, you can leave a few inches of the stem on the flower, depending on what you’re going to use them for.
Next, pat the flower with a paper towel to remove as much moisture as possible. The moisture may lead to burns or simply make this method not work.
2. Flatten the Flowers
Next, you should flatten the flowers with a heavy book. Put a piece of paper onto a hard surface, like a table. Then, arrange the flowers on top and cover them with a hard book. Press down on the book to flatten the flowers as much as possible.
You don’t have to leave the book on the flowers. Simply press them down as much as you can.

3. Sandwich the Flowers
To properly iron the flowers, you’ll need to arrange them carefully on a combination of paper towels and parchment paper. Start by laying a piece of paper towel on your ironing board. Next, cover the paper towel with a piece of parchment paper. Arrange the flowers on this piece of parchment. It is best if they are not touching each other.
Next, cover the flowers with another piece of parchment paper. Place a final paper towel on top.
You can also use some sort of cotton fabric instead of a paper towel. However, we find that paper towels are typically the easiest option.
4. Remove Water from the Iron
While you want the reservoir to be full when ironing clothes, you typically don’t want any water when drying flowers. After all, the steam will inhibit the drying process. Turn the heat on to the lowest setting. If your iron allows you to choose between steam and dry, choose dry.
5. Press the Iron for a Brief Period
With everything prepared, you can begin ironing. Simply press the iron against the paper for 10 to 15 seconds. You do not need to move the iron back and forth along the paper. You aren’t ironing a shirt. Simply press for 10 to 15 seconds and then lift the iron away.
6. Press Again
Wait a few minutes for the paper on top to dry. Once it has, press again for another 10 to 15 seconds. Now, check to see if the flowers are dry and flat. If they are papery and dry, then you can move on to the next step.
If they are not, you’ll need to wait for the paper to dry and press again. Keep following this protocol until the flowers are dry. If they don’t seem to dry after a few tries, turn the heat up slightly.
7. Let the Flowers Cool
You should let the flowers cool completely before you mess with them. You can remove the paper towel and top parchment sheet. However, don’t try to peel the flowers off of the bottom sheet until they are completely dry. Once they are cool, the flowers are ready to use.

Conclusion
There are many ways to dry flowers quickly. Which option you choose will depend largely on the type of flowers you are drying, as well as what you have on hand. For many of these methods, you’ll likely need to purchase materials so plan accordingly.
Featured Image Credit: New Africa, Shutterstock
Contents
