
Not every house has a gutter system, but gutters are important parts of any roofline, and they prevent water from flowing directly off the roof and around your home. Roofs without gutters can spray guests with water, soak the entryway to a home, leave pooling water around the foundation, and even flood basements. Gutters that are installed properly can add curb appeal and value to a home. Luckily, installing a basic gutter system on your own can be simple. Installing your own gutter can save you time and money if you do it properly. Here is everything you need to install your own gutter system in 12 easy steps.

Preparation
Installing a gutter system can be easy with the right preparations. For small homes, the job can be done in a single afternoon. Large homes could require two intensive afternoons of work. The job goes much smoother if you can get two or three people working at the same time.
Installing a gutter system is fairly straightforward and requires some knowledge of basic tools, comfortable use of a ladder, and some forethought. If you gather all of the materials and make sure to plan and measure ahead of time, then the job can be very smooth.
- Complexity: Intermediate
- Time To Complete: 6 – 12 hours
- People: 2+
What You Will Need:
- Drill
- Saw
- Tin snips
- Rivet gun
- Tape measure
- Chalk line and chalk
- Crimper
- Screws
- Rivets
- Gutter sealant
- A ladder
- Marker
- Hole saw (optional)
Note not all gutter systems can be installed at home in DIY fashion. Some systems are more complicated than others. These steps work best for basic aluminum and vinyl gutter systems that you can buy at your local home improvement store. Gutters made from other materials like zinc, copper, or steel will require professional attention or vastly more experience.
 How to Install a Gutter (12-Step Guide)
 How to Install a Gutter (12-Step Guide)
1. Measure Your House and Buy Gutter Material

The first step to a successful project is to make some measurements. You want to measure the entire length of your house where you want to install gutters. Take that measurement and add 10% for waste and then go out and buy the gutter system that you want to install. Don’t forget to buy the downspout and any tools that you might need to complete the job effectively. Most home improvement stores will carry full gutter systems and everything you need to finish the job in one go.
2. Chalk Line the Gutter Layout onto the Fascia
Next, you want to use a chalk line to mark out where you want to install the gutters. A chalk line will ensure that your gutters get installed in a straight line, and it will keep all of the brackets and screw locations uniform.
When marking out your gutter location, be sure to account for a slight slope. A slope will ensure that water runs smoothly down and out of the gutter. A flat gutter will hold water which will lead to sludge and corrosion over time. It is suggested that you account for a half an inch drop over every ten feet of length. You can measure the lengths and account for the drop when you are making your chalk line for the most accurate slope possible.
3. Install Gutter Clips onto Fascia (If Necessary)

After you have your chalk line in place, you can install your gutter clips. Some gutters attach directly to the fascia and do not have any clips or brackets, but many systems do. Be sure to follow your chalk line and firmly fasten each bracket along the line. Your gutter system should prescribe the necessary distance required between each bracket. Make sure the brackets are secure and straight.
If your gutter system does not have any brackets or clips, you can skip this step.
4. Cut Gutter to Length and Arrange on the Ground
Since it is easier to work on the ground than it is in the air, many professionals recommend that you arrange your gutter lengths on the ground and cut them to length. If you have a light enough gutter, it is recommended to join one or two sections together so you can attach them all at once to the fascia. This will make final installation easier than if you have to try to rivet or seal gutters that are already attached to the house. Many gutters are installed in ten to twenty-foot lengths, but your gutter system might come in longer or shorter sections.
Using a hacksaw, snips, or a circular saw, cut your gutters to length so you have exact lengths to cover the full distances.
For example, if you have a twenty-foot run of the house you need to cover, it is recommended to cut and join the sections on the ground, so you have the whole twenty-foot length laid out and ready to go.
Be sure to account for any elbows that you might need to install. It is recommended to join one side of an elbow on the ground so you can secure one corner in the air before joining the other side of the elbow.

5. Seal and Rivet Joints

If you are joining sections of gutter together on the ground, it is much easier to seal and rivet the joints without being on a ladder. The rivets will ensure that each section is properly secured and will not come loose when in the air. Once you have two sections joined together, use your rivet gun to add rivets around the entire section, ensuring that the overlapping portions are strongly joined together.
Recommended specifications call for gutters to have at least 8” of overlap per section, and each overlap should be joined by eight pop rivets or metal screws. If you have enough waste, you might want to consider overlapping by a full foot. The more overlap between gutter sections, the stronger your run will be, and it will be less prone to sagging or gapping in the future.
Seal each joint with caulk or your preferred gutter sealant. If you do not properly seal each joint, you will have water leak through small gaps, which will defeat the purpose of installing a gutter system to begin with. Some people prefer caulk, and some people prefer liquid sealant. The choice is ultimately up to you.
6. Attach End Caps
End caps should be attached on the ground when possible. Securing the end caps and capping a run will help you visualize and lay out your gutter system. Secure the end caps to your manufacturer’s instructions using pop rivets, if necessary. Like the overlapping sections of the gutter, you should seal the end caps so you do not have any water leak out of the ends of your gutters.
7. Mark and Cut Downspout Hole
Now that you have everything laid out on the ground, look to see where you want to put your downspout. The downspout should be located near the end of a gutter run, and the outflow should run into a safe area of your property.
Many people choose to connect the downspouts to the corners of their houses. Be sure the downspout is not going to pour water near a basement window, a soft patch of land, or an entryway.
Once you have chosen the location of your downspout, you can mark and cut the downspout hole on your gutter. Outline the hole with a marker and make the cuts. For aluminum gutters, you can cut the downspout hole with tin snips. If you have a circular downspout, you can cut the hole with a hole saw if you have one. For rectangular openings, you can use tin snips or a hacksaw.
The downspout hole needs to be downslope from the gutter. Do not install the downspout hole at the upper part of the slope because the water will then be flowing away from the downspout. This part is critical.
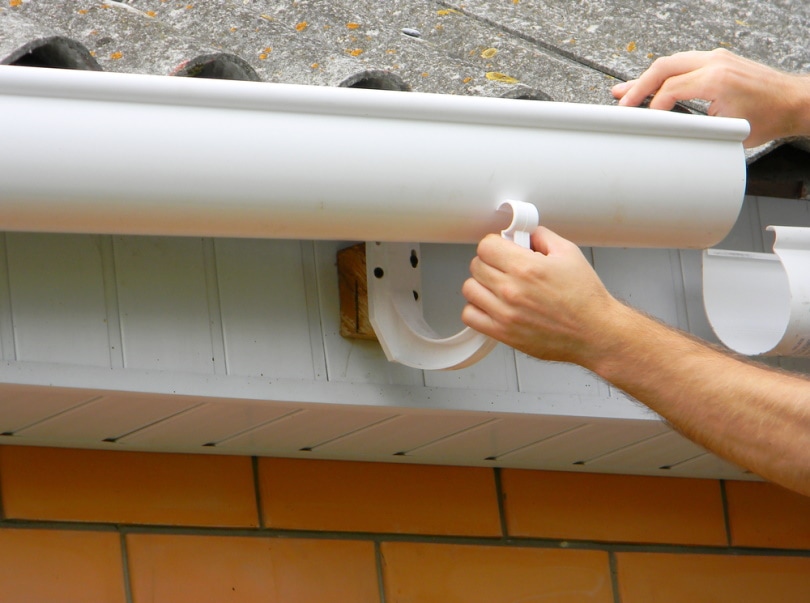
8. Attach Gutters to Fascia
After you cut your downspout hole and have everything arrayed where you want it, it is time to install the gutters to the fascia. This step often requires two or three people to complete. Carefully lift your gutter sections up into place. Having multiple people makes lifting and holding the gutters up easier. Lift each section of the gutter up and begin attaching the gutters to the fascia.
For systems with brackets or clips, attach the gutters to the clips per your manufacturer’s instructions. For gutters that get installed directly to the fascia, hold the gutter in place and begin skewing directly into the boards. Be sure to follow your chalk lines and make sure that you are keeping the slope in place.
Gutters should be straight and secure. Do not skip any clips or brackets along the length. Look for sections where sagging might be possible.
9. Install Flashing If Necessary
Some local codes and gutters require installing flashing. Flashing is something that backs the gutter and prevents water from splashing or sloshing up and hitting your fascia or getting under your roof line. Not all areas require flashing, and not all gutter systems require flashing. Check your instructions and your local codes to see if flashing is necessary. Flashing is installed behind the gutter and up under the roofline to prevent water from spreading to places that it should not.
10. Check Seals and Ends
Once the gutter is up in the air and attached, it is time to check all of your seals and ends. Be sure that each section of the gutter is properly attached to the fascia and check to see that each overlapping section is sealed and secured. Check the ends to make sure the end caps are firmly in place. Check elbows to make sure they are secured and sealed. Make sure there are no uncapped ends, no unsealed joints, and no sagging or disconnected sections.
If you need to seal or reseal gaps, you can seal them from below if it is easier, but it is preferable to try and seal the inner part of the gutter.
11. Install Downspout
The last step is to install the downspout. The hole should be in place, now it is time to attach the final sections of the downspout. Some downspouts require that you attach them to the house using brackets, and some downspouts can come straight down with no reinforcing elements.
You want to make sure that the downspout is flush inside the upper part of the gutter and that the upper opening is sealed to prevent leaking around the downspout.
12. Wait for Rain and Check Your Handiwork
The last step is to wait for natural rain to check your gutter system. When it is raining, you should go outside and look over your handiwork. Check for leaks or improper flow. If you installed everything correctly, the water should be running down towards your downspout and out. There should be no leaks and no standing water. Be sure that water is not coming out of the ends through the endcaps. If you have water pooling by the end caps, you may have installed your downspout in the wrong location.
It might be necessary to reseal sections after the gutter dries if you see any issues.
Don’t Forget the Slope and Downspout Locations
Two of the biggest mistakes that people make when installing a gutter system are the slope and the downspout location. If you do not keep your quarter inch over ten feet of drop, the water will not flow out of your gutters properly. Many people accidentally install their gutters completely straight, or even with an upslope, if they are inaccurate, which will vastly decrease the effectiveness of your gutter system.
The other thing people frequently forget is to install a downspout or to mark out an effective downspout location. That is why it is critical to lay out your gutter system on the ground beforehand and choose the downspout location when you have time to adjust and move your gutters around before they get installed in the air. Many people forget to install the downspout downslope from the gutter, leaving the downspout useless.
Conclusion
With these twelve steps, installing a gutter system can be fairly easy. With a little bit of precision and two people, you can install a gutter system in one day. Larger houses might require two days of work depending on how fast you move, but the steps are fairly straightforward. The key to a smooth gutter installation is precise measurements and forethought. Gutters can increase the value of a home and reduce the prevalence of pooling or water damage from free-flowing water from roofs.
See also:
- How to Replace a Gutter in 6 Easy Steps
- 9 Roof Gutter Types (With Pictures)
- How to Install a Gutter Downspout: 9 Easy Steps
- HOW TO CLEAN A GUTTER DOWNSPOUT: 5 EASY STEPS
- HOW TO FIX A LEAKY GUTTER CORNER IN 7 EASY STEPS
Featured Image Credit: MR. AEKALAK CHIAMCHAROEN, Shutterstock
Contents
