

A practical arrangement is essential for keeping a diverse toolset accessible and clean. It isn’t the only key to success, but tidiness will make every project faster, easier, and more enjoyable.
With something as simple as a workbench, it’s easy to underestimate the possibilities for intelligently laying out your space. Find out how to make the ultimate utilitarian upgrade by checking out these workbench organization ideas.

The 10 Clever and Creative Workbench Organization Ideas
1. Add a Pegboard

A pegboard is one of the most versatile organization systems you can use, and it doesn’t take up a bit of floor space. Keep all your more sizeable tools easy to find and convenient to reach, adjusting the layout with a few quick motions whenever your needs change.
With peg holders, shelves, and other universal hanging attachments, you can use your pegboard for nearly any tool.
2. Install Pegboard Cabinets

Cabinets aren’t an obstruction; they simply add relief to the wall. With a different perspective, you can still utilize all the original wall space alongside the cabinet storage.
Pegboard door faces are an excellent way to get even more utility out of your cabinets. Add pegs to hold tape, cords, or tools related to the contents behind the door, ensuring they’re well-secured.
3. Make Use of Old Jars

Repurposed Mason jars and old tins can be indispensable when fixing up a cluttered workbench. Glass jars are perfect since you can see into them. But with a quick masking tape label, you can organize small items into several containers. Use them for screws, nuts and bolts, pencils, tacks, hooks, and anything else that might scatter across an unkempt bench.
4. Attach a Magnetic Tool Holder

A magnetic tool holder can appear in a few different forms. Using a magnetized tool strip is one of the most convenient and space-saving options to keep your pliers, paintbrushes, wrenches, and other metal tools in an out-of-the-way spot. You can place them anywhere, whether on a wall or the side of your workbench. Nothing is faster or easier than this when you must grab and put back any small tool.
Alternatively, you can upgrade from a strip to a metal sheet for more magnetic storage space. Take a simple piece of sheet metal and attach it to any flat surface. Use small but powerful refrigerator magnets as your magnetic bridges for holding anything from screwdrivers to drill bits.
5. Use Magnetic Parts Trays

Scattered miscellaneous fasteners and other small hardware can be a pain to maintain. Rather than let them roll around uncontrollably, get a magnetic tray to keep your pieces in one place and organized.
Have magnetic trays nearby when you need an on-demand organizer for your tools, or use them as ongoing storage for screws, nails, and small hand tools. Since they attach to metal surfaces, you can keep them on the side of a metal workbench to keep them from stealing any of your workspace.
6. Keep a Couple of Bolt Gauges on Hand
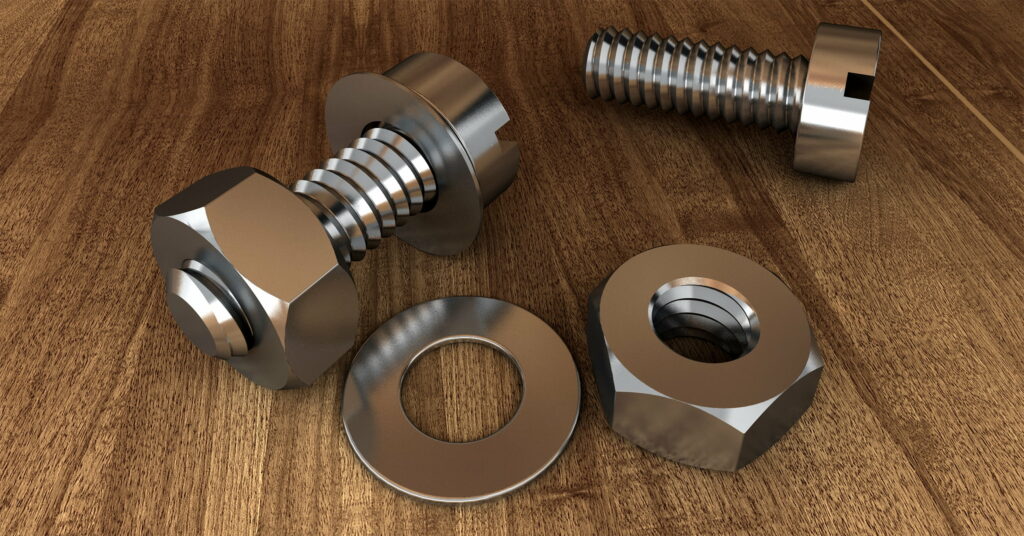
Having the correct piece of random hardware for a project is a blessing that most disorganized workers never experience. With all the random nuts and bolts you’ll find lying around while completing your various projects, keeping them tidy and accessible isn’t possible if you aren’t willing to try. Thankfully, you can make the task exponentially faster and easier with a thread checker.
A thread checker, or bolt gauge, has all the metric and U.S. nut and bolt testers in a neat row. You can instantly get the proper size for your hardware, allowing you to store it in the correct place instead of throwing it in a catch-all. The extra help to stay organized could save you time and possibly even some money the next time you need to find a fastener.
7. Cut Out PVC Storage Bins

Levels, T-squares, and paint stirrers are only a few of the awkwardly long tools that are challenging to keep tidy but are no less essential around the workbench. Solve your storage problems by making a simple PVC organization system.
Cut a few tubes to a desired length to keep those items upright, out of the way, and easily accessible on the side of your bench.
8. Build a Folding Workbench
When your space issues don’t seem to have any answer, the solution may be to take your bench out of the equation. Sharing a space in the garage with a car or in a shed with heavy equipment can force you into limited options and tough compromises with your organization.
If your bench has to jockey for space with something else when you keep it in your preferred location, you could find a win-win situation in a foldable workbench. A few hinges are all you need to create a stable work surface that stores flush against the wall, leaving all the room for anything that doesn’t collapse as neatly.
9. Create Roll Holders

Getting a strip of tape, a line of twine, or a piece of sandpaper to finish up a woodworking project can be as easy as getting a paper towel when you use a roll holder in your workspace.
It can be handmade, or you can use something as simple as a TP holder. Attach one to the wall behind the workbench or on the side of it. You’ll never worry about organizing your rolled-up items since they’ll never have to move!
10. Set Up a Charging Station

It’s all about the battery nowadays, and if you’ve chosen your branded charging system for your powered tool array, you’re ready to set up a charging station. You can find wall-mounted shelving systems with attached power strips and assorted hanging hooks. If you’re feeling handy, a charging station is also a simple DIY woodworking project.
Final Thoughts
A workbench is a blank slate for a thousand DIY projects and a practical organizational system. Consider the makeup of your tool collection and your primary challenges in keeping your space clean. You have countless opportunities to find functional storage solutions, so take inspiration from these clever and creative workbench organization ideas to make your DIY time less about tidying and more about building.
Featured Image Credit: Nattapat.J, Shutterstock
Contents
