
Curb appeal can have an outsized role in your home’s look, feel, and even value. One of the easiest ways to spruce up or change your curb appeal is to add some custom planters to your front porch. But planters can be expensive, and the big box stores don’t often have a large selection of eye-catching options. The good news is that you can build your very own custom planters in a single afternoon. This list consists of ten unique planter designs, with plans that will allow you to build and customize your own planters to fit your particular home’s aesthetics. There are planters here for all styles and skill levels.
Here are nine DIY front porch planters that you can build yourself with plans included.

The 18 DIY Front Porch Planter Ideas to Build
1. Repurposed Trash Can Planters
| Materials: | Simple smooth trash can, under mat (optional) |
| Tools: | Metallic spray paint (optional) |
| Complexity: | As simple as it gets |
If you are looking for a simple and affordable way to add planters to your front porch, look no further. These basic DIY trash can planters only require you to source simple cylindrical trash cans with open tops to put on your porch. The plans suggest looking at IKEA for something that will work. Avoid anything with a lid or handle, or pedal. Once you get your simple trash cans, you can paint them to a metallic hue if you so choose, or you can put some decorative mats under them. Then all you have to do is fill them with a mixture of dirt and rocks and put your real or fake plants inside. Style doesn’t have to be complicated or expensive to achieve.
2. Budget DIY Planter Box
| Materials: | 2x2x8 (x3) 1x4x8 (x4), fence pickets (x4), paint or stain, nails |
| Tools: | Miter saw, tape measure, nail gun, sandpaper |
| Complexity: | Basic |
These simple DIY planter boxes are perfect for people looking to add some curb appeal on a budget. The wood for these planter boxes can be purchased at extremely low prices. If you go with simple pressure treated pine or basic spruce planks, this project will hardly cost anything. These plans are simple to follow and require you to build four identical sides and then connect them with slats. The result is a basic and affordable planter box that can be painted, stained, or sanded to match your desired aesthetic. Planter boxes do not need to be expensive or hard to build. They can be both simple and affordable.
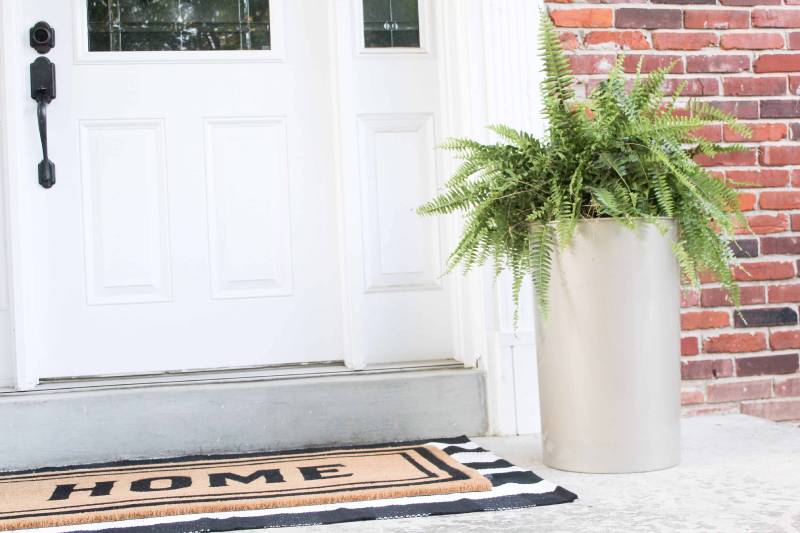
3. Farmhouse Porch Planters
| Materials: | Cedar fence pickets, plastic planter box, wood glue, nails |
| Tools: | Miter saw, table saw, nail gun |
| Complexity: | Basic |
This DIY farmhouse porch planter cleverly uses cedar fence pickets to create a rustic planter that looks great, is easy to build, and is very light. Cedar has a great rustic look, is easy to work with, and is extremely weather resistant. That makes cedar fence pickets a perfect option for building lightweight and durable planters. These plans call for black spray paint to make the boxes stately or moody. However, you can paint or stain these planters any color you want since they are made out of cedar wood. Black planters would certainly look stunning outside of a rustic white house.
4. Upcycled Scrap Wood Planters

| Materials: | Sufficient scrap wood (at least 10” long, preferably the same thickness), wood glue, brad nails |
| Tools: | Brad nailer, table saw, miter saw |
| Complexity: | Basic |
This basic upcycled scrap wood planter is very easy to make and has a lot of room for customization. You are essentially building a box frame and then filling in the sides with strips to make it solid. You can use different widths of wood for an eclectic design. You can build the planter, so it holds a pot. That way, you can leave some gaps in your design if your scrap wood does not fit exactly right. You can paint, stain or sand this planter in a variety of different ways to get different looks and styles. If you have a source of free or cheap scrap wood, this project can be done for pennies on the dollar compared to other designs. As long as you can build a simple box, you can use these plans to create a scrap wood planter for your front porch in a single afternoon.
5. Paver Planter Box

| Materials: | 12×12 pavers (x4), 2x2x8 wood (x3), wood glue, screws |
| Tools: | Circular saw, tape measure, clamps, drill, sandpaper or sander |
| Complexity: | Intermediate |
This ingenious DIY planter box made with pavers is both eye-catching and extremely durable. The pavers give your planter box a chic industrial look while protecting it from the elements. No need to worry about plastic leaching into your plant’s soil or wood slats rotting out or attracting mold and mildew. The look of this planter is very simple yet also unique. You can even customize the appearance by using different colors and styles of paver. You will instantly add a dash of flavor to your porch with these paver planter boxes. They do require some amount of skill to put together, so they might not be the best choice for a person’s first project, but if you are a little handy, you will have no problem nailing this DIY design.
6. Large DIY Planter Box

| Materials: | 1/2x4x8 plywood (x2), 2x4x8 (x2), screws, nails, wood glue |
| Tools: | Jigsaw, miter saw, table saw, drill, nailer, router, sander |
| Complexity: | Advanced |
A lot of DIY planters are small and made from thin slats of wood. Some people like the look of large, stately, and domineering planter boxes. If you are looking for something a little larger than average, you should check out these free DIY plans for a large planter box that is perfect for nearly any front porch or walkway. The key here is cutting and joining sheets of plywood into large boxes. Plywood also allows you to have large solid sections of your planter instead of individual slats. The process is in-depth and requires a lot of tools, but if you have the knowledge and equipment on hand, these plans can help you construct some truly striking planter boxes.
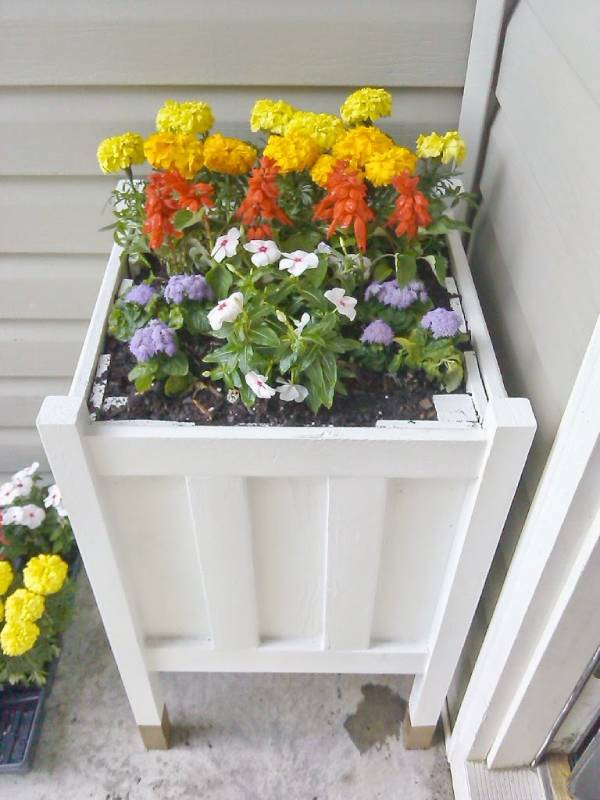
7. Classic Wood Planters
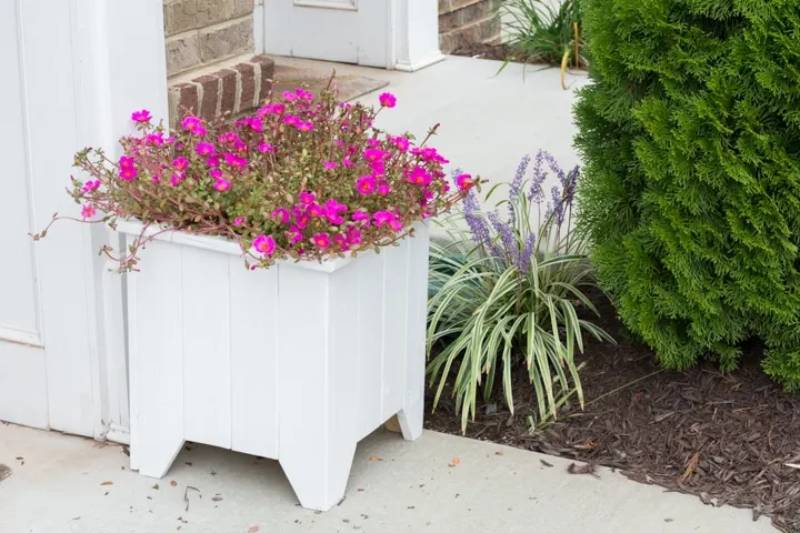
| Materials: | 1x4x8 (x3), 1x2x8 (x4), screws, nails, exterior staples, white paint |
| Tools: | Nail gun, miter saw, stapler, sander, clamp, drill |
| Complexity: | Basic |
These plans are for classic wood planters. These planters are made from simple wood, are painted white, and have rustic planter feet that everyone recognizes on sight. The cut list is very simple, and the assembly process is all about lining up the pieces and putting in some screws. These planters can easily be made in a single afternoon and will instantly add some classic Americana planters to your front porch. You can paint or stain them any color you want, but the classic planter look is best done in white.
8. Planter Box with Trellis

| Materials: | 5/4x6x10 deck board (x1), 1x2x8 (x2), 4×8 sheet of lattice, 2x2x8 (x1), wood glue, screws |
| Tools: | Jigsaw, miter saw, drill |
| Complexity: | Basic |
These awesome planter plans take the idea of a simple exterior planter box and upgrade them with a fetching lattice. Most planter boxes are some variation of a simple box, and this planter is no different. However, these plans upgrade your look and functionality by simply adding a sheet of lattice to the box. By adding lattice, you can change up your exterior look or add climbing plants or vines to your front porch. The verticality of these planter boxes would make a great addition to nearly any porch. You could flank your front door with lattice and climbing vines or install them perpendicular to the door. Not everyone will be taken by the lattice, but it is a great option and an easy alteration to a basic plan.
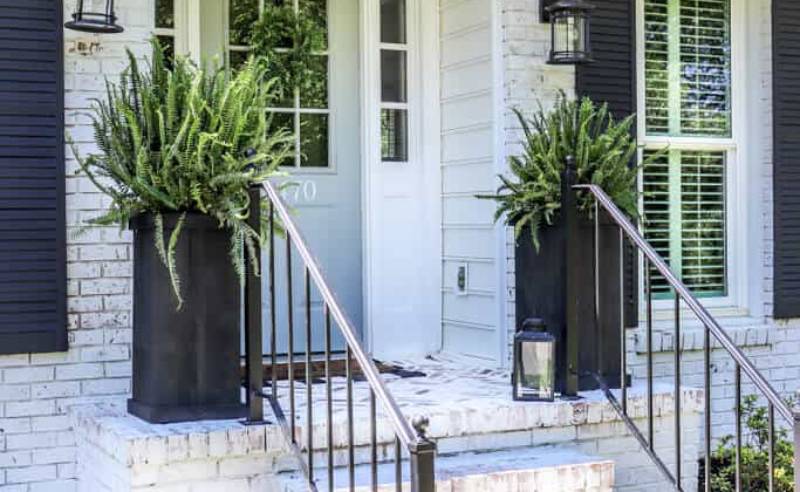
9. Customizable Tall Standing Cedar Planters
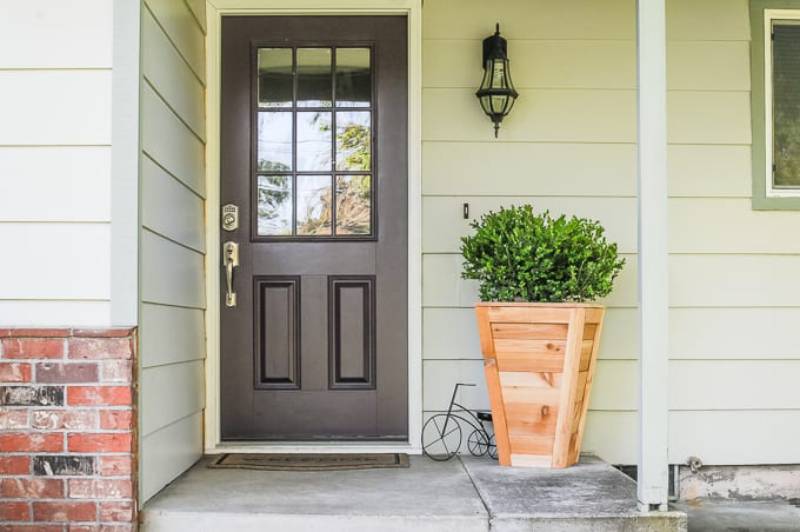
| Materials: | 1x6x8 cedar (x7), 2x2x8 (x1), wood glue, nails |
| Tools: | Nailer, miter saw, table saw |
| Complexity: | Intermediate |
These DIY standing cedar planters are tall, slender, and very attractive. They use high quality 1×6 cedar boards to create a lasting planter that tapers and will be able to survive for years outside. One of the best parts of this plan is the fact that they are very customizable. You can use sanded cedar for a clean look or rough cedar for a rustic look. You can stain the cedar to any color you want or leave it natural. You can even paint the boxes if you so choose. Unlike other plans, these planters are tall, and they taper, so they are not just a simple box. That tapering makes the cut list more complicated than other plans, so bear that in mind before setting out.
10. Plastic Bottle Planter

| Materials: | Plastic Bottles, acrylic paint, googly eyes, plants, glue |
| Tools: | Utility knife |
| Complexity: | Easy |
If you’re worried about your plastic use, recycling some of the used plastic can relieve some of the stress. The Plastic Bottle Planter will allow you to reuse some trash at home while enjoying a fun project with your kids. This can also be the perfect project to mentally stimulate your students if you’re a teacher.
First, cut the plastic bottles in half with the help of a utility knife. Use acrylic paint and markers for decoration and add googly eyes to entertain the children. The utility knife will allow you to cut holes for drainage.
These planters couldn’t be any easier to make, so they’re the ideal school project. Once you’re done, you can use them to decorate your home or school’s porch.
11. Teapot Planter
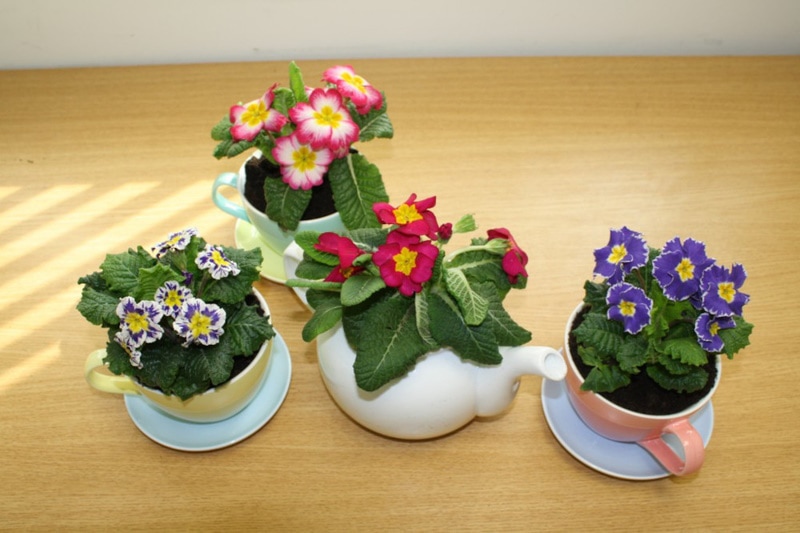
| Materials: | Teapot, soil, safety goggles, gloves |
| Tools: | Drill |
| Complexity: | Hard |
It may seem unusual, but a Teapot Planter will be a sophisticated and unique addition to your front porch. This is the perfect way to utilize a broken teapot or one that’s part of an incomplete tea set. The project may seem time-taking, but the result is worth the effort.
Start by marking the bottle of the teapot with a Sharpie. This will help ensure you’re drilling a hole at the right spot. Remember to only drill the holes while the teapot is under running water, as it prevents breakage.
Then, you can decorate or paint the teapot as needed. Line the teapot with pebbles to aid in better drainage before adding the soil. Plant the seeds, and you’re ready to place the teapot on your front porch.
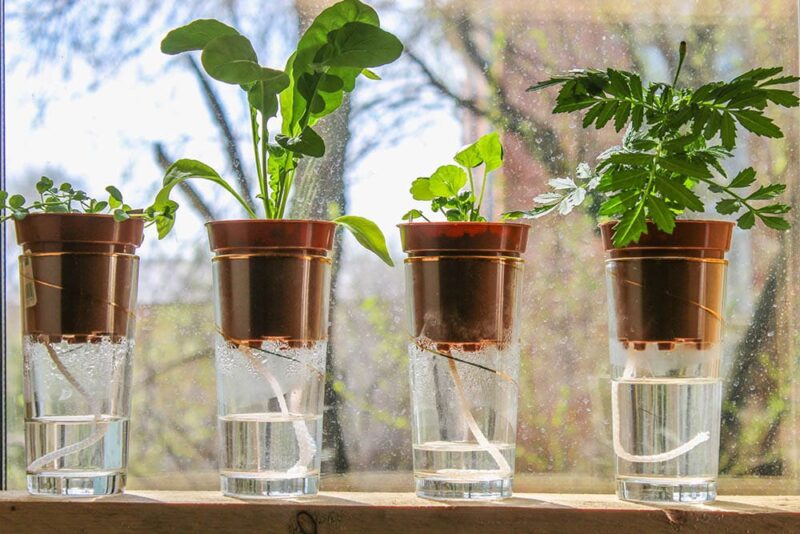
12. Wine Bottle Planter
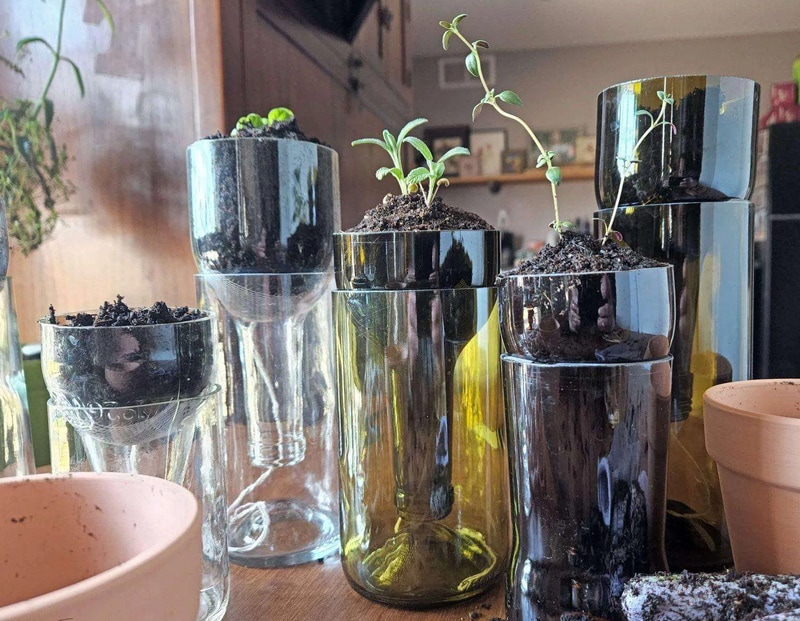
| Materials: | Empty glass bottles, mesh material, cotton rope, water, towel, safety equipment |
| Tools: | Glass bottle cutter kit, superfine sandpaper |
| Complexity: | Hard |
It’s always tricky to know what to do with empty wine bottles. Luckily, this Wine Bottle Planter plan answers all your ideas. The glass-cutting part may seem complicated, but your efforts will definitely pay off.
To simplify the process, we recommend investing in a glass-cutting kit. Use the kit to score the wine bottle. Then, pour scalding hot water over the line, creating enough pressure to split the bottle in half.
The best part about this DIY plan is that the planter is self-watering. You can easily ensure that by placing the bottleneck upside down in the larger base. Remember to fill the base with water first. Then, simply plant the flower into the neck of the bottle and let the water hydrate the soil as needed. This way, you’ll only have to water your plants once a week.
13. Hanging Mason Jar Planter

| Materials: | One piece scrap wood, wide-mouth mason jars, chalkboard paint, copper spray paint, vinyl sticks, d-rings, pebbles, soil |
| Tools: | Drill, screwdriver, hose clamp |
| Complexity: | Moderate |
Mason jars can come in handy in all kinds of crafts. One great example is the Hanging Mason Jar Planter project, which brings an industrial twist to traditional glassware. Plus, the plan takes only 10 to 15 minutes to complete.
You can stain the mason jars for a modish look or leave them transparent for a more conventional finish. Then, wrap a thin metal clamp around the jars for an industrial aesthetic. Finally, fill the jars with soil and add your plants.
You can leave the plants directly on your porch or attach them to a piece of painted scrap wood to hang them. The scrap wood can also serve as a chalkboard to detail what plants are currently in the mason jars. That can be especially helpful for an expert gardener.
14. Birdcage Planter

| Materials: | Birdcage, burlap liner, container potting mix |
| Tools: | Unspecified |
| Complexity: | Moderate |
The Birdcage Planter will be whimsical and beautiful once complete. The birdcage may be expensive, but it’ll be a worthwhile investment. You may hang it on your porch wall or leave it near the steps.
If you’re under a budget, we recommend visiting a thrift shop to find an affordable birdcage. You can even make it original by staining it and adding embellishments. Adding rust protection will help maintain a new and glamorous appearance.
Additionally, using a burlap liner will allow you to add soil without it falling through the gaps. Once the plant begins growing, the leaves and vines will fall through the gaps of the birdcage and create a beautiful cascading look. The result is surely something out of a fairytale.
15. Rustic Log Planter

| Materials: | Log of wood, charcoal, soil |
| Tools: | Hole saw and drill |
| Complexity: | Hard |
No planter will better suit your garden than a Rustic Log Planter. It blends in perfectly with the surrounding nature and is surprisingly easy to make. It’s the perfect gardening project to start under a budget.
Pick a log of wood with enough room to hold a few small plants. Make sure the log has some character to it with moss and discoloration. Then, use a hole saw and drill to hollow out the log.
For a more precise planter, we recommend marking the area you plan to hollow out first. Once the log is hollow, add charcoal to the base of the log planter. Fill it with soil and plant the seeds.
However, this planter looks best with the natural color palette of succulents. Place it near your porch steps to make the entrance more welcoming.
16. Cinder Block Planters

| Materials: | Cinder blocks, paint, wood, soil |
| Tools: | None |
| Complexity: | Easy |
There are always a few cinder blocks leftover after a construction project. These Cinder Block Planters are the perfect DIY to help utilize them. Putting plants in cinder blocks is completely safe, and the result is more beautiful than you’d expect.
Some may stress that cinder blocks won’t allow your plants to grow. That’s because concrete leeches alkaline, making the soil unsuitable for plant growth. However, concrete only does so briefly after curing, making cinder blocks safe for your plants.
The hollow area within the cinder block is perfect for adding flowers or succulents. You can place a piece of scrap wood on the underside to provide a base. Then, the cinder block is ready for planting.
You may also paint the cinder blocks to match your porch’s color palette.
17. Upcycled Tire Planter

| Materials: | Rubber tire, drill, indoor/outdoor spray paint, potting soil, drop cloth or cardboard |
| Tools: | Drill |
| Complexity: |
Looking to add a touch of eco-friendly creativity to your garden or porch? The Upcycled Tire Planter is the perfect project for you! Instead of sending old tires to the landfill, give them a new purpose by transforming them into unique and eye-catching planters.
To start this DIY project, gather a few old tires and clean them well to remove any dirt or debris. You can easily source tires from a local tire shop or salvage yard. Once your tires are clean and ready, it’s time to let your imagination run wild.
Choose a paint color or design that complements your outdoor space. The choice is yours whether you opt for a vibrant color to make a bold statement or a more subtle shade for a rustic feel. Apply several coats of outdoor paint to ensure durability and weather resistance.
18. Hanging Coconut Planter
| Materials: | Coconut, thread, soil |
| Tools: | Drill |
| Complexity: | Easy |
The Hanging Coconut Planter is an eco-friendly way to bring a tropical vibe to your porch. By repurposing a coconut shell, you can create a unique hanging planter that adds a touch of natural beauty to any setting.
First, gather a fresh coconut and drain its water by piercing one of the eyes with a sharp object. Once the water has been removed, crack open the coconut and scoop out the flesh. Remember to wash the coconut shell to remove any remaining residue.
Next, you’ll need some strong twine or rope and a drill. Begin by drilling three holes near the top of the coconut shell. These holes will be the anchor points for the twine or rope.
Cut three equal-length pieces of twine or rope. Thread each piece of twine or rope through the drilled holes and tie them. Now, it’s time to fill your coconut planter with soil and choose the perfect plant.
Conclusion
From simple hacks to in-depth projects, there are a variety of amazing planters here for you to choose from. You will be amazed how quickly you can change the look of your home by simply adding a couple of planters. Many of these plans can easily be doubled to create pairs. Don’t forget to add planter lining if you so choose or build the planters to hold a planter box or pot.
Featured Image Credit: Olya Detry, Shutterstock
Contents
