

One of the best ways to decorate your home for Halloween is to make DIY spooky trees. Spooky trees are affordable to make, but they also look, well, spooky! Here are 7 DIY Halloween tree plans that you can make today:

The 14 DIY Halloween Tree Plans You Can Make Today
1. Twisted Tree by Paper Glitter Glue

| Materials: | Wire, paper, paint |
| Tools: | Wire cutters, glue |
| Difficulty Level: | Beginner |
Another great indoor decor option is the Paper Glitter Glue Twisted Tree. This twisted tree is small, and it is something that you can enjoy with your children. You can place it on countertops, tables, and even windows for a spooky touch.
The plans are straightforward. You’ll find written instructions, pictures, and even a video tutorial. From all these tutorials, you and your children are sure to make a great twisted tree for the home.
2. DIY Halloween Stick Tree Centerpiece by South Lumina Style

| Materials: | Vase, branches, Halloween-themed ornaments, spray paint |
| Tools: | Glue for accessories |
| Difficulty Level: | Beginner |
The South Lumina Style DIY Halloween Stick Tree Centerpiece is a cute take on a Christmas tree with Halloween flair. It can be made for only a few dollars, and it only takes mere minutes to create.
This plan is so simple that you don’t really need instructions to figure out how to make this centerpiece. Even so, the instructions are thorough to ensure you are not left with any questions.

| Materials: | Tree, spray paint, decorations |
| Tools: | Concrete, glue |
| Difficulty Level: | Beginner |
The Navage Patch Halloween Tree is a cute yet creepy take on a Halloween tree. It is perfect for indoor decor that you still want to look fit for an adult home but still themed for the holiday.
These plans are pretty easy to follow. They include everything you need to know about the plan. Plus, the steps themselves are easy. Although this plan isn’t necessarily designed for kids, it is a great beginner plan for adults specifically.
4. DIY Bat Branch Halloween Centerpiece by The Sweetest Occasion

| Materials: | Send branches, bat cutouts, vase |
| Tools: | Hot glue gun, hot glue sticks |
| Difficulty Level: | Beginner |
The Sweetest Occasion DIY Bat Branch Halloween Centerpiece offers an alternative option to an indoor spooky tree fit for an adult home. This final product is cute and Halloween-themed, but it isn’t too spooky either, allowing it to fit into practically any home.
The instructions are super easy to follow. Not only is the project itself easy to anticipate, but the author takes the time to fully explain what you need, why you need it, and how to use the tools to make the best finish.
5. Halloween Creepy Tree by The Craft Crib

| Materials: | Steel wire fencing, chicken wire, newspaper, floral wire, foam spray, twigs, wooden dowels, paint, fabric, piping, elbows |
| Tools: | Wire cutters, Dremel, saws, paint rollers |
| Difficulty Level: | Intermediate |
The Craft Crib Halloween Creepy Tree is an outdoor creepy tree for trick-or-treaters. This tree almost looks like a character enjoying your home as well.
These instructions are very thought out and easy to follow. It easily lists everything you need and everything you need to do, along with pictures for every step in the process. Although this plan requires more skill, it can still get done pretty easily.
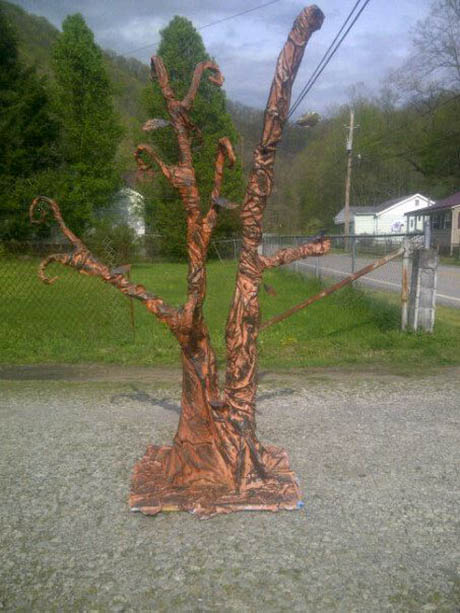
6. Design Spooky Tree by Dave Low

| Materials: | Concrete, tubes, plywood, painters’ paper, face protection, spray paint, latex paint, pencil, branches, law and stakes |
| Tools: | Brackets, adhesive, jigsaw, screws, drill, glue, paintbrush |
| Difficulty Level: | Intermediate |
An alternative spooky tree character for your yard is the Dave Low Design Spooky Tree. This tree will add a great touch to your home because the tree looks a bit spooky for guests and trick-or-treaters.
You will have to head over to Hallmark Channel’s website to get full instructions. These instructions are super easy to follow and include a list of everything you will need. Although this plan will take some time, the instructions are easy enough to follow.
7. Vine Arch by Oak Lane Cemetery

| Materials: | Stretch wrap, poles, plastic skeletons |
| Tools: | Scissors, heat source, glue, spray paint |
| Difficulty Level: | Expert |
If you want something for the outside of your home, consider Oak Lane Cemetery’s Vine Arch. This vine arch will transform your home into a creepy portal for the trick-or-treaters and onlookers to enjoy.
This plan is a little difficult to make. The plan itself requires a bit of skill, and the instructions are a bit chaotic. There are plenty of pictures that you can enjoy and a long post describing the plan, but you will have to figure out most of the planning yourself.
8. DIY Spooky Tree for Halloween by Waiting for Godot
| Materials: | Plywood or OSB board, shelf braces, cup hooks, PVC pipe, a variety of fabrics, tree branches, paint, 14-gauge wire |
| Tools: | Screws, wire cutter, drill, masking tape |
| Difficulty Level: | Intermediate |
As part of the props for the movie Waiting for Godot, this DIY Spooky Halloween Tree requires minimal materials to turn it into fantastic spookiness. The design adds an eerie atmosphere to your home, reminiscent of a decrypt forest corrupted by ghoulish elements.
Add any amount of fabric to represent cobwebs or dank moss tendrils for practical season appeal, and strategically place the tree outside as a sight for trick-or-treaters. Ensure the base is firmly rooted to avoid tipping over.
Check out the simplistic plan for the Waiting for Godot inspired Halloween tree, which requires minimal material and is easy to take down after the festivities. It’s the perfect setup when you don’t have actual trees outside your home, plus it has the versatility for moving it indoors.
9. DIY Haunted Tree Trunk by Mizerella

| Materials: | Concrete pour molds, irrigation pipe, plywood, crumpled up newspaper, paper mache, Celluclay, fabric |
| Tools: | Glue, spray paint, tape, eye hooks, fishing line |
| Difficulty Level: | Intermediate |
The DIY Haunted Tree by Mizerella is an indoor Halloween decoration made entirely from cardboard and paper mache, meaning it’s easy to construct and set up. It’s the perfect prop to add gory eeriness to your house and makes for a craft you can do together as a family.
Have fun while getting your hands dirty with crumpled-up newspapers, glue, and Celluclay. You can integrate aspects of trees you made for last Halloween into this year’s project. You can also make the tree in two parts to facilitate setting up and bringing it down for storage after the holidays.
Use various types of fabrics or netting to give it extra spookiness, while you can have the branches creepily spreading all over your ceiling. Add internal lighting to provide the tree’s fascia and top part eerie luminescence guaranteed to spook anyone looking in through your window at night.
10. Halloween Pumpkin Vine Tree by The Keeper of Cheerios

| Materials: | Pool noodles, PVC couplings, wire, cloth fabric, paint, duct tape, creepy pumpkins |
| Tools: | PVC cutters, scissors, spray adhesive, paint brushes or sprayer, wire cutter |
| Difficulty Level: | Intermediate |
The DIY Halloween Pumpkin Vine Tree is a durable project that you can reuse for the forthcoming holidays. It’s a creepy construction that you can hold up with ground stakes to add shock appeal to your yard.
Trick-or-treaters will love the spooky theme promoted by the Halloween Pumpkin Vine Tree, and you can improve on this with lighting and a fog machine. It’ll take approximately 6 hours to make this decorative element if you’re working alone, including the time it takes the paint to dry.
11. DIY Eyeball Plant by The Craft Crib

| Materials: | PVC pipes and connections, flower pot, rocks, mesh tubing, plastic eyeballs, balloon, floral wire, fake leaves, Flexbond, foam spray, and paint |
| Tools: | Paint roller, paint brush, drywall mesh tape, hot glue, wire cutter |
| Difficulty Level: | Expert |
If your Halloween theme is a collection of vegetative or tree creatures, the Craft Crib DIY Eyeball Plant is an excellent start to decorating your yard. Made from a skeleton of PVC pipes wrapped in pool noodles, you can construct this creation as high and wide as your materials allow.
Use Flexbond and newspaper strips to give the Eyeball Plant realistic features and integrate leaves that carry eyeballs onto its branches. Foam spray lets you hide the floral wire bindings and forms the rough texture you’ll paint green.
For the main entrée, use a balloon head to create a giant eyeball that acts as the Craft Crib DIY Eyeball Plant’s head. You’ll have a unique alien-looking Halloween tree that stares and gives the heebie-jeebies at trick-or-treaters or anyone brave enough to venture onto your yard.
12. DIY Spooky Tree by Gina Tepper

| Materials: | Oatmeal container, brown packing paper, tissue paper, acrylic paint, cardboard, thin wire, faux leaves, led lights |
| Tools: | Pattern for the creepy face, craft knife, wire cutter, white glue, paint brushes |
| Difficulty Level: | Intermediate |
The Gina Tepper DIY Spooky Tree is an easy-to-do project that requires materials you’ll find around your kitchen or from last Halloween’s leftover decorations. The tree is designed to blend in with the rest of the autumn fauna or pumpkin-themed décor. It looks cute despite the snarling scary face.
Besides ease of construction and inexpensive materials, you can add LED lights within the tree for extra nighttime spookiness. You’ll find a printable pattern for the tree’s scary face, while brown paper bags, crumpled tissue paper, and fake leaves comprise the rest of its features.
Although many paintings are involved in making the Gina Tepper DIY Spooky Tree, it’s not a time-consuming project, and you’ll have the aperture ready to spook within hours. Find a suitable location and add more leaves, mossy undergrowth, and lighting to give the tree a realistic look.
13. Halloween Tree by Haunted Paper Mache

| Materials: | PVC pipe, water bottles, 2 x 4s, newspapers, paper mache clay, acrylic paint |
| Tools: | Craft knife, masking tape |
| Difficulty Level: | Intermediate |
The Haunted Paper Mache Halloween Tree is a craft creation that uses the Original Paper Mache Clay recipe by Jonni Good. Once you’ve done the skeleton and put on your required newspaper padding, use paper mache to fill out its shape, including a broad enough base for table or floor placement.
Use acrylic paint to add coloration and texture to your creation, ensuring that the inner part has lighter hues contrasting with the bark, arms, and roots.
Attaching dead tree branches to the tree’s arms gives it realistic spookiness, and you can hang candies for partygoers or trick-or-treaters.
14. DIY Halloween Tree by The Country Chic Cottage Spooky

| Materials: | Small cups, toilet paper roll, tissue paper, led light or battery-operated candle, 20-gauge wire, fake spider webbing, glue sticks, craft paste, and paint |
| Tools: | Craft knife, pallet knife, wire cutters, pliers, tape, hot glue gun |
| Difficulty Level: | Intermediate |
The Country Chic Cottage Spooky DIY Halloween Tree is an easy-to-make indoor table-top craft placement that requires only a few supplies. You need a lot of hot gluing to fix tissue paper onto the toilet paper roll and integrate electrical wiring to light LEDs or battery candles.
Use dimensional craft paste to give structure and texture to your project, mixing it with an equal part of acrylic paint for a thickening effect. Once given time to dry, preferably 24 hours, you’ll add the fake spider web and lighting before displaying it on any suitable surface within your house.

How Do You Make a Tree Look Spooky?
If you want to decorate the trees outside your home, there are a lot of easy things you can do. You can hang decorations from the tree. One of the easiest methods is having Halloween spider webs. These will make the trees look spooky, but they aren’t bad for the environment, and they are easy to take down.
- See also: How to Paint Countertops
Final Thoughts
We hope that these plans have inspired you to make some spooky trees this holiday season. Give one of these plans a try and post some pictures!
Featured Image Credit: freestocks, Unsplash
Contents
