

Sometimes referred to as a “storm door,” a screen door is certainly an important feature in any home. Even though its main function is to keep all the unwanted guests outside—AKA flying insects—there are homeowners who also install it to protect the main door from harsh weather elements.
Needless to say, without the screen itself, that door is useless. It should be uninstalled and recycled into something useful. However, if you’re still looking to use it as a screen door, your number one priority should be to repair the torn part.
The good news is, this is one of those things that can be worked on without the help of a professional. So, go ahead and grab your toolbox, then confirm you have all the materials required.

Materials Needed
- Replacement screen
- Utility and putty knife
- Sawhorses
- Spline and spline tool
- Philips-head screwdriver
- Protective eyewear
- Closed-toe boots and gloves

How to Fix a Screen Door (10 Steps)
1. Protect Yourself
Before doing anything, we have to make sure that you’re protected. So, after making sure that you have everything that’s needed for the job, put on your protective gear. The goggles will protect your eyes from all the flying particles in the air, and the gloves will prevent your screwdriver from slipping in case your hands start sweating. The boots are just as important, as they will protect your toes from the tools that keep dropping on the floor!
2. Start with the Screws
The one mistake that we often see a lot of people make is trying to replace or fix a worn-out screen before detaching the door from its frame. We hate to break it to you, but that’s not a smart move.
You first have to unfasten the screws meant to secure the door, and then detach it. Those screws are normally situated at the top and bottom corners. Ask a friend or family member to hold the door in place as you unfasten the screws using your screwdriver.
3. Lift the Door
Once you’re done unfastening the screws, you’ll be able to gain access to the rollers underneath the door—rollers that were inaccessible a couple of minutes ago because the screws made it impossible to lift the door off the tracks.
Using your utility or putty knife, try to lift those wheels off the tracks by just sliding the knife underneath and pushing downwards. And while you do that, ask the guy holding the door to help lift it, and angle it either inwards or outwards. This will detach the door’s bottom section from the track and loosen the top part. Which, by the way, will come out eventually.
If you sense that something’s still holding it back, remove the head stopper—it could be the culprit.
4. Detach the Handle
This is where the sawhorse comes in. Lay the door on it and start working on that handle. Removing the handle is necessary because depending on the design, it could act as an impediment while installing the replacement screen.
5. Remove the Spline
If you closely look at the screen, you’ll be able to see something that resembles a cable. That thing is called the spline and is what’s holding your old screen in place. Dig into the corner using your screwdriver and start pulling it out. Once you’re done, you can throw it away (it will be too worn out to be recyclable) and then pull out the screen.
6. Measure the New Spline
Before we get to the new screen, we first need to take measurements. Measure the perimeter of that empty screen space on the door, and then cut the replacement spline into four pieces—two for the length and two for the width.
They don’t need to be exact measurements. Cut them a little bit longer, so that you can tuck some of them into the groove after installing the screen.
7. Unwrap the New Screen
Spread it out and ensure all the sides are hanging over the edges. Ensuring this will make it easier for you to tuck it in—remember, it’s always the simple steps that make all the difference at the end of the day!
Now bring out your spline tool and start tucking. Gently tuck it all into the door’s grooves to avoid tearing. We always like to start on the right, before proceeding to the left. We don’t know why, but we just find it easier that way. And when it comes to the top and bottom parts, we’ll start with the top and end at the bottom.
8. Install the Spline
The goal is to ensure the new screen fits the same way the old one did. So start with the longer piece. Align it with the frame and use the spline tool to push it into the grooves. Try to be methodical if you want to make your work easier. Pick one corner, any corner, and work your way from there. Once you’re done, repeat that same process with the other pieces.
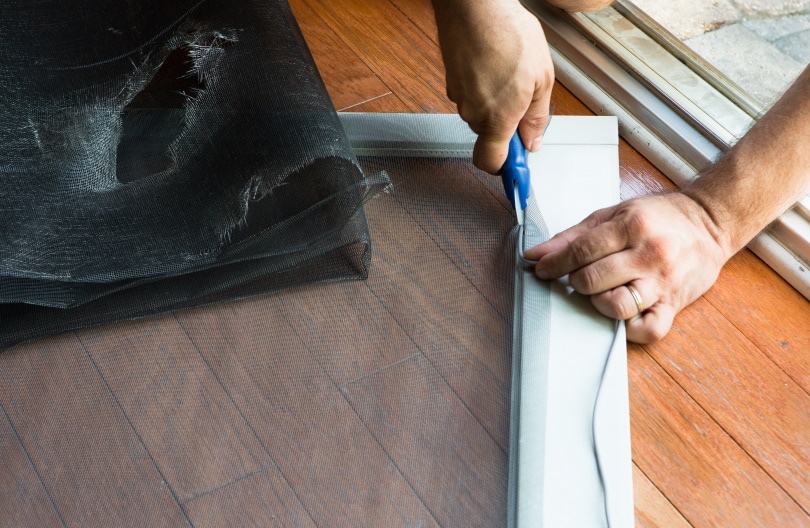
9. Trim Parts of the Screen That Are Overhanging
Okay, we’re done with the spline installation, the screen still looks taut, and now it’s time to get rid of those sections that are overlapping. Pick up your utility knife, gently pull on the overlaps, and start cutting. Be careful though. We don’t want to accidentally puncture the screen or chop off our thumbs!
10. Reattach the Door
Ask your sidekick to help you lift and reattach the door. As usual, we’ll need to reattach the bottom part before moving on to the top. Mount the wheels onto the lower track, then push the upper ones into the top track.
While they hold the door in place, put back the screws and start fastening. Once you’re done, reinstall the stopper and finally the handle.
- Related Read: How to Patch a Window Screen in 4 Steps (With Pictures)

Wrapping Up
We hope these instructions were clear and easy to follow. In case they weren’t, or if there’s something that you’d like to contribute, feel free to reach out. Otherwise, you can put away your tools and pat yourself on the back!
Featured Image Credit: Kawin Ounprasertsuk, Shutterstock
Contents
