

Installing a new door can be a daunting task, but so too can the price tag for getting a professional to do it. While the process for installing interior and exterior doors is involved, they are doable by homeowners with the right materials and the right instructions.
This article will cover how to install pre-hung interior doors as well as brand-new exterior doors. Whether you are looking to swap out an old bedroom door or want to gut your entire entryway, these steps will cover both processes in depth. Swapping an interior door takes ten steps while redoing an exterior entryway takes seventeen steps.
Here is how you can install any door in just a few steps.

Preparation for Interior Door Installation
This article covers how to install a pre-hung interior door. That means the door comes prepped by the manufacturer for the best possible results. It is possible to hang a non-prepped slab and build a new frame from component materials, but that process is much more involved. This process will only cover pre-hung doors.
In order to hang a pre-hung interior door, you will need to gather some supplies before you get started. You will need the following:
- Level
- Jigsaw
- Drill
- Miter saw
- Hammer
- Tape measure
- Wood shims
- Replacement trim
- Replacement door
- Pry bar
- Finish nails
- Wood screws
You might also need the following optional materials:
- New door hardware
- Nail gun
- Air compressor
- Untreated 2×4
- Untreated 2×6
Make sure you have gathered all of the appropriate materials before beginning. Clean and prep the workspace.
Installing a pre-hung interior door will take between three and six hours. The skill level required is intermediate. The cost will depend on what kind of door you are replacing and whether you already have the proper tools. If you do not need to buy any tools and only need to buy materials, the cost will be between $200 and $300, including the door itself.
The 10 Steps For Installing an Interior Door
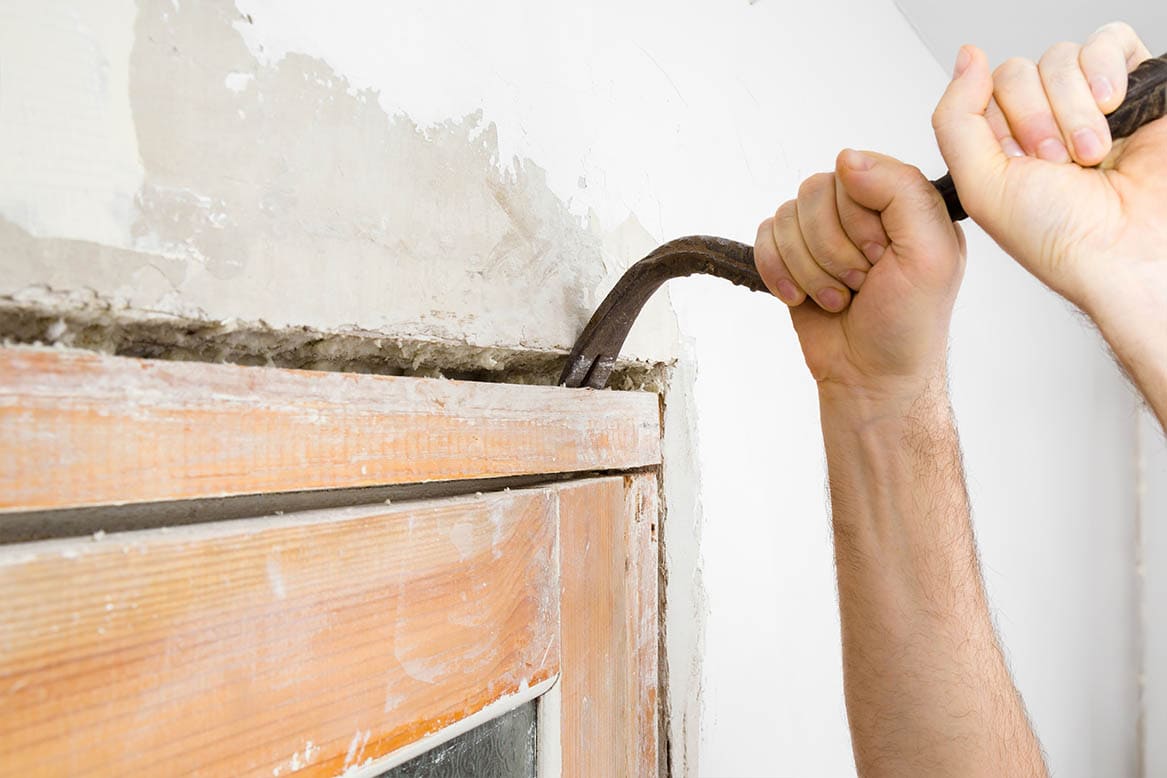
1. Remove the old door
The first step to putting in a new door is to remove the old door. First, pry away the casing from either side of the door. The casing will reveal a gap between the door jamb and the frame of the house. You need to pry out of the old door from the frame. If you run into issues, you might need to use a saw to cut through the old nails to free the door. Most interior doors should come loose with a hammer and pry bar. Once the door is free, and the opening is bare, it is time to go onto step two.
2. Measure and prep rough opening
The resulting hole is known as the rough opening. It is good to measure the rough opening to ensure that you purchased the correct replacement door. The rough opening size will have an additional couple of inches over the stated size of the replacement door. Take diligent measurements and compare the rough opening size to the size of the replacement door. If the rough opening is smaller than the door you purchased, then you have a big problem right off the bat. You can always build out a little bit of space, but you cannot trim down a pre-hung door to fit.
After you check your measurements, go through and remove any scraps, old shims, and nails that might still be present and make sure the opening is smooth and free of debris.
3. Check floor and walls
If your old door was having problems with its swing or was frequently getting jammed, it might be a problem with your walls or floors. With the old door out of the way, now is a perfect time to make sure that everything is level. Check the walls for signs of damage, look at the studs, and check for warping or termite damage. Warped walls can affect a new door the same as an old door.
Similarly, use a level and check to make sure that the floor is level. A slanted floor will change how you install your door so that it swings freely. Fixing a non-level floor is an involved process that requires an entirely separate job. If you do not want to level the floor, make a note of the slant so you can hang your door to accommodate the floor.
Ignoring problems with unlevel floors or damaged walls can lead to your new door suffering from the same problems as your old door.
4. Fit the door into the opening
Next, fit the pre-hung door into the opening. In order to keep the door off the floor, set the door on shims to the height that you want the door to swing at. Be sure the bottom of the door slab clears any carpet, flooring, or transitions that might be present beneath the door. You can tack the door into place with small nails to keep it from moving during the next two steps.
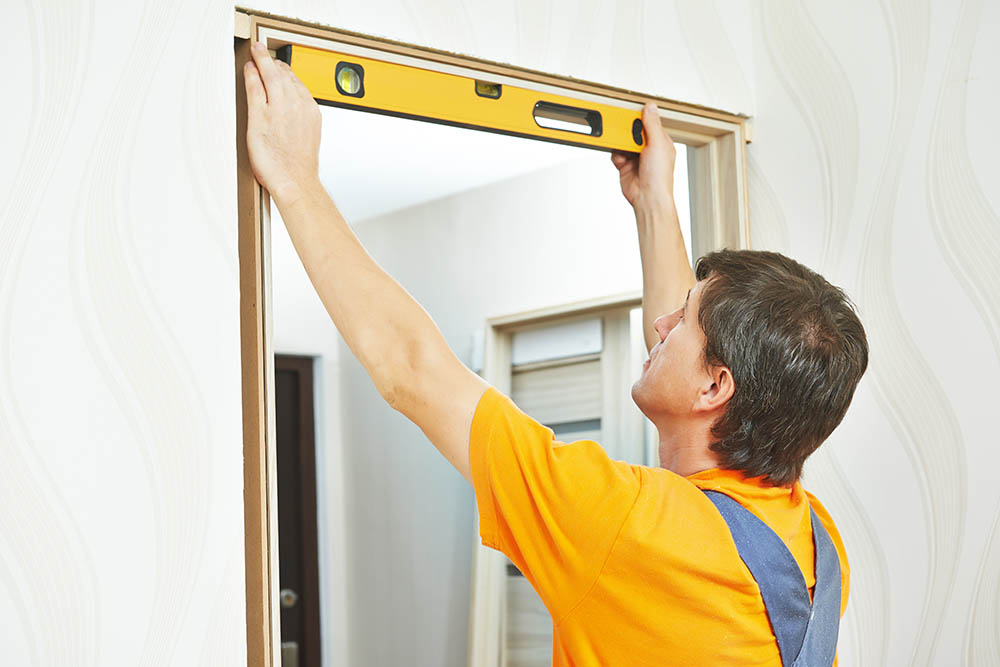
5. Check gaps and shim
Now, check the door position. Shim the door starting on the hinge side, making sure that the door is plumb and level. Be sure to check the level every time you add a shim. Insert shims to adjust the door position until it is in a perfect position.
Move to the top of the door and then to the latch side of the door. Each side should be completely plumb. Make sure you have a shim above and below the strike plate as well as six inches from the bottom of the door.
The shims will be sticking out from the wall after this step. That is how it is supposed to look.
6. Secure door frame to wall
After the door is shimmed correctly, it is time to secure the door in place. Nail through the door frame, into the shims, and into the adjacent wall studs. The door will be secured through the shims, which will hold the door frame and the studs together for a firm fit. As you secure the door, starting on the hinge side, be sure that your nailing is not disturbing the balance of the door. Be sure everything remains snug and plumb during this step.
Go around the door and nail through the frame everywhere that you put shims.
7. Check door swing
Now that the door is in place, test the swing of the door. Make sure the height is still good. Make sure the door swings properly. You don’t want the door catching on anything. You don’t want the door to be slanted or loose. The door will not latch without the hardware installed, and you are just checking to make sure that the door swings freely. Signs of a problem include a door where the slab swings open by itself or naturally falls one way or the other without being pushed.
8. Cut the shims
After the door is hanging and swinging properly, it is time to cut the shims. Using the reciprocating saw, carefully cut the shims down so that they are flush with the wall. The shims need to be flush so that the trim can cover the openings without any issues.
9. Install trim
Now that the shims are cut and out of the way, you can install the new trim. Take the replacement trim and measure it to size. You will need to cut the corners at a 45-degree angle. Cut the two vertical legs being sure to cut one end at a 45. Next, cut the horizontal top piece to size. Again, be sure to cut each end at a 45 to fit with the vertical jamb legs. Do this for both sides of the door.
Once the trim is cut, place it over the gap between the door and the wall, ensuring that everything fits together. After everything fits right, you can nail the trim in place with finish nails. You can nail the trim by hand but using a nail gun is a lot faster. If you have certain kinds of floors, baseboards, or quarter-round, you might need to cut the door trim or baseboards with a jigsaw to fit with the new trim. Trimming the new casing to size is important to make sure that everything fits together.

10. Install the hardware
The last step is to install the door hardware. This includes door stops and knobs. If you bought new door hardware, now is the time to go ahead and install it. If you did not get new hardware, put the old hardware on the new door. Make sure that the strike lines up with the handle so that the knob spins freely and the door opens properly. On a pre-hung door, everything should line up without any issues.
The door should now be completely installed and functional. Use the handle to open the door and close the door multiple times. If you followed all of the steps without running into any unforeseen problems, it should be working as intended.

Preparation for Exterior Door Installation
Installing an exterior door can be an involved process that requires many hours and a lot of materials. In order to get the best results possible, you should gather up all of the necessary materials and set aside a full day to get the job done. Leaving an exterior door open or unfinished can let weather into a dried-in home, meaning that the job needs to be completed in a timely manner to avoid issues.
Here are the basic materials needed to complete the job.
- Miter saw
- Drill
- Tape measure
- Caulk gun
- Level
- Pry bar
- Razor knife
- Reciprocating saw
- Replacement door
- Replacement interior trim
- Replacement exterior trim
- Galvanized nails
- Finish nails
- 3” exterior screws
- Wood shims
- Expanding foam
- Caulk
- Metal flashing
- Flexible flashing
Optional materials:
- Nail gun
- Air compressor
- Shop-vac
- Pressure-treated 2×6 or 2×8
The cost of the job is going to heavily depend on the cost of the replacement door. Some exterior doors can be found for as little as $300 or go as high as $2,500. The cost of the materials required should be $200 or less.
The complexity of the job is rated as intermediate to advanced. The job will take the better part of a full day—up to 12 hours.
The 17 Steps For Installing an Exterior Door
1. Remove the existing door
Before putting in a fresh exterior door, you will have to take out the old door. To start, remove the original door from its hinges and set it aside. Use your drill to undo the screws holding the door in place.
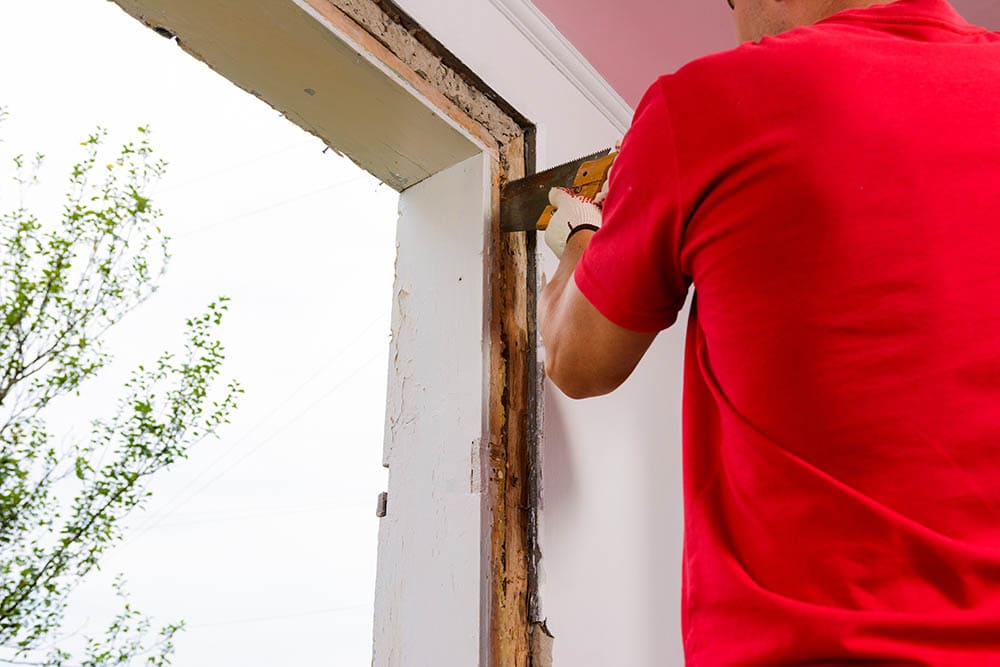
2. Remove trim and jambs
After the door is off the hinges and out of the way, it is time to take out the jambs and the trim. Using your hammer and pry bar, begin removing the old jamb from the house. Remove the exterior trim in order to get between the jamb and the house. Next, remove the interior trim also using your pry bar. You will have to use your reciprocating saw to hack through the old nails and screws holding the door in place. Make sure to get all of the jamb, the old sill, and all of the trim off the opening and move it out of the way.
3. Measure and prep rough opening
Now, measure your rough opening. This will tell you what you are working with and ensure that you purchased the correct size door. Prep the opening. Remove any old nails, screws, wood fragments, and other debris that might be left in the opening. This is a good time to vacuum up any dust that might have spread into your house using your shop vac. Otherwise, clean and prep the area for the coming steps.
4. Prep sill and check the floor
If your door comes with a detached sill, now is the time to install it. Check the area where the new sill will be installed. This is a common area to spot rot. Old doors are prone to having rot underneath them. If the sill area is rotted out, you will have to replace the old wood, so you have a fresh solid base to set the new door. Also, check the floor inside your house under and around the door because it could also be suffering from water damage or rot. With the door out of the way, this is the best time to look for these kinds of damages.
5. Flash sill and frame, install sill
The next step involves flashing the opening to protect from future water damage. Using your flexible flashing, cover the area where you are going to install the sill. Cover all of the wood to prevent water damage. Also, check the metal flashing above the door to make sure it is intact. If you do not see any metal flashing, you will need to install some to prevent water from running onto your new door.
After the base is solidly flashed, install the sill by setting it and screwing it into the floor.
6. Caulk the studs
Now, caulk the studs around the door. If you have a masonry house, you will coat it with a waterproofing agent made for brick. The caulk will prevent water from going from outside into the house and getting behind the door and into the wall.
Steps five and six are essential to protect the whole area from outdoor weathering and water.
7. Place new door in the opening
Going from top to bottom, place the new door into the opening. If the opening is a standard size and if you ordered the right door, it should fit tightly into the space. Make sure the door is level in the opening and that everything fits as it should before moving on to the next step.
8. Tack in new door
Since exterior doors are much heavier than interior doors tacking them in is important to keeping everything in place. Using small tack nails, nail the door into place just to keep it from falling during the next steps. If the door is the proper size, it should fit snugly enough only to require a few small tack nails to keep it in place.
9. Shim hinge side
Always start by shimming the hinge side of the door. Place shims along the length and make sure that the door is hanging properly. You want to make sure the whole unit remains plumb throughout this process. Once you have the hinge side perfectly plumb and centered properly, screw through the jambs into the studs and secure the hinge side of the door.
10. Shim latch side
Now it is time to shim the latch side. Add shims until the latch side is plumb. Do not put shims within six inches of the latch but make sure you have a shim above and below the latch. Shim the door adjusting as you go until the whole unit is plumb and centered. Then shim the top of the door. Once you are done, the whole unit should be plumb and swinging properly.
11. Check the jamb
Check the jamb. Make sure the whole door is still plumb after screwing the unit into the house. If the door has moved during this process, you will need to go back and adjust until it is right. This step is critical to ensuring the door turns out properly in the end.
12. Insulate the door
After you are happy with the door’s position, it is time to insulate the door. Use your spray foam spray into the gap between the door and the house. You want to cover the entire opening so that you cannot see from outside to inside. This will insulate your house and protect it from the outside air. Spray the foam, let it harden, and then sand down if necessary so the whole outline is flush. The bottom sill should already be flashed and secure from our earlier steps. Do not forget to insulate the top of the door as well as the sides.

13. Install hinges
If your door came pre-hung, the hinges would already be installed and mostly ready to go. It is advised to sink one anchor screw per hinge that goes through the door frame, the shims, and into the wall. In order to do that, even if the hinges are already in, remove the top screw from each hinge and replace it with an anchor screw long enough to go through to the surrounding wall. If the wall is masonry, that screw will be a tapcon.
14. Install the hardware
It is time to install the hardware. You can replace the hardware or reuse existing hardware if it is still in good shape. Set the handle in place and screw it down tight. Make sure that the latch fits and that the mechanism moves freely and operates correctly. Install the deadbolt if you need to do that separately.
15. Cut shims
Using a reciprocating saw, cut the shims down. The shims will need to be flush with the surrounding door and wall in order to properly install the trim. Shims that are not cut to be flush will stick out and hamper the installation of the vital trim.
16. Install trim
Trim needs to be installed on both the inside and outside of an exterior door. The interior trim will be standard primed door trim used for any indoor cased opening. The exterior trim can be cement board, cedar, or PVC brickmould. The exterior trim has to be weather resistant in order to prevent rot in the future.
Cut the interior trim using your miter saw to length both horizontally across the top of the door and vertically, making sure that the lengths are enough to completely cover the gap between the door jamb and the frame of the house. Cut the tails at a 45-degree angle so that the vertical legs fit into the horizontal leg. Once everything fits, finish nail the trim into place either by hand or with a nail gun.
The exterior trim can be installed differently. Using 1×4 or 1×6 trim will remove the need for 45 cuts. The entryway can be covered and built out in a variety of different ways, but the principle is the same. Cover the gaps and dress up the opening no matter what materials you choose to use.
17. Check the door
The last thing to do is to check the door. This is a vital step for an exterior door. Make sure there are no gaps where you can see daylight. Any gaps in an exterior door will lead to weather seeping into the home. Make sure the door swings freely and closes securely. Check the hardware to make sure that the door can open, lock, and unlock without any issues. If everything looks and feels good, the job is finished. It is time to enjoy your new entryway.

Conclusion
These steps will ensure that you can properly install and replace both interior and exterior doors. This is not the easiest home improvement project to tackle, but it is doable by standard homeowners. It just takes time and attention to detail. If you follow these steps, you are just a few hours away from enjoying fresh doors inside and outside.
Featured Image Credit: Prostock-studio, Shutterstock
Contents
