
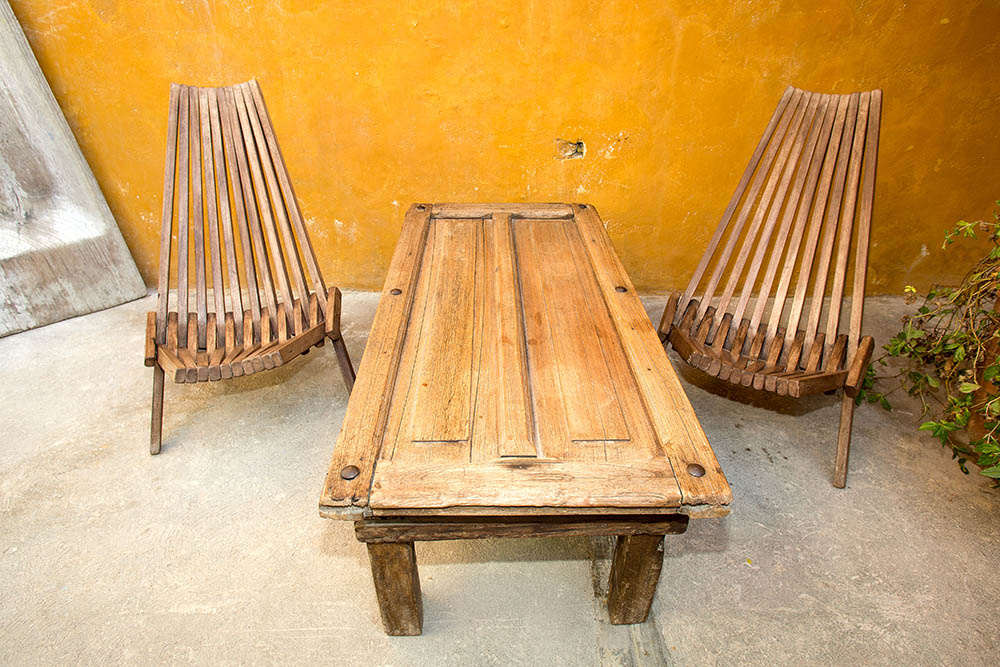
If you live in a house that was built in the previous century, chances are, you’re not a big fan of the stock doors. Maybe you’ve already replaced them and now you have a shed, garage, or hut crowded with bulky, faded old doors? In any case, don’t throw them away just yet! Old doors can be repurposed and reused in many creative ways.
In this guide, we’ll focus on ten amazing DIY projects that can breathe new life into your old doors. For the most part, you’ll only need a saw, drill, a set of nails/screws, and paint. With some elbow grease and 4–5 hours of spare time, you’ll be able to handle every single one of these plans hassle-free. So, ready to do some quality repurposing? Here goes!

The 10 Brilliant Uses for Old Doors
1. Upcycled Door Potting Shed- empress of dirt
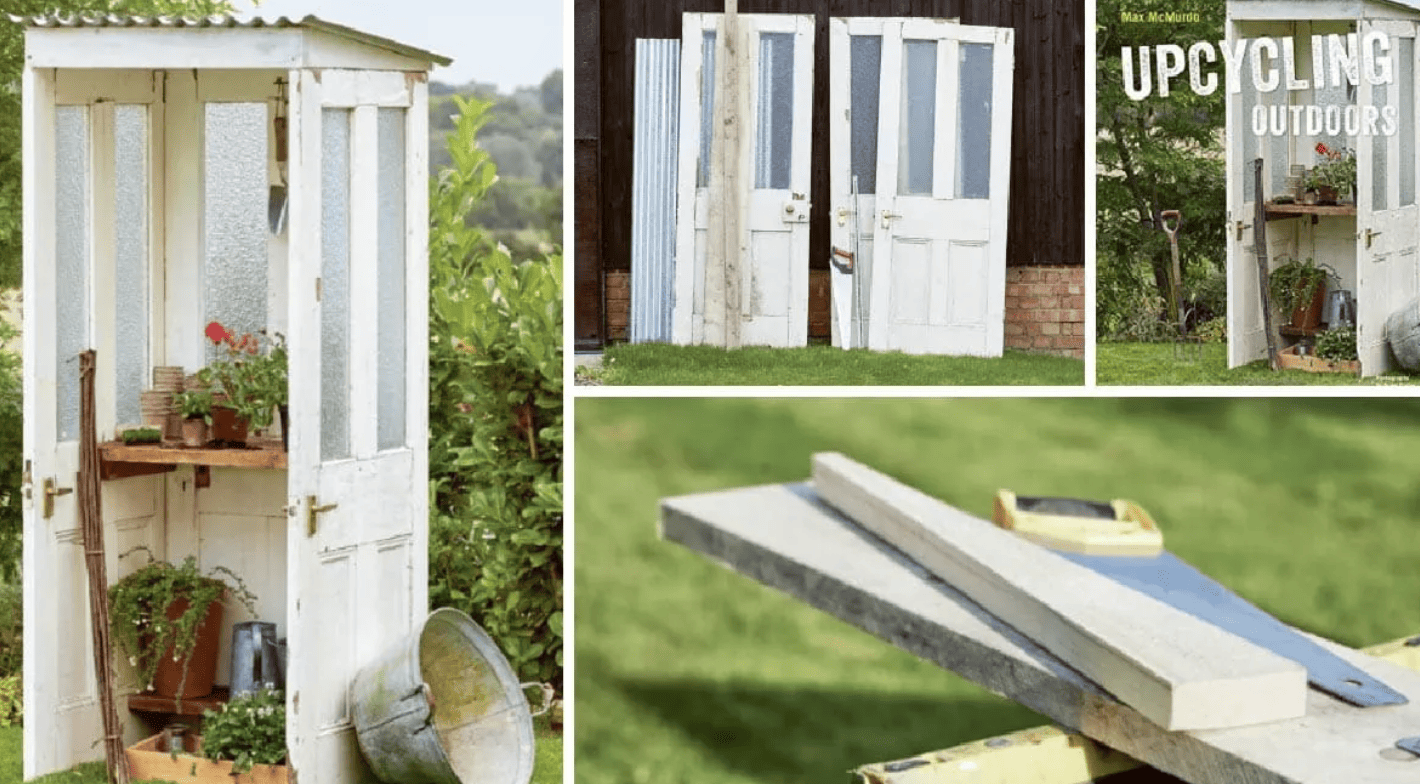
| Materials Needed: | Doors (3), wood boards for the shelves, screws, rubber washers, hinges, corrugated tin |
| Tools Needed: | Angle grinder, electric drill, pencil, measuring stick, wood saw, ladders |
| Difficulty Level: | Easy/Moderate |
If you have more than one door collecting dust in the garage, put them to good use with this upcycled door potting shed plan. Secure them with hinges and screws, add a couple of shelves, and that’s it! Use a wood saw to make wood boards for the shelves and to cut the doors to the right size. Not happy with the colors? A fresh coat of paint will fix that right up! A makeshift potting shed is a perfect solution for a larger-than-average yard.
For example, if your garden gets 8 hours of sunlight and you have a couple of flowers/plants that only grow in the shade, this right here can be an excellent DIY project for the weekend.
2. Wood Cart Coffee Table- shanty-2-chic
| Materials Needed: | Old doors (2), wood boards (4), pocket hole screws, wood screws, metal angles, brad nails, casters |
| Tools Needed: | Electric drill, glue, paint brush/spray paint, protective gloves |
| Difficulty Level: | Moderate |
Improvised tables are one of the most popular uses for old doors. Four 2x4s, some plywood, a set of screws, casters, some cheap paint, and an electric drill—that’s all you’ll need to build this fancy wood cart coffee table. Now, while this repurposing plan will take a bit more effort than the average table, it will be mobile and have an extra shelf. It would be best to ask a friend to lend a helping hand, as the doors might be heavy (depending on the material).
But, it’s very well possible to pull the project off on your own. Start with the bottom shelf, paint it white, paint the screws and the hardware black, and go from there!
3. Bench for the Yard- my creative days
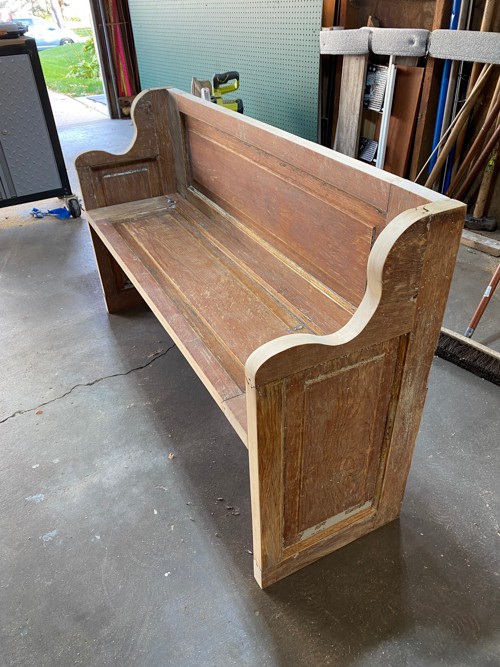
| Materials Needed: | Large door, wood conditioner, a set of screws |
| Tools Needed: | Table, miter, circular, and jigsaw, sander, framing square, tape measure, pocket hole Jig set |
| Difficulty Level: | Moderate |
Don’t have enough seats in the garden? Then why not try and build a bench for the yard? This project involves a lot of cutting, sanding, and measuring. So, make sure you have at least two types of saws, a framing square, and measuring tape. To make the bench look brand-new, we recommend using a wood conditioner product. Painting is always an option, of course, but it’s not 100% necessary.
The key here is to cut the door into four pieces that will serve as the back, the sides, and the seat. To give the sides that “vintage” look, make a template using a piece of cardboard, trace it with a pencil/marker, and only then cut it with a jigsaw. To put the whole thing together, secure the individual parts with regular screws.
4. DIY Chalkboard Calendar- liz marie blog
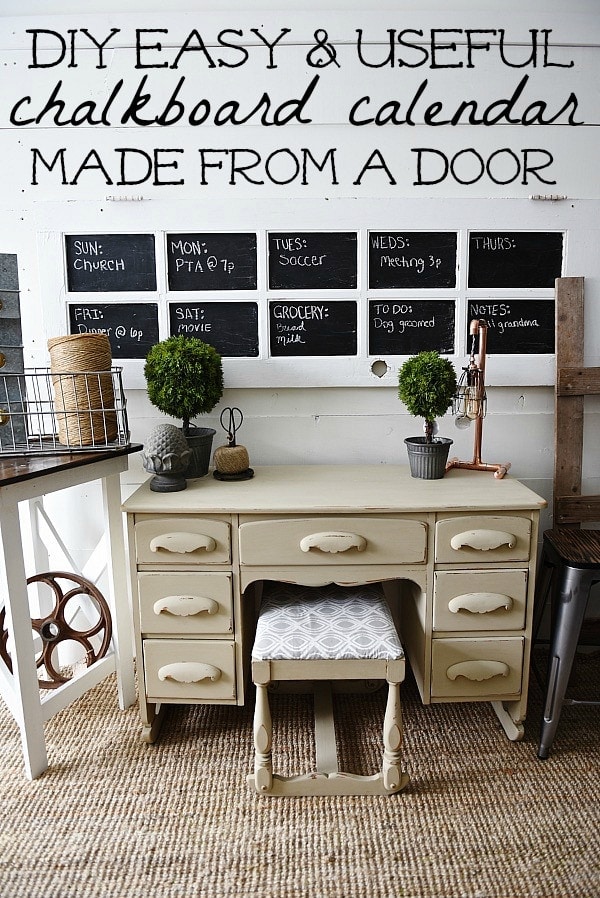
| Materials Needed: | A door with panes, screws, chalkboard paint, primer (optional) |
| Tools Needed: | Pencil/marker, paintbrush, screwdriver, a jigsaw (optional) |
| Difficulty Level: | Easy |
You might not even realize that right now, but a DIY chalkboard calendar is a brilliant old door repurposing plan for your home! It’s one of the easiest, yet most fun projects on the list and will only take 1–2 hours to complete. Ideally, it should come with panes; if not, you can always cut them out. To attach the door to the wall, get a set of longer-than-average screws. For the panes, use chalkboard paint that they sell at home improvement stores.
Is the door really old, and the paint is peeled off? Then you might want to invest in a primer + paint to make it look nice and fresh. The glass on the panes will benefit from a primer as well. Alright, now grab a piece of chalk and write down all the chores, activities, grocery lists, and days of the week on the board!
5. Makeshift Corner Door Shelf- craftaholics anonymous
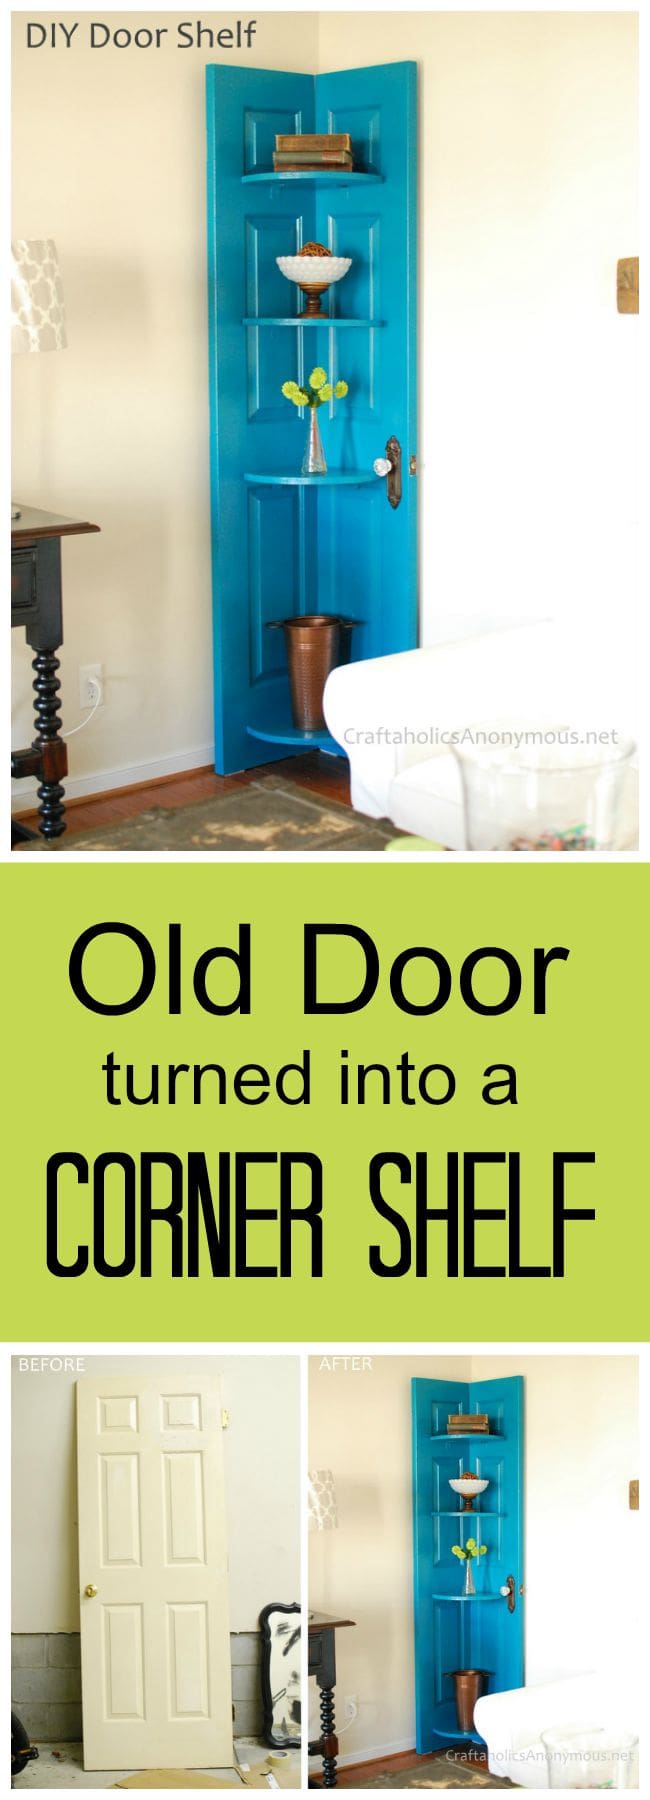
| Materials Needed: | Regular-sized door, particle boards, clamps, metal brackets, screws, door knobs (optional) |
| Tools Needed: | Circular saw, marker, measuring tape, electric drill, sandpaper (200 grit) |
| Difficulty Level: | Easy |
Old doors are very easy to turn into bookshelves, but if you have very limited space in the room, a makeshift corner door shelf will be a great alternative. Begin by cutting the door in half with a circular saw then attach the two pieces with metal brackets, clamps, and standard-issue screws. Don’t forget to make holes for the screws with a drill. And what about the shelves, though? Use any pieces of wood/particle boards you’ve got handy.
They don’t have to be fancy—only functional. You can place your favorite books, clothes, or plants there. And remember: the larger (longer) the door, the more stuff the shelves will be able to hold.
6. Rural-Style Coat Racks- my repurposed life
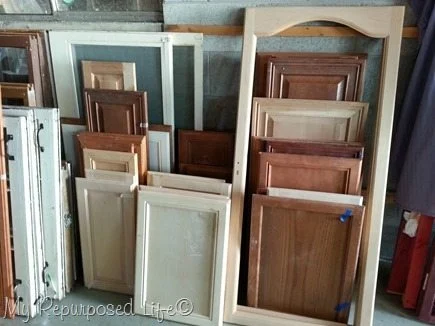
| Materials Needed: | Cabinet door (rectangular), plywood, D rings, coat hooks, screws, paint, wax |
| Tools Needed: | Table saw, miter saw, drill + bits, Kreg Jig, wood glue, sandpaper, brush/sprayer |
| Difficulty Level: | Easy |
Feel like you’re constantly running out of coat racks to hang a brand-new jacket? Then it’s time to turn old cabinet doors into rural-style coat racks. Or, just trim a regular-sized door into different parts instead. Much like with all the other projects, the most important tools are a saw, drill (with bits), and, in this case, sandpaper to get the racks ready for wax or paint. And don’t worry if you cut the wrong size the first time: one single door can turn into lots of racks!
Put the largest rack in the hallway and another one in every single room. You will need to buy a set of coat hooks, of course, along with D rings. If the door is a bit too thin, use plywood to make it easier for the screws to pierce through.
7. Raised Garden Bed- our airfield home and garden
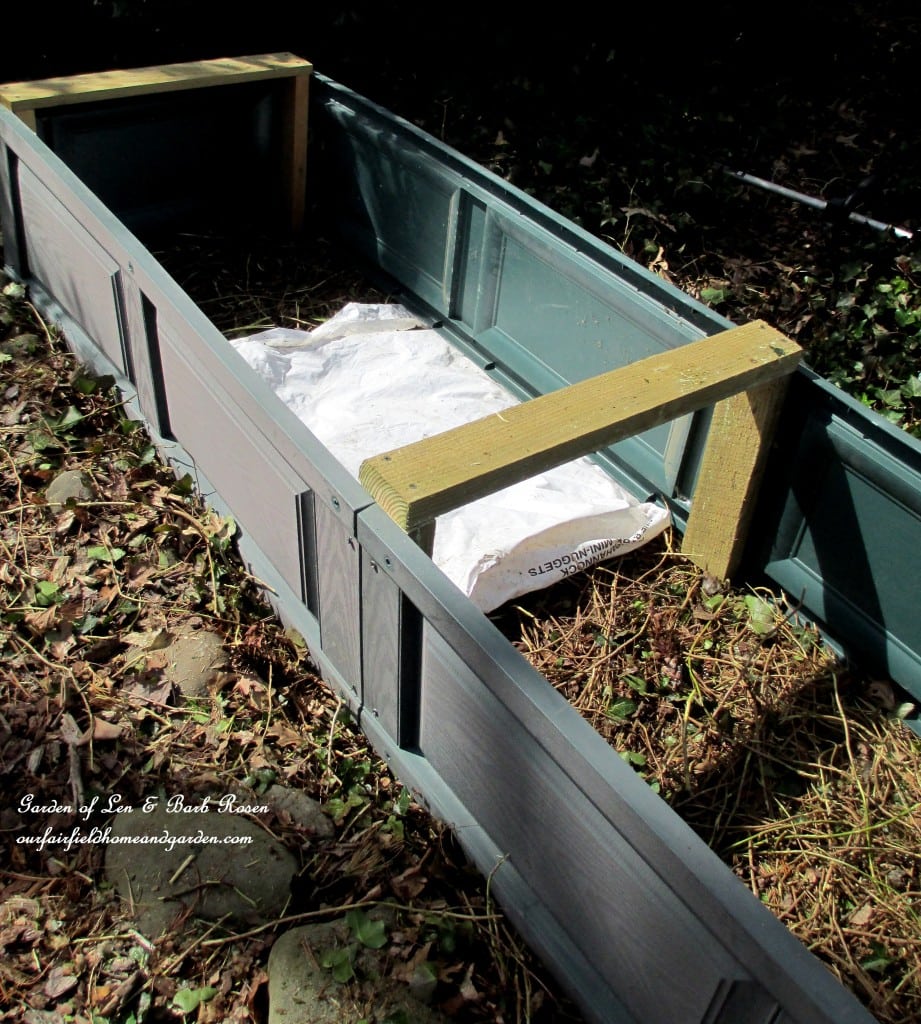
| Materials Needed: | Shutter doors, plywood, nails, screws, deck paint |
| Tools Needed: | Circular saw, paintbrush |
| Difficulty Level: | Easy |
Beds are one of the simplest, yet most commonly used pieces in any modern-day garden. They protect the plants from insects, critters, and floods while keeping the soil warmer. Good news: it will take you very little effort to turn an old, dusty door into a raised garden bed. You have two options here: cutting one large door into two pieces or using a set of shutter doors instead. For the odds and ends, one-half of a door will do.
Use plywood for the supports. Cover the bed in deck paint, use water-resistant nails and screws to secure the wood, and you’re in business. After that, pour your favorite potting mix into the freshly-built bed and sow the seeds!
8. Eye-Catching Picture Frame- mags made.blogspo

| Materials Needed: | Window-paned door, a set of hooks, water, rags, screws |
| Tools Needed: | Drill, tape measure, antiquing glaze, clear coat, paintbrush, window cleaner, scotch tape |
| Difficulty Level: | Easy/Moderate |
Earlier, we took a window-paned door and turned it into a unique chalkboard. This time around, we encourage you to build an eye-catching picture frame from it. Again, secure it to the floor horizontally, not vertically. The hardest part here is to pick the right photos for the panes. Depending on how many panes there are, you’ll be able to display 4–16 pictures; use scotch tape to hold them in place.
Before adding any precious photos, wipe the door with some rags and window cleaner and finish it up with antiquing glaze. The project doesn’t stop there! With a couple of set hooks, you’ll be able to make this DIY plan even better. An electric drill and a set of screws will get this done.
9. DIY Garden Screen- interior frugalista

| Materials Needed: | Bi-fold doors, fence posts, fence boards, wood screws (galvanized), concrete mix |
| Tools Needed: | Posthole auger, level, measuring tape |
| Difficulty Level: | Easy/Moderate |
Can’t seem to get enough privacy while hanging out in the yard with your family? Well, that can be solved with a DIY garden screen. Ideally, you should use louvered/bi-fold doors for this, but regular doors will also work. The idea is very simple: to block the view. So, the bigger the doors, the better. To secure the screens into the ground, we recommend renting a posthole auger, as it will make the job (digging 3-feet-deep holes) a lot easier.
Do make sure to contact your local utility company and get a green light from them on digging. Also, don’t forget to buy a bag of concrete mix.
10. Porch Swing- lindy and tony

| Materials Needed: | A set of doors, eye hooks (8), S hooks (2), carabiner clips, nails, brackets + screws, chair legs, chain, paint/sealant, cushions (optional) |
| Tools Needed: | Circular saw, chalk line, measuring tape, sander, protective gloves, and goggles |
| Difficulty Level: | Moderate |
Who doesn’t like a good old porch swing to relax on after a hard day of work? If you do everything right, it will turn into your new favorite place to hang out. At its core, the swing is just a bench/chair that’s hanging from the ceiling. You will need lots of chain and eye hooks, and if the door at hand isn’t painted or finished, sanding + repainting is a must. You don’t want the swing looking old and rusty!
This is important: before adding the chains, measure the porch with tape and cut the doors to fit it. Finally, take a minute to check on the ceiling. It should be strong enough to hold the weight of the swing and the person sitting on it.
What if You Don’t Have the Right Tools?
It’s safe to say that most of us have a marker, a couple of screws, and measuring tape in the garage. However, the same can’t be said about electric drills, angle grinders, or posthole augers. So, the big question is—will a DIY repurposing project justify buying expensive equipment? In most cases, the answer is no. There is an excellent solution, though: you can always rent whatever tool you need to get the job done.
Even if you live in a small city, it shouldn’t be hard to find a tool rental service in the area. For example, Home Depot is one of the most trusted names in the country and it has tool rental services in most stores. The same is true for Lowes. Give them a call to learn about the rental conditions, available equipment, and what papers you’ll have to sign.
How to Dispose of an Old Door?
Earlier, we checked out 10 amazing repurposing ideas for old doors. We specifically picked the ones that are (relatively) easy to bring into life and are wholesome and rewarding. But what if you have more old doors on your property than you can handle? How do you get rid of them without violating any laws or paying extra? Well, if the doors are made of wood, the easiest and most obvious solution would be to just burn them.
Metal, glass, or stone won’t burn, however. So, instead, get in contact with a professional waste hauler and let them take care of it. Alternatively, you can visit a landfill/solid waste facility in your area. Again, do make a call first, as they only work at specific hours. Besides, there may be fees involved. Last, but not least, consider donating your doors to a BMRC center. Don’t worry: they won’t charge anything for that.
What About Reusing Windows?
Did you have to get through a whole bunch of windows to access the old doors in your shed/garage? Well, those windows can be repurposed as well! The process is very similar and requires roughly the same tools for most DIY projects. Windows can serve as headboards, space dividers, cabinet pieces, fences, and coat racks.
In some ways, it’s easier to work with windows, as they’re smaller, lightweight, and usually not as thick as doors. On the other hand, many DIY repurposing plans require using expensive equipment and making precise cuts. Regardless, do not send the old windows straight to a landfill even if you don’t want to use them for a project just yet!

Conclusion
There’s something magical about reusing old, “out-of-commission” doors, windows, and furniture. First, you don’t have to spend time and money trying to dispose of them. Second, you get to try some exciting DIY ideas. More importantly, reused doors will serve you for many extra years, be it as a coffee table, porch swing, or garden bed.
As long as you find a new purpose for an old door and have the tools for repurposing it, you can get it done. Don’t be afraid to experiment, add your own touch to any of the ten DIY plans from the list, and enjoy. By reusing old doors, you’ll up your DIY skills, get to learn something new, and keep your bank account intact!
Featured Image Credit: Barna Tanko, Shutterstock
Contents
