

If you have a big, beautiful, and diverse garden, a pathway is a must! No matter how exotic, lush, or grandiose the plants, flowers, and bushes are, if you don’t have a garden path, the backyard won’t look like much. Besides, it can serve as a perfect “guideline” for guests that aren’t familiar with the layout. How do you build one, though? Will you have to pay a contractor? And how much is that going to cost?
Good news: DIY garden paths aren’t at all hard to build! As long as you’ve got some basic tools and a sleight of hands, you’ll be able to handle everything on your own. And it won’t cost much! The following list includes many user-friendly, easy-to-build, and durable garden path plans/ideas that you can build right now. Let’s see what they’re all about!

The 17 Cheap DIY Garden Path Ideas & Plans
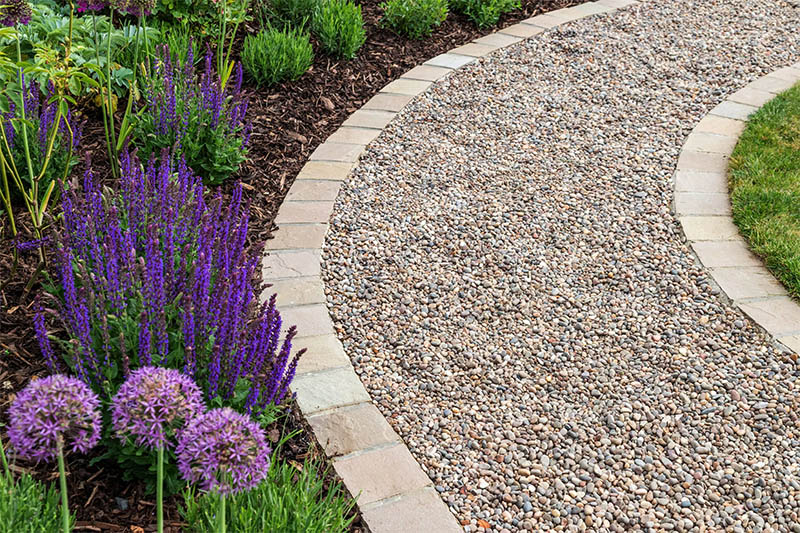
1. Simple Gravel Garden Path by This Old House
| Materials Needed: | Gravel/crushed stone, landscape fabric/newspaper |
| Tools Needed: | Spade, steel rake, garden hose, hand tamper |
| Difficulty Level: | Easy |
Gravel is one the most common, easy to work with, and cheapest materials out there. So, if this is your first DIY project, you might want to start with a simple gravel garden path. It does involve hauling heavy stones and some digging and tamping, but that’s it. As long as you have enough gravel (or crushed stone) and some fabric, along with a spade, you’ll be done in no time. On average, it takes 2–4 hours to complete the project.
Just dig down an inch or two, lay down the landscape fabric, fill it with gravel, and enjoy! While it’s not very fancy, this cheap DIY garden path will last for many years, if not decades. If you want, add edging on the sides.
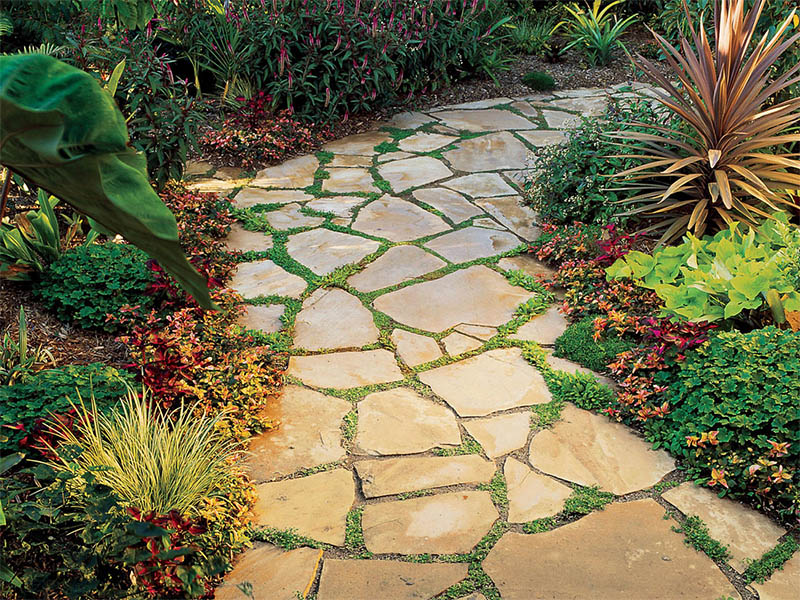
2. Flagstone Pathway Plan by Sunset
| Materials Needed: | Flagstone, groundcover, flour/gypsum, compost, granite |
| Tools Needed: | Rake, spade, hand tamper, line level, string, brick chisel |
| Difficulty Level: | Moderate |
Don’t have any power tools, years of experience, or an entire week to build a garden path, but still want something fancy? Then this flagstone pathway plan will be right up your alley. Don’t rush yourself, follow the guide closely, and you’ll be done in 4–5 hours. As for the “blanks” between the stones, use groundcover, Irish moss, or dwarf thyme. There are no strict rules about this.
The reddish color of the flagstone fits perfectly if you live in a hot area where the sun is always up. For the pathway to look “expensive”, use stones of different sizes.
3. Stone Garden Pathway by Family Handyman

| Materials Needed: | Gravel, limestone, mulch, soil, wall stone, sand |
| Tools Needed: | Spade, rubber mallet, level, wheelbarrow |
| Difficulty Level: | Easy |
Why not go with the classics—a good old stone garden pathway? You won’t have to do any cutting, drilling, or fitting. This is a time-consuming project, though, and might take up to three days to complete. On the bright side, it won’t cost much and can be done manually. A wheelbarrow to carry the heavy stones, a spade to get the soil ready, a level, and a rubber mallet will help you with that.
This is a “universal” design, by the way, and can work not only for a garden but for a sidewalk or a walkway as well.
4. Planted Stone Path with Edging by The Spruce

| Materials Needed: | Large stones (flat), landscape fabric/staples, gravel + plants, sand, wood timber |
| Tools Needed: | Flat spade, shovel, hand stamp, wheelbarrow, level, knife, a set of stakes, hammer |
| Difficulty Level: | Moderate |
If the previous DIY plan is a bit too basic for you, this planted stone path with edging might be the right choice. The required tools are mostly the same (but also include a knife, stakes, and hand stamp). This also applies to the materials but this time around, you should go with large, flat stones and gravel. The estimated cost for this pathway is $2.50–3.50 and it takes 10–12 hours to build. It will fit perfectly in a rustic farm, a rural landscape, or any backyard garden.
A bed of sand to hold the stones in place, some gravel to fill the space between the stones, and wood timber for the edging—that’s all you’ll need for this plan.
5. Crushed Rocks and Bricks Path by DIYKalinga
| Materials Needed: | Bricks, concrete, soil, rocks |
| Tools Needed: | Shovel/spade, mason line, measuring tape, grinder (angled), protective gloves |
| Difficulty Level: | Easy |
Using crushed gravel to form the foundation for a pathway is a common practice. But how about we build a beautiful crushed rocks and bricks path instead? It won’t take much effort, and the budget for the whole project is more than fair. An angle grinder is the most expensive required tool. A spade, mason line, and tape won’t cost nearly as much. First, get rid of any grass in the area. Next, add some soil and make sure it’s nice and tamped.
To get the measurements right, set up a string line and follow it. Use the grinder to cut the bricks and place them evenly on both sides. Finishing up, add as many crushed rocks as you need.
6. Broken Concrete Path by How to Build a House
| Materials Needed: | Wood board, gravel, concrete pieces, construction sand |
| Tools Needed: | Level, hammer, string line, wheelbarrow, shovel, gloves, rubber mallet |
| Difficulty Level: | Moderate |
Concrete is a low-cost and reliable construction material. So, if you’ve got some broken concrete pieces lying around, we encourage you to use them to build a garden path. The idea here is the same as with the flagstone and the pavers. Choose whatever pattern you want and stick with it. This broken concrete path DIY plan requires patience, but it will be well worth your time. Use a level to make sure the pathway is even. Next, add some gravel and construction sand to strengthen the concrete.
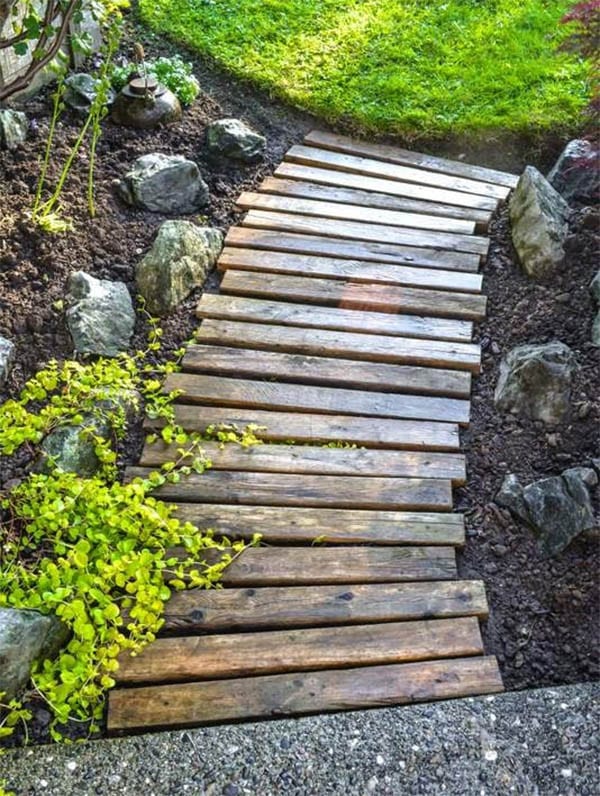
7. Reclaimed Wood Garden Path by Funky Junk Interiors
| Materials Needed: | Gravel, wood planks/boards |
| Tools Needed: | Gloves, shovel, miter saw, cordless drill, screws, rake, paint (optional) |
| Difficulty Level: | Easy |
If bricks from an old building work for a pathway, why not use reclaimed wood for the same purpose? Gardeners that have a drill and miter saw should definitely try the reclaimed wood garden path plan out. It might not be the ideal choice if you’re the proud owner of a Japanese-style, formal, or English garden. On the other hand, for people that want a bold, eye-grabbing pathway, reclaimed wood will be just right.
Cut the wood planks with a miter saw, place them on the ground, add some gravel, and that’s it!
8. Brick Edging Path by Family Handyman

| Materials Needed: | Brick pavers, plywood, crushed gravel, sod, sand, paver edging |
| Tools Needed: | Circular saw, brick saw, wheelbarrow, knife, spade, hand tamper + maul, hammer |
| Difficulty Level: | Moderate |
Bricks can also serve as a great material for the edging. The idea is quite simple, but the result looks spectacular. One brick on each side and gravel or paver in the middle—that’s all a brick edging path is all about. The hardest part here is cutting the brick and making sure it’s of the right size. A gravel base and a sand foundation will make sure the path lasts for decades. If there’s a landscape supplier in your area, they’ll be able to provide bricks, gravel, and sand. If not, look at home centers and brickyards.
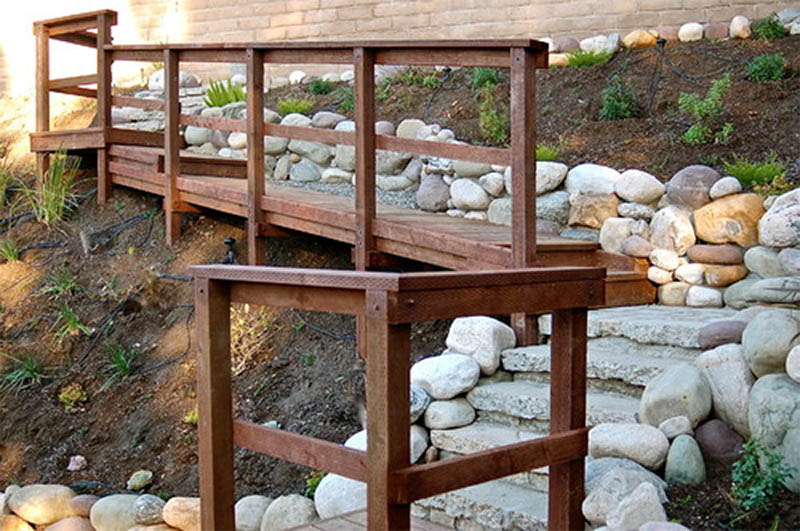
9. Wooden Boardwalk Path by Family Handyman

| Materials Needed: | Pea gravel, wood boards, finishing screws (steel), deck screws, hardboard siding, joist hangers + nails, marking paint |
| Tools Needed: | Speed square, router, miter, circular, and jigsaw, drill + bits, wrench, belt sander, level, spade |
| Difficulty Level: | Hard |
If reclaimed wood/log isn’t your cup of tea, this wooden boardwalk path will be exactly what you want. It’s cheap (won’t cost more than $250–300), looks amazing, and is ideal in wet and humid areas. Now, the list of required tools is quite large, but this DIY plan is very simple and easy to build. You won’t have to do any digging or haul heavy stuff like stones/bricks. We do, however, recommend asking a friend to help. Together, you’ll be able to finish the project over the weekend.
10. Cheap Concrete Path by bob vila
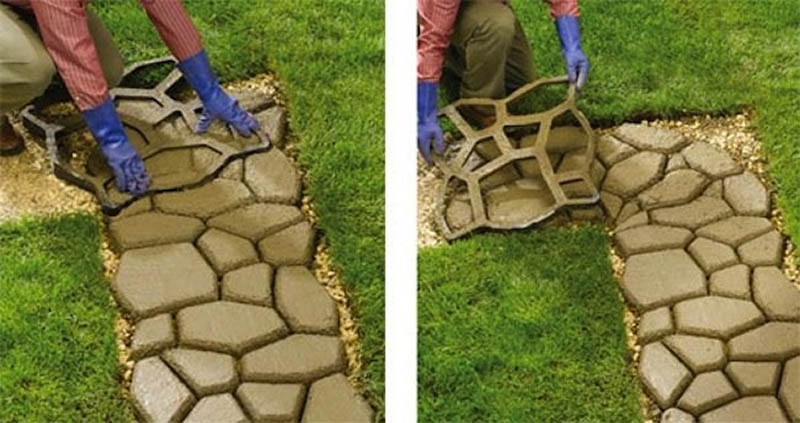
| Materials Needed: | Jointing sand, plastic sheeting, concrete mix, concrete form, cement color |
| Tools Needed: | Level, Shovel, broom, finishing towel, wheelbarrow |
| Difficulty Level: | Moderate |
No, we’re not talking about broken concrete anymore. Instead, for this cheap concrete path, we’ll be using forms to shape the pathway to our liking. This way, you won’t have to spend days placing the individual pieces on the ground. Instead, put the concrete mix into the form, let it harden, and move on to the next part. To make the garden path look even more attractive and last longer, use a cement color to paint it.
11. Wood Mulch Path by Pretty Handy Girl

| Materials Needed: | Stepping + flat stones, metal or bricks for edging, mulch (two sets) |
| Tools Needed: | Rake, hammer, yardstick, protective gloves |
| Difficulty Level: | Easy |
Mulch is often looked down upon, but it’s known to serve as an excellent foundation for a garden path. It does a nice job of keeping water, dirt, and sludge away. The wood mulch path plan is quite versatile and can include flat stones (put them in the middle of the walkway), edging, and different colors of mulch. If you have enough space in the backyard, use light-color mulch for the path and a darker tone for the sides to create a beautiful contrast.
12. Paver Path With Grass by Family Handyman

| Materials: | Grid-shaped concrete pavers, wood 2×4 |
| Tools Needed: | Shovel, rafter square, tape measure, level, |
| Difficulty Level: | High |
When it comes to creating a durable and visually appealing path or walkway for your outdoor living space, grid-shaped concrete pavers can be an excellent choice. These pavers are not only easy to install but also provide a clean and modern look to your landscape design. Before starting the installation process, it’s essential to prepare the area properly by removing any existing vegetation, debris, and rocks. Then, you can lay down a layer of gravel to provide a sturdy base for the pavers. Once the base is prepared, start placing the grid-shaped concrete pavers in a pattern that suits your design. Finally, fill in the gaps between the pavers with your dug up grass to spray some weed killer to prevent weed growth.
13. Freeform Stone Path by Family Handyman

| Materials: | Freeform stepping stones |
| Tools Needed: | Shovel, level, tape measure, builder’s line |
| Difficulty Level: | Easy |
Creating a garden path with jagged-shaped stepping stones can add a unique and artistic touch to any area. In addition to their aesthetic value, jagged-shaped stepping stones can also help prevent soil erosion and provide a stable surface for walking. Before starting the project, be sure to consider the size and shape of the stones to ensure they’re functional as well as visually appealing. The stones should be placed strategically to create a natural flow and guide visitors through the garden – so be sure to line the area out with your builder’s tape before buying the stone. To ensure the longevity of the path, it’s best recommended to use a sturdy base material like gravel or sand underneath the stones.
14. Simple Cut Stone Path by bhg

| Materials: | Cut stones, gravel (or sand), plastic membrane (for edges) |
| Tools Needed: | Shovel, level, rake, builder’s line |
| Difficulty Level: | Intermediate |
Cut stones are an excellent way to level up your backyard or any pathways around your home. To begin with, decide on the design of the path and the type of stone you want to use. Cut stones are available in various sizes, shapes, and colors, so choose one that complements your garden’s overall aesthetic. Once you have selected the stones, mark out the path’s shape with stakes and twine. Then, dig out the soil and level it off. Place a layer of sand or gravel on top of the soil to create a stable base for the stones. Finally, arrange the stones in the desired pattern, leaving some space between them for grass or ground cover to grow. And boom, you’ve just made yourself an awesome, yet simple, stone path.
15. The Glowing Stone Path by womenio
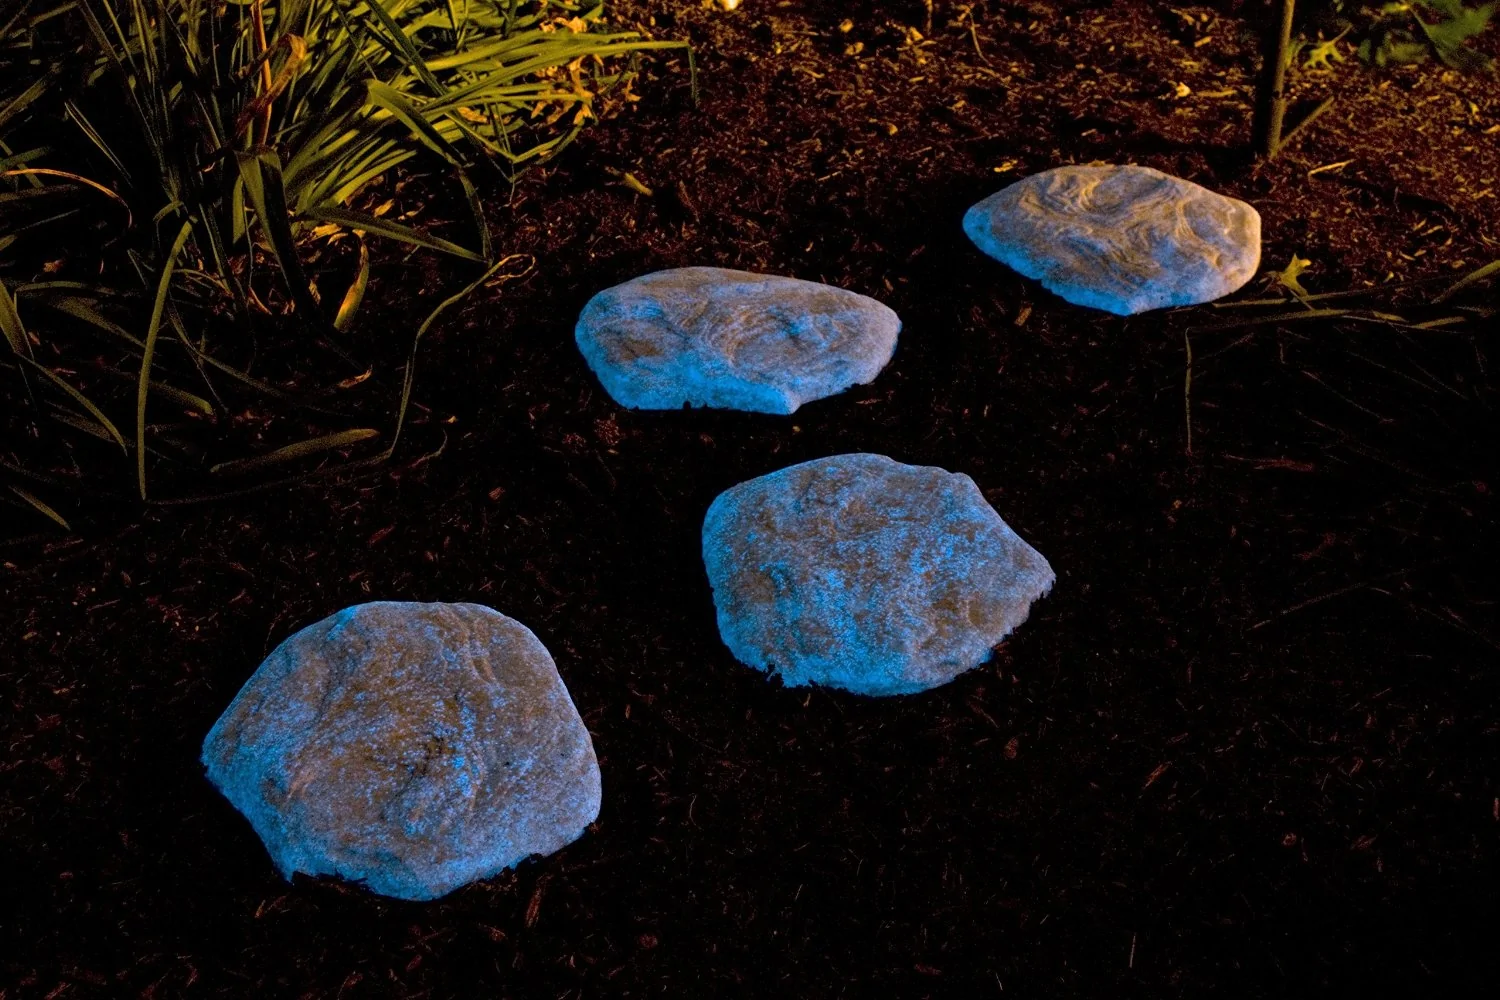
| Materials: | Garden stones, glowing powder solution |
| Tools Needed: | Shovel, level, builder’s line, gravel (optional) |
| Difficulty Level: | Easy |
A glowing stone path can add a touch of magic to any landscape, and creating one is easier than you might think. First, choose the location for your path and mark out the area. Next, dig out the path and create a smooth, level surface. Now it’s time to choose your stones. You’ll want to select stones that are flat and smooth for ease of walking. Once you’ve laid the stones, it’s time to add the glow. Using glow-in-the-dark paint or photoluminescent powder mixed with a clear outdoor sealer, apply the mixture to the stones. Be sure to follow the manufacturer’s instructions closely. Finally, let those stones dry completely before turning off any surrounding lights and enjoying your beautiful glowing stone path.
16. Make-Your-Own-Stone Garden Path by artsy pretty plants
| Materials: | Concrete solution, vinyl liner |
| Tools Needed: | Shovel, level, builder’s line |
| Difficulty Level: | High |
By making your own stepping stones, you can create a unique garden path that reflects your personal style. The process is relatively simple and can be completed in a weekend. First, choose the shape and size of your stepping stones. You can use molds made from vinyl liners or create free-form shapes with cement mix. Next, mix the cement according to instructions and pour it into the mold. Add any decorative elements, such as stones or shells, to the surface of the wet cement. Allow the cement to dry for at least 24 hours before removing it from the mold. Finally, place the stepping stones in your desired pattern to create a beautiful garden path. Let it set – and you’re good to go.
17. River Rock Path by a traditional life
| Materials: | River rocks, vinyl liner, rocks (or gravel) |
| Tools Needed: | Shovel, level, builder’s line |
| Difficulty Level: | Intermediate |
Here’s a simple, yet beautiful path that you can create in no time. Like with any other method, you’ll first need to outline the path for the rocks and dig out the dirt. So be sure to measure the height of the rocks so that you’ll know how much to dig out. You may also want to pull out any rocks or other debris that you come across while digging out your pathway. Next, simply line your river rocks up, leaving a few inches of space between them until you’ve completed your pathway. Finally, surround the outline of the stones with rocks or gravel and you’re all set. Note that these rocks are fairly weighty, so you may need to have an assistant or two.

In Conclusion
Garden paths are great: they are cheap, easy to build, and look terrific. Now, some of these projects require extra time, effort, and skills, not to mention pricey instruments. But most DIY garden paths on today’s list are user-friendly, straightforward, and can be built in a day or two. On average, they will take you 5–10 hours at a moderate pace.
So, if you’ve got a spare weekend, pick a plan/idea from our line-up, and use it as a guide for creating your dream garden pathway! Gravel, stones, bricks, pavers, and mulch—use whatever you see fit!
You Might Also Be Interested In:
Featured Image Credit: Aga Murawska, Shutterstock
Contents
