

With Christmas just around the corner, it is time to consider how you will decorate the house this year. Sadly, Christmas décor is relatively expensive—especially when you’re only going to have it up for a few weeks.
It is easy to create some Christmas décor of your own. Many popular designs aren’t that hard to make with a plan and a little know-how. Below, we’ve listed some of our favorite designs for you to look at.

The 20 DIY Christmas Signs
1. Wood Holiday Sign by Lemon Thistle
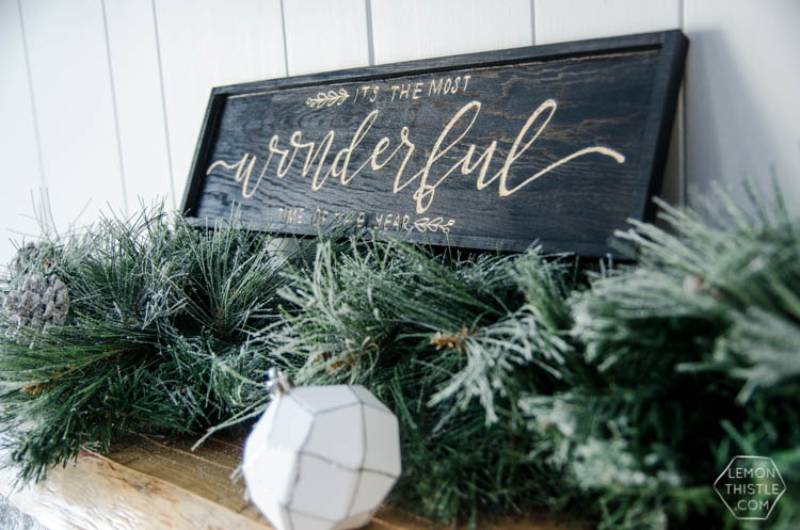
| Materials: | Prefab wood sign, pre-stain conditioner, wood finish stain |
| Tools: | Stain brush, pencil, Dremel, quality brush for clear coat |
| Difficulty: | Easy |
With a prefab design, you can easily make this traditional sign. This plan describes how to write anything you want on the sign, allowing you to customize the sign to your heart’s content. Furthermore, you can also choose whatever colors you’d like. However, the sign does look best in a darker grey.
2. Light Up Holiday Yard Sign by Morenas Corner
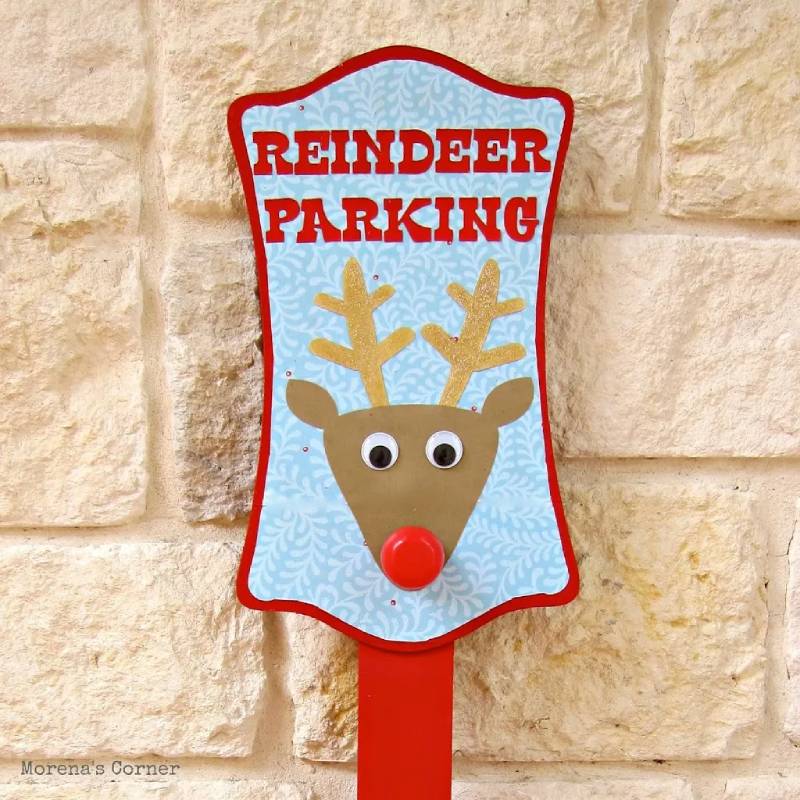
| Materials: | Mod Podge outdoor formula, paint, prefab wood sign, tea light, small ornament, Velcro circles, google eyes, cardstock |
| Tools: | Basic tools, like scissors |
| Difficulty: | Easy |
With Mod Podge and a few other materials, you can make this relatively easy yard sign. While the directions are easy, you’re left with a light-up sign that looks professionally done. The light is made with a tea light, so you won’t have to plug this sign in. All you’ll need to do is change the batteries in the tea light when necessary.
3. Farmhouse Christmas Sign by Crafta Holics Anonymous
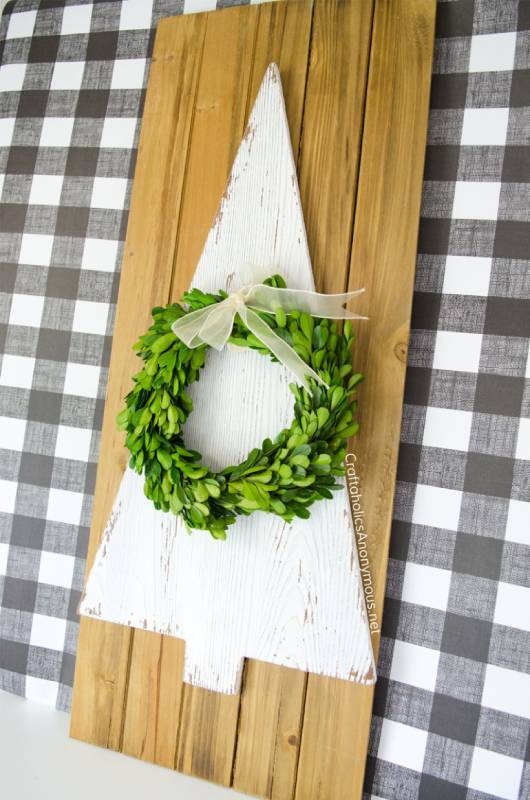
| Materials: | Wood plaque, Christmas tree plaque, mini wreath |
| Tools: | Hot glue gun |
| Difficulty: | Easy |
We loved that this plan is extremely easy to make. You’re just gluing two pieces of wood together and adding a wreath. However, the final product is extremely nice and doesn’t look like it was easy to make.
Still, this plan is reliant on you finding the exact right pieces. Ultimately, this may not be possible, depending on your location and the time of year.
4. Countdown Sign by The DIY Dreamer
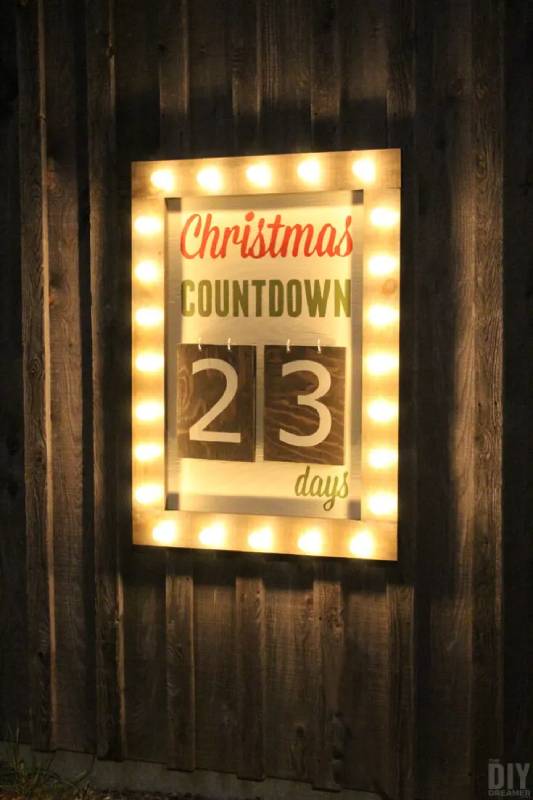
| Materials: | Several pieces of wood, print paper, paint of various colors, graphite paper, hooks, screws, lights, fastening system for hanging, staples |
| Tools: | Paint brushes, printer, pencil, clamps, ruler |
| Difficulty: | Easy |
This countdown sign is adorable. However, it is a bit more involved than other options. The lettering and countdown pages are simply printed out and cut, so you could easily edit them if you wish. The paint could also be turned into whatever color you desired. Therefore, this is an easily customizable and pretty easy plan.
With that said, printing off the letters does require a printer that is capable of printing on larger pieces of paper.
5. Be Merry Front Porch Sign by Our Crafty Mom
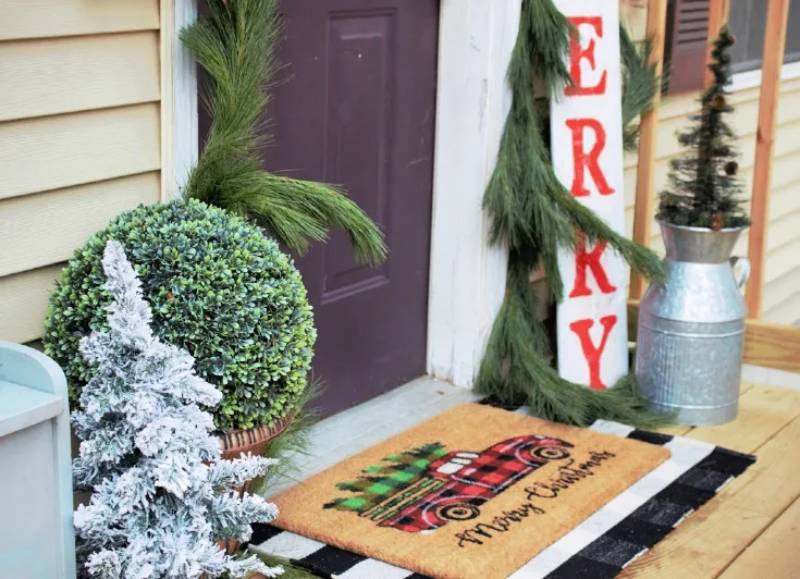
| Materials: | Long wood board, chalk paste, paint |
| Tools: | Squeegee for chalk paint, stencil for words |
| Difficulty: | Easy |
This straightforward sign simply requires a long piece of wood. Then, you simply use a stencil to add the words you wish and paint to give the sign a complete look. All in all, this is one of the easier signs on this list.
However, a piece of wood that long can be a bit costly. Still, if you manage to find a scrap that is quite long, you can make this plan for basically free.
6. Giant Ornament Sign by The Endearing Home
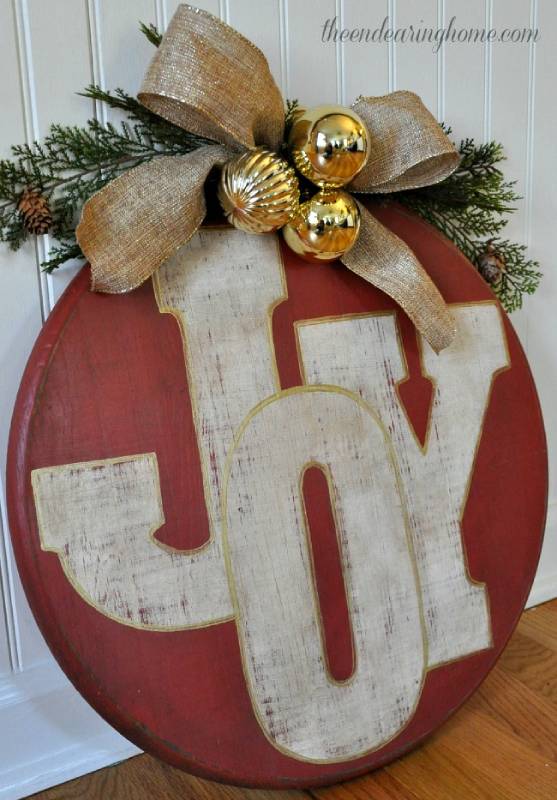
| Materials: | Round wood sign, paint of your chosen color |
| Tools: | Paint brushes |
| Difficulty: | Moderate |
We consider this plan to be a bit harder than others because a lot of it is more freehanded. Therefore, you have to have some painting ability that the other plans didn’t require. While it doesn’t require cutting any wood, you will need to basically free-hand some pretty letters.
Alternatively, you could use a stencil. However, the plan itself doesn’t call for one.
7. Snowman Sign by That Sweet tea Life
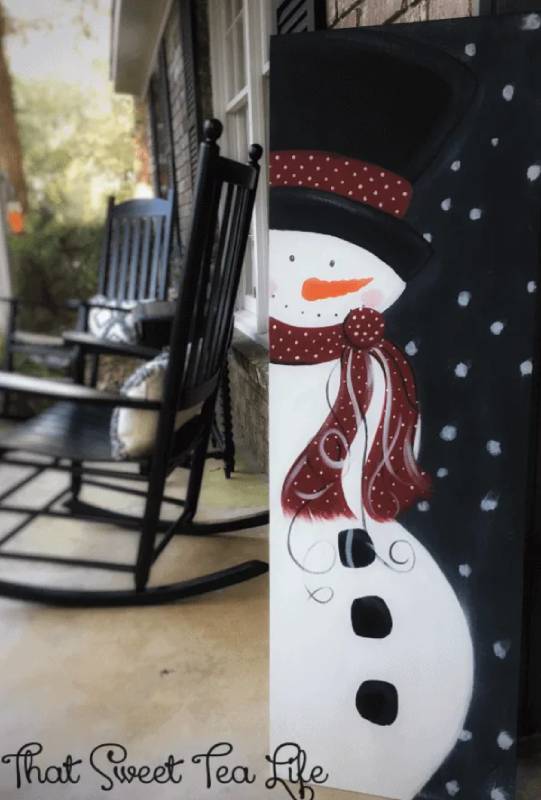
| Materials: | Board, pencil, primer, sealer, paint, cardboard |
| Tools: | Paint brushes, water bottle |
| Difficulty: | Medium |
This beautiful snowman sign hardly seems like it is DIY. However, by following this pretty straightforward plan, it’s pretty easy to make one of your own. The materials needed are similar to what the other plans have asked for, such as wood and paint. Of course, it does help to be a bit artsy for this plan, though that isn’t necessarily required.
For the most part, you can use whatever you have on hand. Of course, the paints must be the correct color. However, beyond that, it doesn’t particularly matter what type of paint you have.
8. Noel Sign by Anderson And Grant
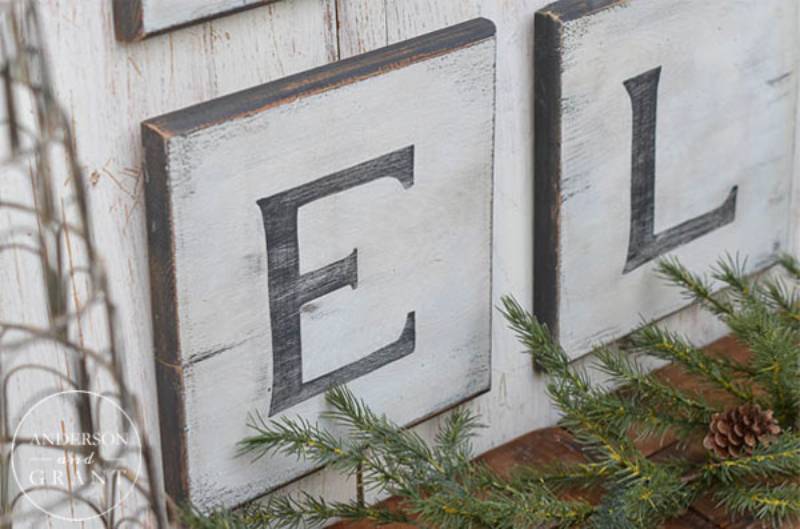
| Materials: | Boards, wood stain, colored pain, clear candle, painter’s tape, sandpaper, carbon paper, pencil |
| Tools: | Ruler, pencil |
| Difficulty: | Easy |
This simple sign tutorial could technically be used to spell various things. However, the tutorial specifically makes it spell “Noel,” and the design does lend itself better to wintertime (though you could make it spell anything).
This tutorial is pretty easy, but it relies on you finding boards that fit with the design. Therefore, if you can’t find a few smaller square boards for pretty cheap, this design may not be worth it. Still, the steps are pretty straightforward and should work for most purposes.
9. Arrow Sign by The Happy Scraps
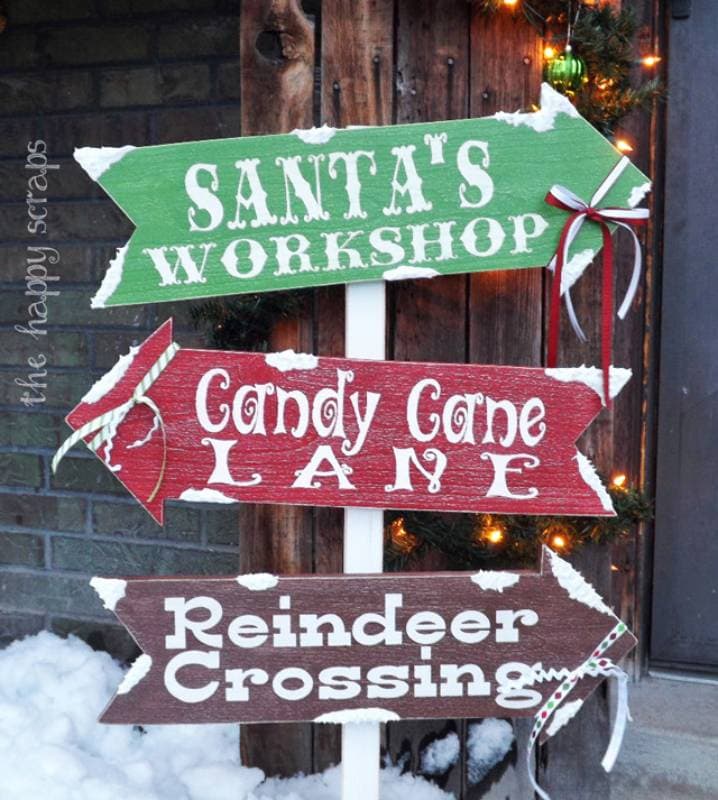
| Materials: | Arrow planks, long piece of wood, paints of various colors |
| Tools: | Paint brushes, fake snow |
| Difficulty: | Medium |
Technically, these signs aren’t terribly difficult to make. They do require a bit more work than other signs, mostly because you’re technically making three.
However, we found the specific plan to be a bit more unclear than others. There isn’t a simple list of steps or materials, and the writer describes several ways you could make the sign. While this is useful if you only have certain materials at hand, we did find it a bit complicated.
Therefore, this may be one of those situations you use for inspiration but don’t necessarily follow word-by-word.
10. Christmas Tree Sign by Sugar And Cloth
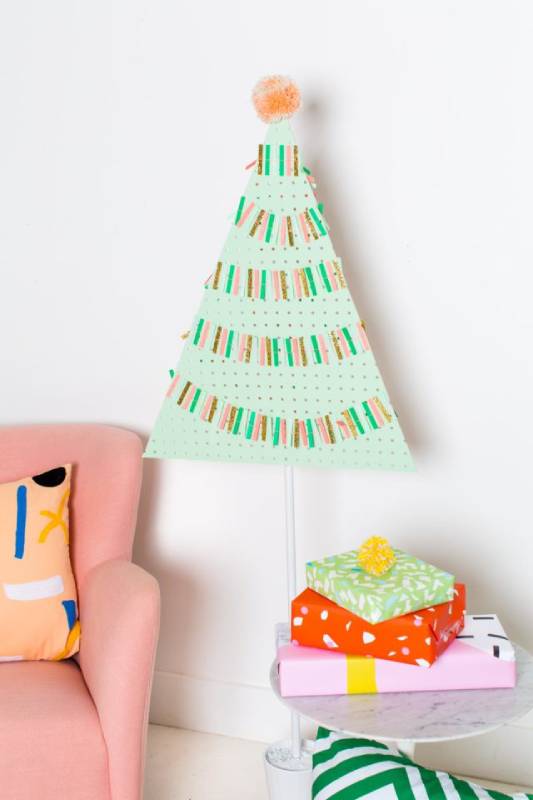
| Materials: | Pegboard, metal pipe, two screws with bolts, paint, ceramic planter |
| Tools: | Quickrete, skill saw |
| Difficulty: | Easy |
This sign is very straightforward to make thanks to the high-quality directions. It looks quite a bit different from the other options we’ve discussed so far. Plus, it doesn’t require many hard-to-find materials, like boards of specific sizes. The only potential issue is that you do need a ceramic planter, which can cost a bit. Plus, the design will depend a lot on the planter you choose.
11. Farmhouse-Style Sign by Mod Podge Rocks
| Materials: | Mod Podge, wood square, wood trim, acrylic paint, wood stain, plaid paper |
| Tools: | Sandpaper, paintbrush, rags, stencil, scissors, table saw, nail gun |
| Difficulty: | Easy |
For those with a farmhouse-style home, you may be interested in this sign. It is pretty straightforward to make, though it does need several tools. Therefore, we only recommend it for those with the common household tools necessary to make it, such as a nail gun.
The directions are very easy to follow. However, overall, this plan is very simple, to begin with.
12. Reclaimed Wood Sign by Kristi Murphy

| Materials: | Reclaimed wood pieces, paper Mache letters, long paint stir sticks, picture hangers, several small nails |
| Tools: | Small nails |
| Difficulty: | Easy |
If you have some pieces of reclaimed wood laying around, then this is a great option for you to try. You can use 2x4s as well. However, the main draw of this plan is that it utilizes reclaimed wood. Overall, the plan is very simple, though you will likely need to run to a local paint store for some free paint stir sticks.
In the end, this is one of the most professional signs we found.
13. Foil Christmas Art by Lia Griffith
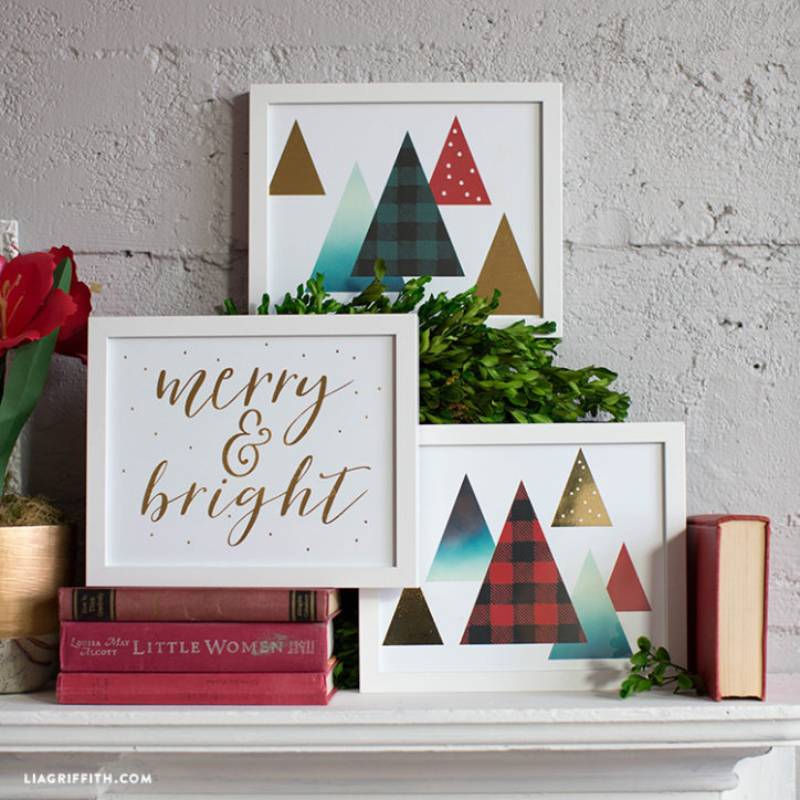
| Materials: | Cardstock, laminating supplies, picture frames |
| Tools: | Laminating machine |
| Difficulty: | Easy |
Simply put, this plan describes how to print out pictures onto white cardstock, laminate them, and then put them inside picture frames. The main draw of this plan is that it is extremely cheap, especially if you already have a laminating machine. Plus, you can switch the pictures out with the seasons very simply.
Therefore, it works well for those looking for a more permanent display that can be adjusted.
14. Wood Slice Sign by Design Dazzle

| Materials: | Paint, template provided in plan, large slice of wood |
| Tools: | Printer |
| Difficulty: | Easy |
Thanks to the free template provided with this plan, this wood sign is extremely easy to put together. All you have to do is print the template and follow the directions. Beyond that, it is extremely straightforward.
The main issue may be finding a large enough wood slice. However, if you see one, be sure to grab it up and try out this plan.
15. Farm Fresh Christmas Tree Sign by aray of sunlight
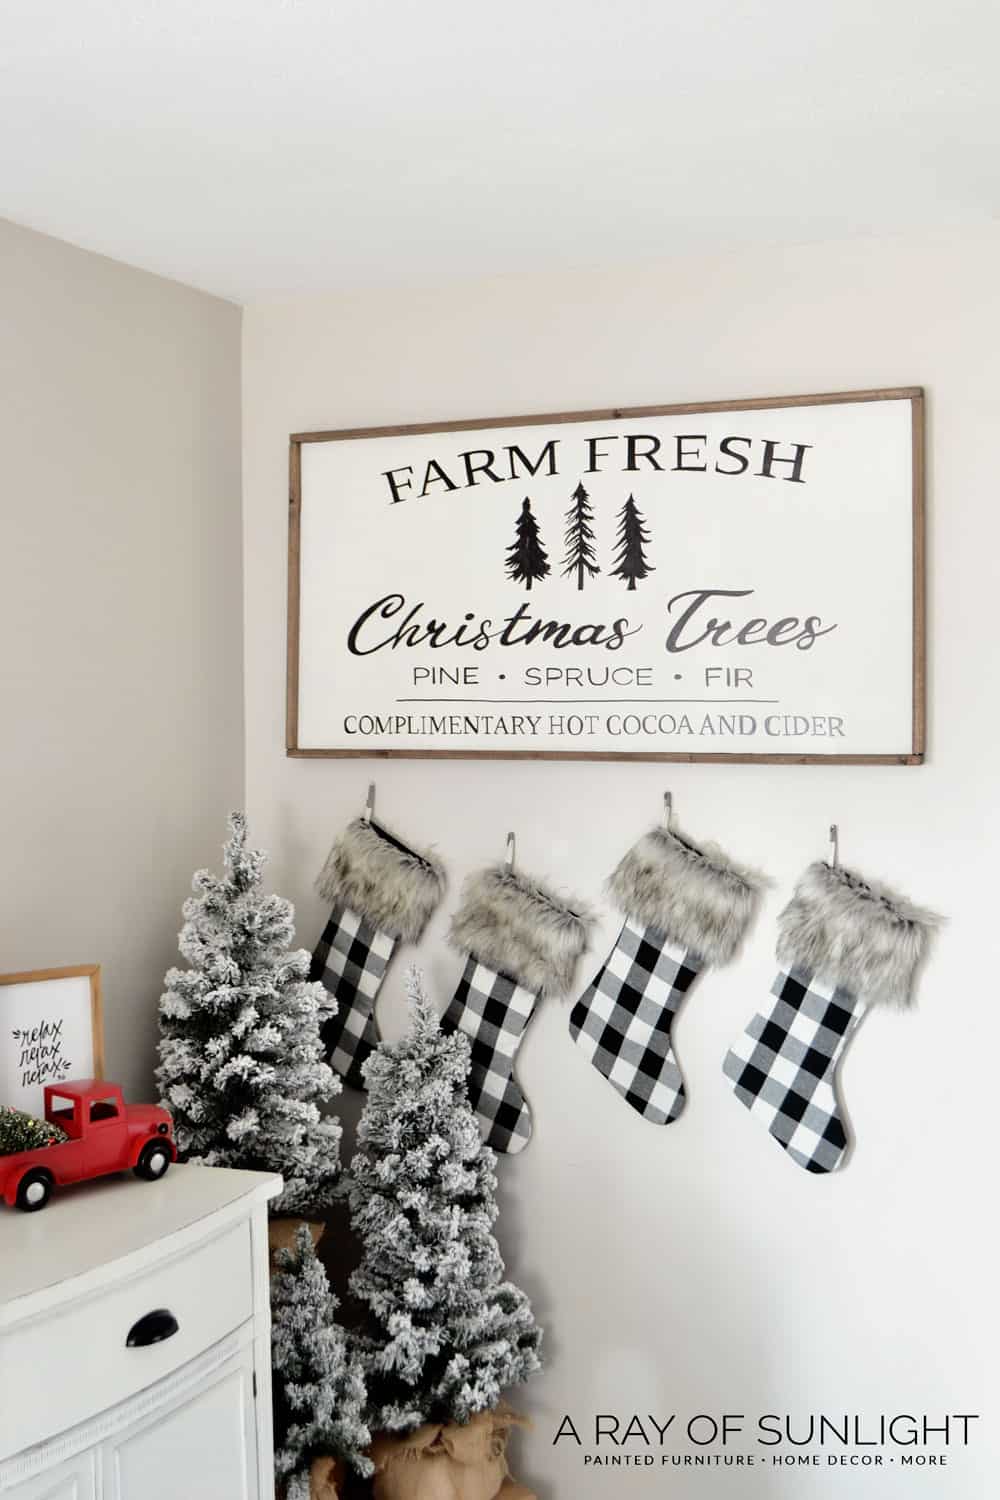
| Materials: | Plywood or MDF board, furring strips |
| Tools: | Primer, chalk paint, wood stain, chisel tip Sharpie or Sharpie paint pen, nail gun, inkjet printer |
| Difficulty: | Beginner |
With the help of a simple inkjet printer and a Sharpie, you can create a beautiful Farm Fresh Christmas Tree sign. This project involves printing the template, taping it onto a piece of plywood or MDF board, and tracing the design with a sharpie. The board is framed using furring strips, and everything is stained or painted to give it a rustic, farmhouse look.
16. Merry Christmas Sign with Cricut/Silhouette Cameo by angela marie made
| Materials: | Plywood panel, 1 x 2 boards, brad nails, primer, paint, paint rollers, wood stain, wood glue, vinyl |
| Tools: | Cutting machine (Cricut, Silhouette Cameo, etc.), craft razor blade cutter, vinyl weeding tool, transfer tape, vinyl application squeegee, masking tape or painter’s tape |
| Difficulty: | Intermediate |
This Merry Christmas sign is a great way to add some holiday cheer to your home. Using a cutting machine, you create a vinyl stencil of the “Merry Christmas” design. The stencil is then applied to a piece of plywood painted with your chosen color. The letters are painted over, and once the paint is dry, the stencil is removed, leaving a clean and crisp design. The sign is framed using 1 x 2 boards for a finished look.
17. Gold Merry Sign with Decorative Filler by homey oh my
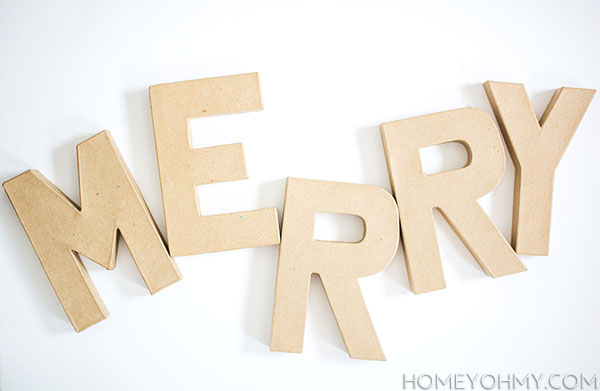
| Materials: | Cardboard letters, gold spray paint, decorative gold filler |
| Tools: | X-ACTO knife, hot glue gun |
| Difficulty: | Beginner |
This Gold Merry Sign is a gorgeous and shiny addition to your holiday décor. It involves cutting out the front side of cardboard letters, painting them gold, and then filling them with decorative gold filler using a hot glue gun. The end result is a set of letters that sparkle and shine, reminiscent of the glow from marquee signs. As a bonus, you can also create a festive hanging pine cone decoration with ribbon and faux evergreen garland to accompany your sign.
18. Wood Slice Christmas Signs with Free Template by design dazzle

| Materials: | Basswood rounds, DecoArt paint, decorative embellishments |
| Tools: | Chalk or tracing paper, paintbrush |
| Difficulty: | Beginner |
These Wood Slice Christmas Signs are an easy and fun holiday project. Using basswood rounds as the base, paint them with DecoArt paint, and use the free template provided to create festive designs. A little chalk or tracing paper helps transfer the template to the wood, and you can add some extra pop with decorative embellishments.
19. DIY Joy Sign by liz marie blog
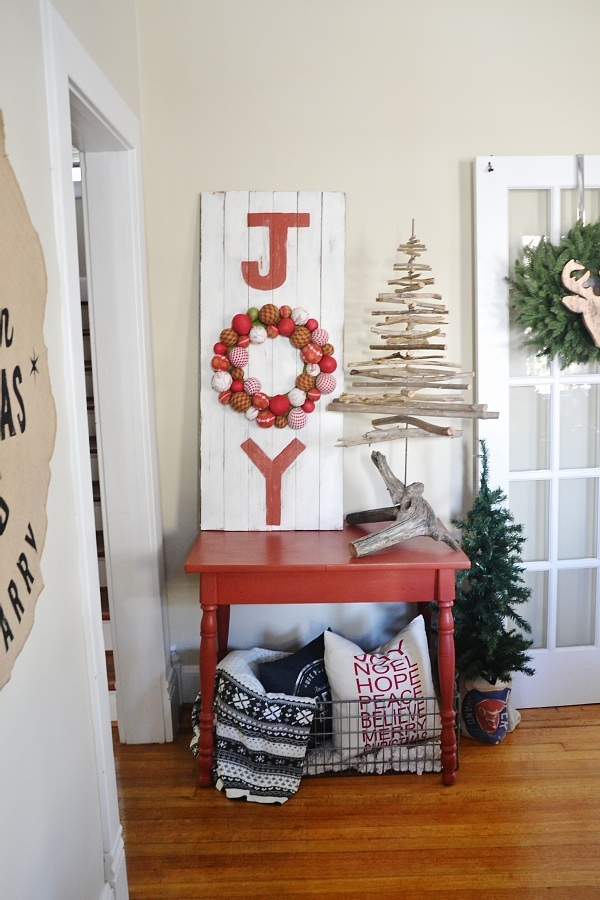
| Materials: | Scrap wood, white and red paint, wreath |
| Tools: | Paint brushes, chalk |
| Difficulty: | Beginner |
Create a charming and rustic Joy sign with this straightforward DIY guide. Use scrap wood, paint it with white and red paint, and add a wreath as the “O” in “Joy”. This project is simple, effective, and adds a touch of holiday spirit to any corner of your home.
20. Faux Framed Stained Glass Wall Hanging by tater to tsandjello
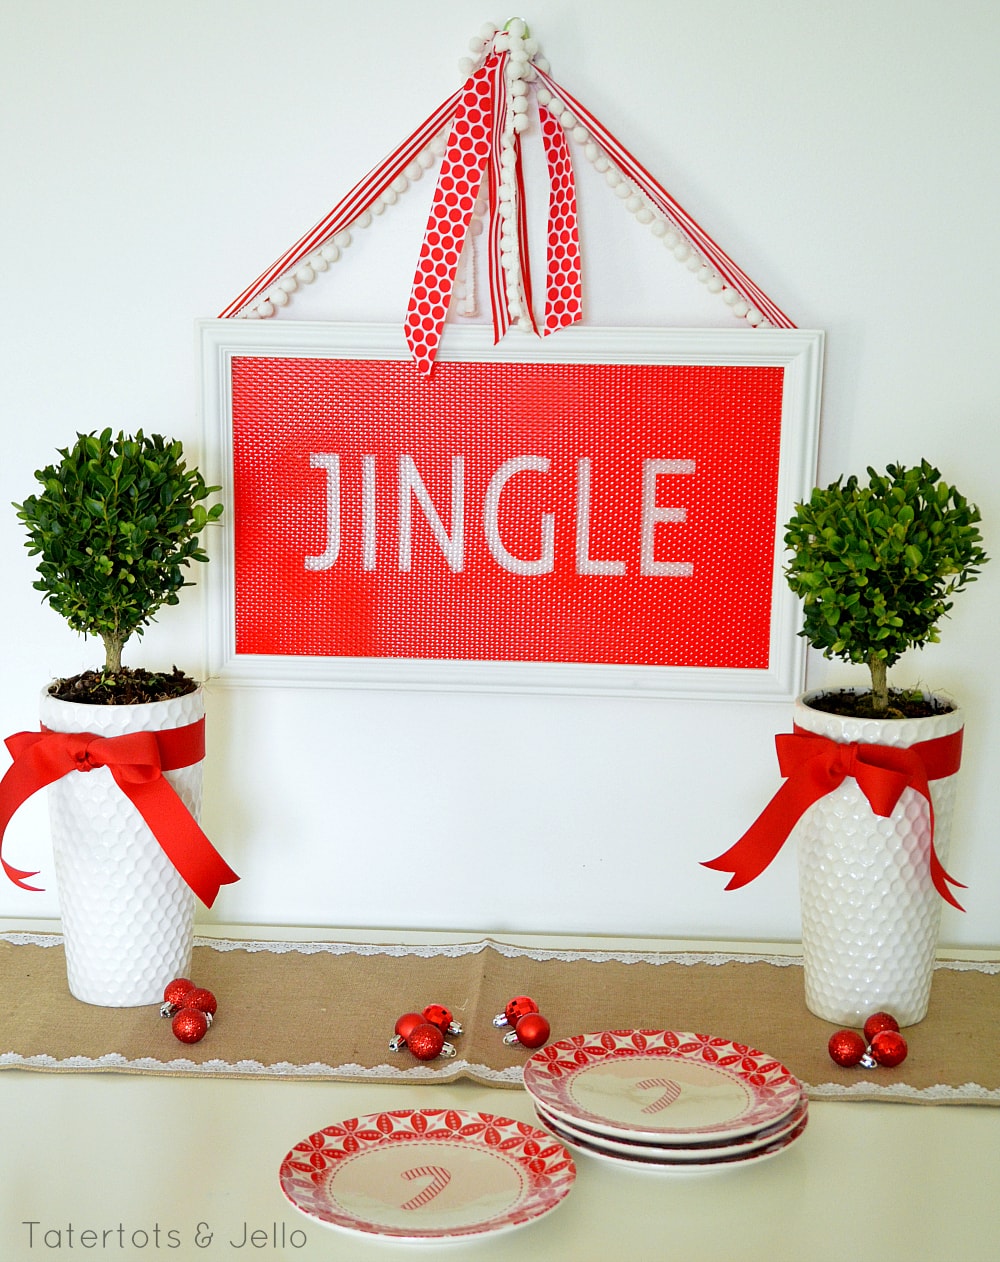
| Materials: | Fluorescent lighting material, rectangular panels of wainscoting, vinyl for letters, ribbon |
| Tools: | Spray paint on the plastic surfaces |
| Difficulty: | Intermediate |
Using an innovative material like fluorescent lighting material, you can create your own Faux Framed Stained Glass Wall Hanging. After cutting and painting the material, peel off the vinyl letters to reveal a beautiful, pebbled texture. Framed with rectangular panels of wainscoting and finished with a ribbon for hanging, this wall hanging adds a festive touch to your holiday décor.
Conclusion
Christmas signs are abundant around the holiday season. However, purchasing one ready to hang can be expensive. Luckily, with some essential pieces of wood, you can easily make a sign. With the plans we’ve posted above, you should be able to find the perfect sign for your needs.
Alternatively, making your own sign isn’t tricky. Using one of the plans above as a base, you can easily adjust the color or words to fit your needs.
Related Reads:
- 10 DIY Wall Christmas Tree Plans You Can Make Today! (With Pictures)
- 31 DIY Christmas Centerpieces You Can Make Today (With Pictures)
- 25 Creative DIY Outdoor Christmas Decorations You Can Make Today (With Pictures)
Featured Image Credit: Smspsy, Shutterstock
Contents
