

Warped floors can be extremely annoying. One day, your floor is nice and flat, and the next, you find yourself walking over a wavy area. This is usually nothing to be alarmed about, but warped floors can be a lingering problem that can cause headaches if not addressed. The good news is, fixing a warped floor is relatively simple to do. With the right materials and determination, anyone can fix a warped floor.
Here is how anyone can fix a warped floor in twelve easy-to-do steps.

Assessing the Warp
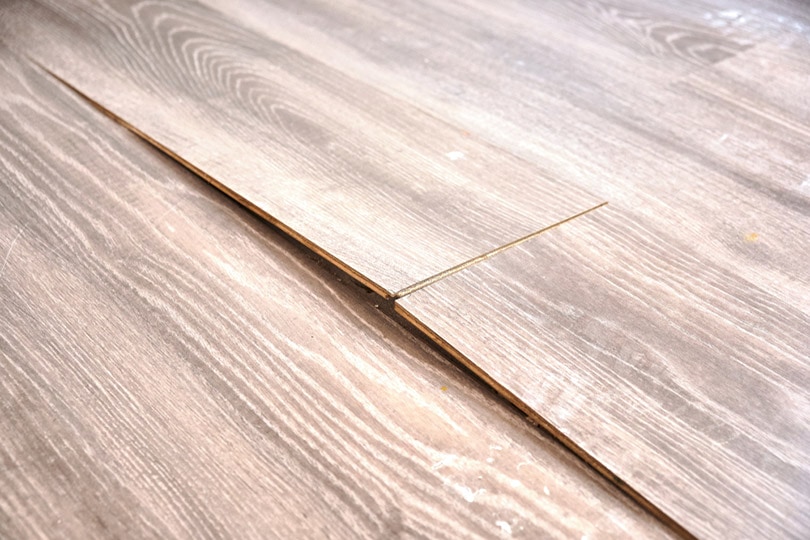
Not all warps are created equal. Some warps in the floor are very small and will require an equally small fix. Other warps are much larger and will require a more extensive repair. Before starting on your project, you need to assess the size of the warp to determine if the floorboards will need to be replaced or simply put back into place.
A good rule of thumb is to measure the warped area. If the warp is 16” long or less, it is a small warp and can probably be worked back into place without replacing any boards. If the warp is longer than 16 inches, you should plan on replacing the damaged boards with fresh ones.
Preparation
The first thing to do before starting any project is to assess your floor. If you are planning on replacing floorboards, you need to source and obtain identical or matching boards so that they can fit the repair. Replacement flooring needs to be the same thickness as the existing floor and most people want it to be the same color and style.
When you are out getting your replacement boards make sure that you have everything else you will need to finish the job.
- Circular saw with a proper blade
- Miter saw
- Replacement boards
- Rag
- Scraper
- Trowel
- Floor adhesive
- Hammer
- Pry bar
- Pencil
- Tape measure
- One day
- Intermediate
Once you have all the required materials and an idea of what kind of warp you are dealing with, you can move on to the next steps.


For Small Warps
Small warps that do not need boards to be replaced can be fixed in five easy steps. It will take a few days for the board to regain its shape, so set aside a weekend that you can keep an eye on your floor.
1. Clear and Mark The Area
The first step is to clear the area around the warped portion of the floor. Move any furniture or items from the workspace. Then mark out the affected area with a pencil so you know where exactly the area is.
2. Wet the Area
Next, wet the affected area. Pour some water onto the floor enough to get the floor wet. While this may seem counterintuitive, water helps increase the malleability of flooring. Oftentimes, water is why the boards warped in the first place. Water is now being used to set things right.
Do not put too much water on the floor. You don’t want to damage nearby flooring. Make sure you are only wetting the small area that is warped and not any of the nearby straight boards.
3. Set Heavy Object On Area
After the floor is wet, set a heavy object over the affected board. Many people suggest using a cinder block. A piece of nearby heavy furniture will work too but you want to make sure that the entire length of the warped board is covered. Do not put something with a leg on it where the pressure will be distributed unevenly.
Even a sufficiently heavy book will work if it will cover the area. Set your heavy object and make sure the area is being flattened evenly over the length.
4. Wait
Now you wait. Keep the heavy object over the warped area for at least 48 hours. There is no time frame. You can leave it sitting for a week if you feel like it. Give the board time to regain its original shape. The weight plus the water and then being dried while flat should return the warped area to normal.
5. Assess Results
After a few days, remove the heavy item and assess the results. The floor should have returned to its original flat shape. The floor might still be slightly warped but the warp should have definitely improved. If you are happy with the results you are done. If you are unhappy, you can try again. If a second attempt fails, then the area might need to be replaced completely. If that is the case, follow the next section on how to replace a warped section of the floor.

For Larger Warps
Large warps extend at least 16 inches along the floor and often extend much farther. Any warp that is longer than that constitutes a large warp which will need to be completely replaced for a permanent fix.
1. Clear and Mark The Area
Clear the affected area of any items or furniture. Assess the extent of the boards that need to be replaced. Once you have the area prepped, mark out exactly what boards you are replacing and make lines where you are going to make your cuts. It is easiest to replace boards in a square area instead of offset or mismatched spaces.
2. Cut Old Boards
Set your circular saw to the height of your floorboards. Many floorboards measure 3/4” in thickness. If you are not sure how thick your floorboards are you might need to pry a board up and measure. The circular saw needs to be set to the proper height to avoid cutting into your subfloor.
Once the circular saw is set, cut the affected boards. Make straight clean cuts. Cut the boards on both ends and clean up any resulting sawdust.
3. Remove Old Boards
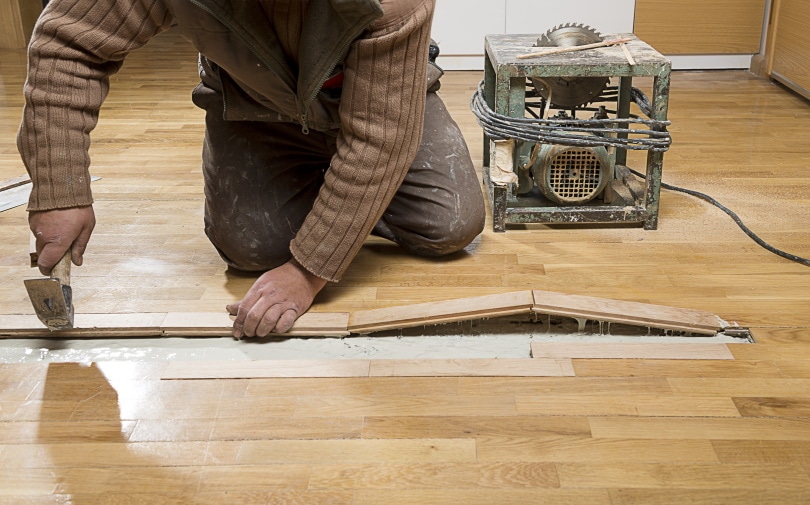
Now it is time to remove the old, warped floorboards. Using your pry bar and a hammer, pry up the old boards using the cuts in the boards to get under them. Depending on how the boards are attached to the subfloor this can be an arduous process. Take care not to damage nearby healthy boards.
Leverage the boards up and pull them out. The boards might crack or break. That is okay. Completely remove all the boards and throw them away.
4. Clean Under Area
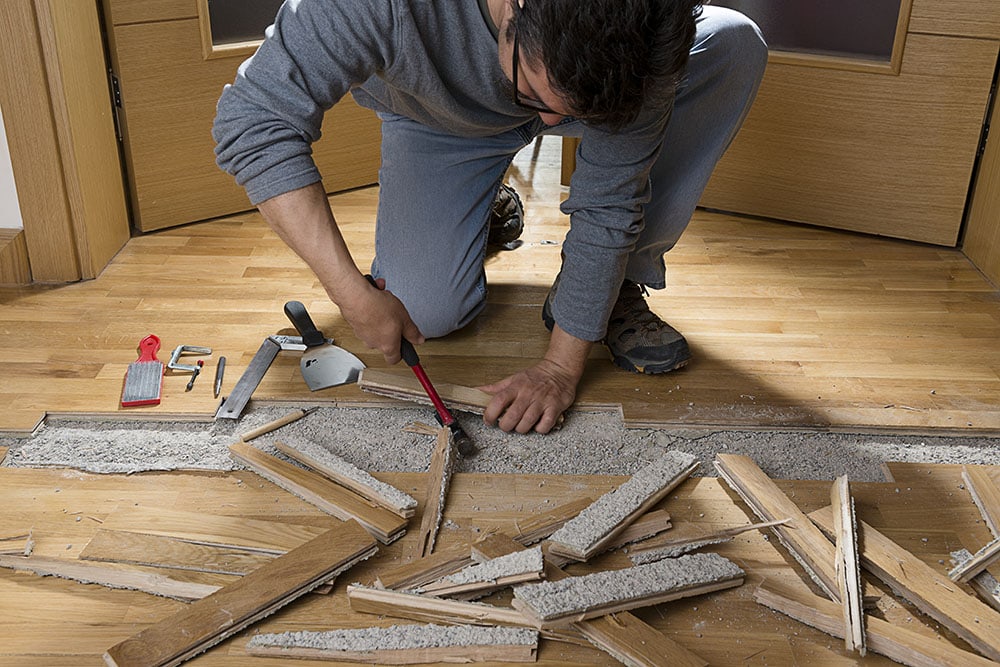
Next, you need to clean the area under the floorboards. In most homes, the subfloor will be flat plywood. Remove any old adhesive, nails, dust, and debris from the hole. If you only have joists under your floors, make sure that they look good and are free from any damage or rot.
The area needs to be cleaned in order to make a good surface to place the new boards. A dirty subfloor will interfere with the floor adhesive or nails that are going to be used to put in the fresh boards.
Scrape away any leftover adhesive. Use a wet rag and the scraper to make sure there is no debris stuck to the subfloor.
5. Measure and Cut Fresh Boards
Measure your new boards and prepare to make your cuts on the miter saw. You want to leave a 1/8-inch gap on either end to allow your floors to breathe during temperature changes. Regardless of how many boards you are replacing, make your cuts and mind your gaps. Remember, measure twice and cut once.
After you have your freshly cut boards, lay them out and prepare to install them.
6. Replace and Secure Fresh Boards
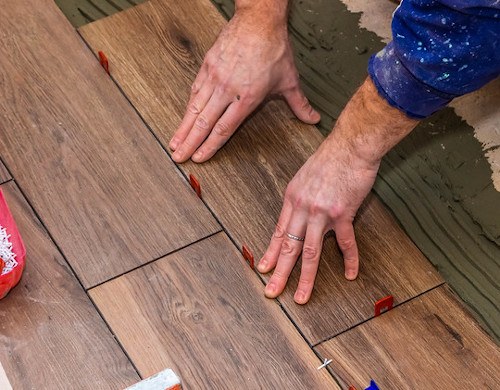
Most floors today are secured to a flat subfloor with floor adhesive. You should have bought some when you found your replacement boards. Put a bead of glue on the back of each board you are installing. Try not to overdo the amount of glue. Each tube should have a recommended amount to place per board.
Set the boards into the area one at a time. Press down and hold each board in place for at least thirty seconds. Do this for each board you are replacing.
Some boards are installed with nails, though that is not common in most cases today. Boards that need to be nailed down should be done with a finish nailer in the recommended nailing pattern.
7. Flatten Area and Assess
Press down on the area to make sure that the boards are flat and secure. If you used adhesive, make sure no adhesive is coming up through the gaps. If you see any wayward glue coming up, wipe it away immediately.
The floor should be good to go at this point. It is best to let the glue dry and set for at least a day. Try not to walk over the area during that time and don’t replace any furniture until the waiting period is over.
Why Do Floorboards Warp?
Floors can warp for a variety of different reasons. Over time, old floors will naturally lose their original shape and take on new shapes after years of use and temperature swings. New floors often warp after being exposed to a large amount of water. Water can warp the surface of the boards or erode the adhesive that keeps the floors attached to the subfloor. Both of those things can cause a floor to warp.
Wood floors in areas with hot summers and high humidity can warp seasonally and can lose their shape gradually over time due to environmental factors.

In Conclusion
By following these steps, you can fix a small warp or a large warp. Small warps are easy to handle while larger warps require a more extensive fix. Modern floors are pretty easy to fix and replace. After following these steps and paying attention to your specific floor, you will be able to assess and fix nearly any warp in your home and get rid of that irritating imperfection.
Featured Image Credit: Joshua Rainey Photography, Shutterstock
Contents
