

Ceiling cracks aren’t always an enormous structural concern, but they are certainly always an eyesore no matter their size. Many factors can contribute to these common household maladies, from poor workmanship on the ceiling to roof leaks and normal foundation settling.
If they’re cosmetic flaws, cracks in ceiling drywall are almost always easy to repair in just a few hours. In this article, we’ll show you how to fix ceiling cracks in seven steps.

- A-frame ladder
- Taping knives
- Utility knife
- Mesh drywall tape
- Pre-mixed joint compound
- Rolling pin
- Sandpaper
- Sponge
- Goggles and a dust mask

How to Fix Ceiling Cracks (7 Steps)
1. Identify the Cause of the Ceiling Crack
Before starting on your ceiling crack repair, you must find the source of the crack. If you have moisture damage or poorly installed ceiling sections, you’ll need to fix the issue first to avoid recurring cracking problems.
Watermarks are a clear sign of moisture issues. You may notice brown or yellow discoloration around the crack, either caused by a roof leak or water coming from the floor above the ceiling. Pinpoint the source of the moisture and fix it before working on the crack.
Another issue may be a poorly taped or hung piece of drywall. If the original installer didn’t correctly apply the tape, you could see it separate from the ceiling, creating a smooth-lined split. You may also notice nail pops, indicating that you need to fasten the panel to the joists with more screws.
A settling house is another common cause of a ceiling crack, and there’s generally no need to seek repair beyond fixing the seam. There may be cause for concern if it is more than ⅛” wide, which could be a sign of structural issues. Contact your contractor if you notice larger cracks forming.
2. Prepare the Ceiling and Floor
Lay down a large drop cloth to collect any dust and falling pieces as you work on the ceiling crack. Set your A-frame ladder on top of your floor covering.
The ceiling needs to be as smooth as possible before you fill in the crack to create a seamless look. Use a putty knife to scrape along and around the crack to knock off debris, paint chips, or drywall flecks. Cut off hanging bits of drywall with a utility knife but try and avoid ripping the paper.
3. Put Down the Mesh Tape
You can use either mesh or paper tape to create a strong joint. Many mesh tapes are adhesive on one side, so they may be easier to use.
Cut a piece of mesh tape that will cover the entire length of the crack. You can cut multiple pieces as needed for long or uneven cracks, but make sure that you cover the whole gap without overlapping pieces of tape.
Before laying down the mesh tape, use a 4-inch knife to apply a thin layer of joint compound to the crack to give it a solid hold. You don’t want the tape separating from the ceiling during or after the process.
Next, lay the tape down, keeping it centered over the crack. Use a rolling pin to smooth it out and press it firmly against the ceiling.
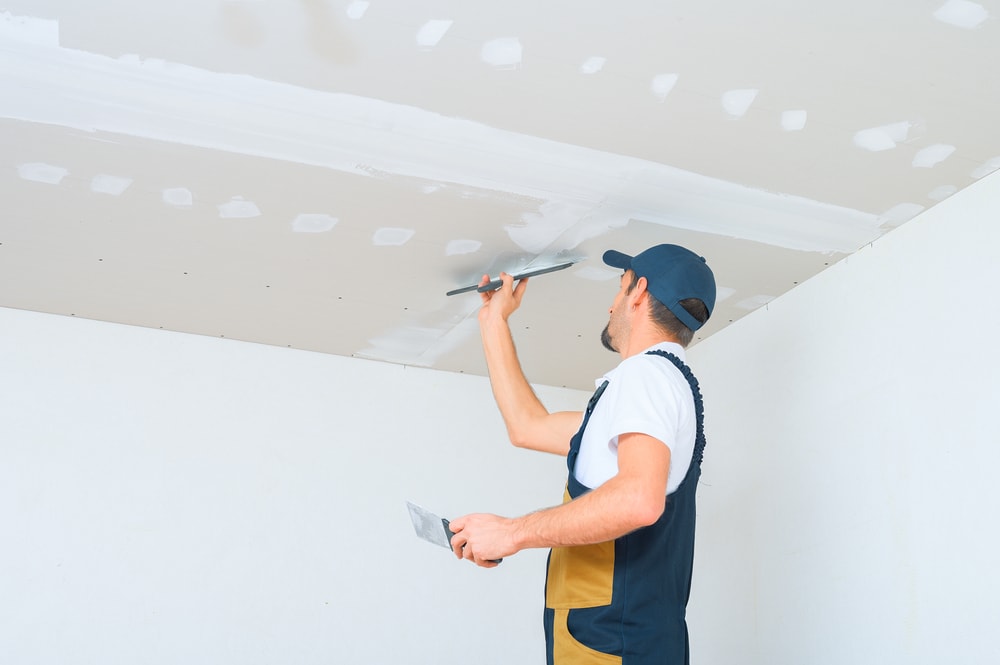
4. Apply the First Layer of Mud
Use your knife to go back over the tape with another layer of compound. To keep it from shifting, you may need to apply the mud from the center of the tape. Starting at the center, smooth it out to one end, and then do the same thing moving toward the other end. Make sure you apply enough to cover the mesh tape but be careful not to add an excessive amount.
Feather the mud to make it blend in with the ceiling and reduce the amount of sanding you’ll have to do later. Press the knife firmly against the outside edge as you smooth the side of the line of mud. Take your sponge and gently blend the mud even more while it’s wet, so there will be less touchup work before the next layer.
Let the compound dry completely before working on the next layer. To speed things up, use quick-setting 5-minute mud instead of standard joint compound.
5. Sand the Mud
Using a medium grit hand sander or sanding sponge, lightly sand the first layer of mud once it’s dry. You want to make it as smooth as possible to minimize imperfections that may show up in later layers. However, you do not want to sand so much that you start exposing the mesh tape underneath the first layer of the mud compound.
After sanding, wipe off any dust with a cloth. You want the surface to be as clean as possible for the next layer of mud.
6. Apply the Second Layer of Mud
Use a slightly larger taping knife (6-8 inches) for the second layer of mud. The tape should be set at this point so you can run a single line of mud from one end to the other. To make the job easier and get a smoother line, add a little extra water to thin it out.
Make a wider spread with the second layer, feathering the edges to create the same blend with the ceiling. The second layer should cover any remaining pieces of tape that are still peeking out from the first layer of mud.
7. Sand and Mud One Final Time
Depending on the length and location of the ceiling crack, repairs may be over after two layers of mud. But if you want the most precise blend to make the repair job disappear, you can go over the crack one last time.
Lightly sand and clean the ceiling to prepare it for the third layer. Make an even thinner mix to create a skim coat with a whipped cream-like consistency. Use a 12-inch knife to make a broader spread that will hide any remaining imperfections and fill in the ridge created by the mud layers.
After sanding the last layer smooth, remove any remaining dust with a slightly damp cloth. Once the ceiling is ready for paint, apply a coat of primer followed by two coats of ceiling paint.
Prevent Future Cracks with Elastic Sealant
If cracks are opening up in the same spots over and over again, you can apply an elastic compound that helps prevent cracks. As panels shift, the compound flexes with the movement to keep gaps from opening up. You can try a product like Elastopatch over an un-taped crack filled with joint compound, or a spray-on option like Goodbye Cracks for hairline splits.
How to Fix Ceiling Cracks in Popcorn Ceilings
If you have a popcorn ceiling, repairing a crack may seem difficult. Fortunately, with products like Zinsser Popcorn Ceiling Patch, one added step is all it takes to get a like-new repair for your textured ceiling.
Minor blemishes may be easier to repair on a popcorn ceiling than on a smooth one. You can try finessing mud into the cracks without removing any of the surrounding popcorn ceiling. If you can get the color to match, the texture will hide the evidence of a patch job.
For a larger crack, you may need to scrape back an inch or two of popcorn from either side of it to create a smooth surface. Tape and mud over the crack as normal to seal the crack. You don’t have to be quite as precise with blending the sides, as the popcorn texture will cover up minor flaws.
Once the crack is fixed and the ceiling is dry, you can apply the popcorn patch. Lightly blend the texture in with the surrounding ceiling and let it dry.
Conclusion
Ceiling cracks are a common problem that can quickly take away from the aesthetics of a room. They’ll require the help of a professional if they’re a sign of structural damage, but in most cases, one proper fix is all it takes to solve the problem for good. With the simple steps laid out here, you can quickly and effectively get rid of these everyday imperfections and refresh the look of your home.
See also:
- How to Clean Porcelain Sink: 5 Steps (with Pictures)
- How to Clean a Bathroom Sink Drain (Quick & Easy)
Featured Image Credit: zlikovec, Shutterstock
Contents
