
A window regulator is one of those car components that play a key role in ensuring the driver experiences comfortability. However, this will never be apparent until they start malfunctioning. There are two types of regulators. We have the automatic window regulator, and the manual window regulator.
The automatic regulator is sometimes referred to as the power window regulator because it relies on power to operate. Unlike its manual twin, it’s often designed with a button or switch that’s located on the door’s armrest.
But it doesn’t quite matter what kind of regulator your car comes with because they both serve the same function. That is, creating a force that allows your window to efficiently move up or down. Also, they are both located in the internal section of the door’s panel, so you’ll have to disassemble the whole thing if you want to get to them.
- Work gloves
- Safety toe covers
- Goggles/Eyewear
- Hard hat (Not important, but you can never be too sure)
- Screw driver
- Small hammer
- Service manual
- Trim tool
 How to Replace a Malfunctioning Window Regulator (10 Steps)
 How to Replace a Malfunctioning Window Regulator (10 Steps)
1. Put on your PPEs (Personal Protective Equipment)

Even if it’s a simple job, there are so many things that could go wrong. Professional mechanics are cognizant of this fact, and that’s why they are always wearing their safety gear. Ensure you’ve worn your gloves, protected your eyes from flying debris using your favorite pair of goggles, and covered your toes.
2. Disconnect the Battery Cable
The first thing that you need to do anytime you’re repairing an electrical component, is to ensure there’s no power being channeled through it. And to do that, you’ll have to uninstall the cables that run the electric motor.
Fortunately, this is not something to worry about if you’re working with a manual window regulator—it comes with cranks that are manually rotated to push the window up or down.
After disconnecting the cable, unscrew the interior window and door handles, and put them aside.
3. Remove the Door Panel

That thing screwed to the door shell is what’s called a door panel. Unscrew it, and then reach for the trim tool. You’ll need the tool to pry the panel away from your door, seeing as they are normally glued together.
If you’re not so sure about what we’re referring to, use your service manual. It has pictures and detailed descriptions of different parts of the car.
4. Disconnect the Electrical Connector
If you feel like the connector is in the way, or kind of making the process more difficult than it should be, you could always disconnect it from the window switch. But this should not be an issue for the guys working with a manual window regulator. Your vehicles don’t have an electrical connector.
Okay, now try to remove the door panel.
5. Removing the Water Shield
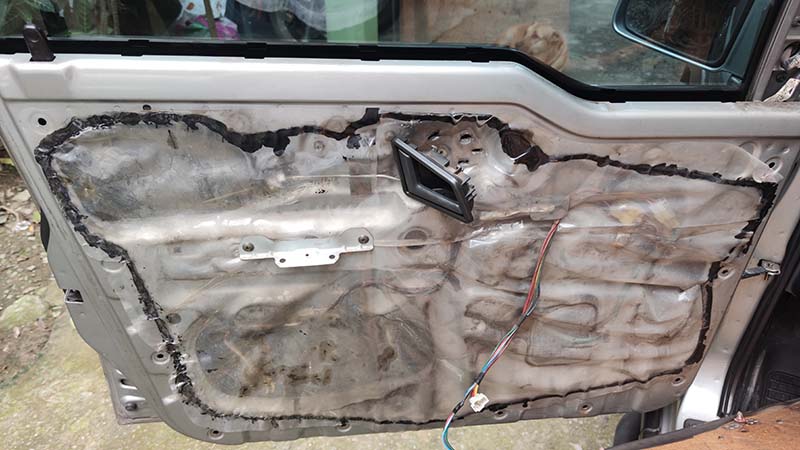
In some circles, our water shield is commonly referred to as the vapor barrier. And it’s the material that’s responsible for redirecting water back into the door, so that it can all drain out. If that water is allowed to get to the cardboard, that whole thing will be warped and mushy.
Removing it should be easy. Just grab a pinch, and yank it off fast. Don’t pull it off slowly. You’ll only be stretching it, and making your work a tad bit more difficult. Also, a stretched vapor barrier is not reusable. And we still need it.
6. Detach the Glass
Detach, but don’t remove it completely. Just make sure it’s separated from the window regulator, and then tape it to the door frame. Please be careful and gentle because that glass is so delicate. We wouldn’t want to break it.
7. Removing the Mounting Bolts

By now, you should be able to see the regulator’s mounting bolts. Get them off, and slide the regulator assembly out. This should be easy, as it often goes through the door’s interior access opening. If there’s a slight struggle, remove the window motor first, and then give it a second shot.
8. Install the New Replacement
While installing the new regulator, remember to apply white lithium grease on the different surfaces. It usually acts as a lubricant that ensures all the different moving parts (and window tracks) operate smoothly, without having to deal with friction.
Once you’ve done all that, attach the original motor to the regulator before installing the regulator assembly.
If you’re done, tighten the mounting bolts.
9. Reinstall All the Other Parts

Let’s start with the window, because that’s what’s supposed to go onto the regulator first. After that, reinstall the water shield, before connecting the electrical connector to the power switch.
We’re almost getting to the finish line. Just reconnect the battery cable, and give it a small test run. We have to be sure everything’s working the way it’s supposed to, before reattaching the trim panel and handles.
10. Give It a Final Test
The work’s done, and all that’s remaining is testing the whole thing one more time. So go ahead and roll down the window. Roll it back up, and then roll it down one last time. If it’s operating the way it should, or if you’re satisfied with how things are, put away your tools, and call it a day.
Conclusion: How To Replace A Window Regulator
The window regulator is a basic and durable car component. But that doesn’t mean that they don’t malfunction from time to time, because they do. Their electric motors wearing out is one of the most common issues that mechanics have to deal with on a daily basis. If all of a sudden you start hearing some strange buzzing sound whenever you press the power switch, that’s a sign you need to have it checked.
You can either reach out to a reputable mechanic for assistance, or change the regulator yourself. If you decide to do it yourself, just follow these steps. But don’t leave it unattended because it can quickly snowball into something costly.
Featured Image Credit: CreaPark on Pixabay
Contents
