

Having the maintenance light illuminated on your dashboard can be distracting, frustrating, and annoying. There are numerous reasons why your maintenance light could be on even after you change your oil. Some mechanic shops won’t reset the light for you. You might have changed the oil yourself. Or you might want to just wait a little longer before getting your oil changed. Whatever the reason, you can reset your 4Runner’s maintenance light at home in just a few minutes.

Preparation
- Time: 5-10 minutes
- What You Need: Your keys
- Difficulty: Easy
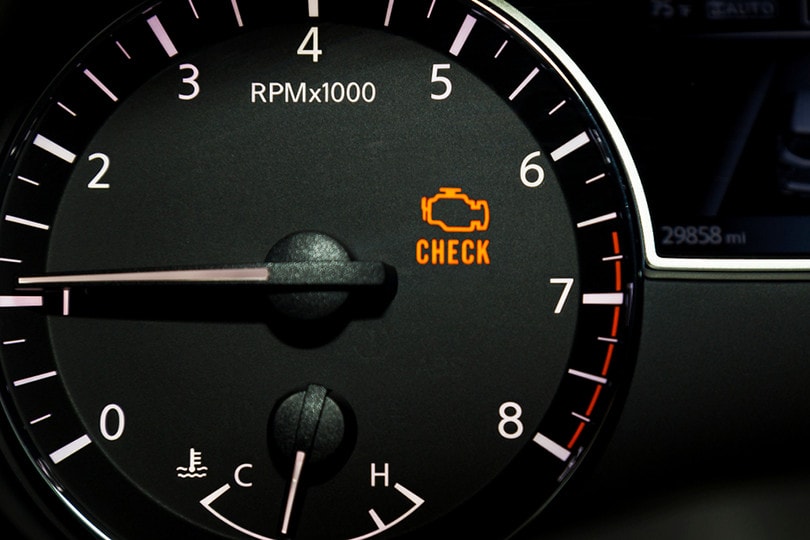
Resetting the maintenance light on a Toyota 4Runner is very simple. All you need is your keys and a couple of minutes. You don’t even have to start the car. Before you go to reset the maintenance light, you should ensure that there are no other lights on the dashboard. Be sure that it is the maintenance light and not the check engine light. Generally, you only want to reset the maintenance light after you change your oil. You should not reset the light to simply turn it off without doing any maintenance.
Why Is My Maintenance Light On?
The maintenance light will light up on most 4Runner models after 4500 miles of driving. It is simply a reminder to get your oil changed and have your fluid models checked. The maintenance light is different from the check engine light. The maintenance light exists simply to remind you to get an oil change. The check engine light denotes a problem with the engine. The maintenance light doesn’t scan for any problems. It is simply a mileage light.
The 5 Steps for Resetting the Maintenance Light On a Toyota 4Runner
1. Turn Ignition to On
The first step is to turn the ignition on. Do not start the car. Turning your car on without starting it makes the radio come on and the AC blow, but it will not fully start the car.
For Push to Start Models
Press the start button without having your foot on the gas. You might need to push the button twice. The car’s ignition should come on.
For Keyed Models
Turn the key halfway to the right. Do not turn it all the way. Usually, the starter will have a section that reads ON where you need to turn the key to.
2. Switch Odometer to Trip A
Once the car is on you, you need to switch the odometer trip to Trip A on the dashboard. That is accomplished by pressing the odometer button. There is a stick that comes out of the dashboard on the right side. The small button allows you to change your odometer settings. Press the button multiple times until you see the dash cycle to Trip A.
3. Switch Ignition Off
With the odometer trip set to Trip A, turn the ignition off again. This can be done by pressing the starter button or returning the key to the off position.
4. Press and Hold Odometer Trip Button on Dash
Next, go back to the odometer button. It is the same button used to cycle the odometer trips. Press and hold the button. Keep the button pressed and do not release it.
5. Switch Ignition Back on and Release After Odometer Flashes
Lastly, switch the ignition back to the on position. Again, do not start the car. Return the car to the on position. Watch the dash. The odometer should flash. Trip A should reset to zero. After you see the flash and the zeroes, you can release the button and either start the car or turn the car off. Whenever you restart the car, the maintenance light should now be off. On some models, the maintenance light itself will flash and turn off but normally it is the odometer.
This works because you are simply resetting the interior odometer, which triggers the light every 4,500 miles of driving.

Troubleshooting
If this doesn’t work the first time, try it again. It could take two or three tries to get it just right. You have to keep the car on without starting it. You have to keep the button held while the car starts. You must have the trip set properly. You have to wait until the odometer flashes before you release the button. If you miss any of these steps, the process will not work, and you will have to start over.
When In Doubt, Consult the Manual
If you have any issues, consult the manual. Your car’s manual should have a section about the dash lights and how to reset the maintenance light. There is a chance that your particular year could have had a different method for resetting the light. Every year has the potential to be a little different from the previous years.
In Conclusion
With these five easy steps and a few minutes, anyone can reset the maintenance light on their Toyota 4Runner. You should always do this after changing the oil or receiving maintenance. Generally, the light triggers every 4,500 miles. Use the light as a helpful reminder before turning it off.
Featured Image Credit: Jerad Hill, Unsplash
Contents
