

Pocket doors are convenient, afford you more space in a room, and they look stylish. However, if installed incorrectly or if you use inappropriate or low-quality materials, they can scrape, catch, and be very challenging to properly open and close. As such, while installing a pocket door yourself is possible, you do need to follow the proper steps to make sure you get it just right.
Below, we have outlined the process required to install a pocket door, in 10 steps, but if you’re unsure of any of the stages or worried about getting it wrong, it could be worth getting a carpenter or handyman in to do the job for you.

Materials
Installing a pocket door does mean that you must take down drywall, as well as remove any existing door. This means that it is a bigger job than simple replacing an existing door with a new one. However, if you take things slowly, get a decent pocket door kit, and use the right tools and equipment, you can get the job done yourself for a couple of hundred dollars, rather than paying a professional to do it for you. Here are the materials and tools that you will require.
- Circular saw
- Craft Knife
- Drill and screwdriver bits
- Drywall
- Drywall mud
- Drywall tape
- Hand saw
- Level
- Measure
- Paint
- Pencil
- Pocket Door Kit
- Reciprocating saw
- Sandpaper
How To Install A Pocket Door (10 Steps)
1. Remove the Existing Door
Take the existing door off its hinges and then remove the molding. Use a reciprocating saw and cut the shims. Once the nails are out, you can take off the full door frame.
2. Remove the Drywall
The pocket of the pocket door sits inside the wall, which means that, at this point, you need to remove the drywall from one side. Use a utility knife to cut through the wall and carefully remove the drywall up to a few inches above the height of the header. There’s no need to go all the way to the ceiling, as this will make it more difficult when it comes time to put new drywall in later.
3. Cut the Studs
Once the drywall is down, it will leave the studs exposed. You can use a small hand saw, but a circular saw will make the job easier. Whichever you use, ensure that you don’t damage the side of drywall that you left in place, or you will find yourself having to repair this as well. You need to leave enough space in the studs so that the pocket door can pass fully through.
4. Install the Slider Track
Install the slider track on the wall half of the pocket door. Assuming you bought a pocket door kit, the track will have been included. Screw the brackets into the studs for security and stability and ensure that the track is level by using a level. In some cases, it may be necessary to cut the track down to the appropriate size. Some kits have markings for different sized doors, but not all do.
5. Insert the Door Into the Slider Track
Once half of the slider track is up, mount the wheels on top of the door. These will sit inside the track and enable you to slide the door from one end of the track to the other. Once the wheels are fitted, slide the carriages into the track at the open end. Adjust it until the door is level and it slides smoothly back and forth and then fix the remaining half of the track.
6. Replace the Drywall
Use adhesive and screws to fix new drywall of the same size as you removed earlier. Use new drywall and have the merchant cut it to size for you, using your old piece as a guide. Don’t tape and mud the drywall yet, though.
7. Install the Latch
The door kit will have included a latch that goes in the door and a section to attach to the wall. This keeps the door closed. Fit the latch in the door and the wall, ensuring that the two line up and following the instructions that came with your door kit.
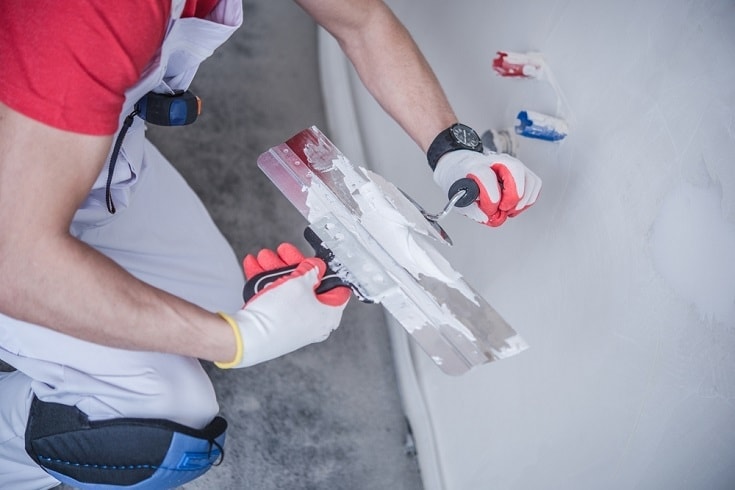
8. Finish the Drywall
Now you can finish replacing the drywall by applying tape and mud. Be generous with compound, ensuring that you cover all the seals with multiple coats and tape. Allow the mud to dry and then sand it down. Apply more layers of compound following the same steps and, when finished, give it a final sanding to ensure that it is fully smooth.
9. Paint and Finish
Now you can paint and finish the wall, ideally to match existing wall décor. By painting the wall, now before you add the door trim, it means that you don’t have to tape the trim or try and ensure straight lines because the trim will cover up any mess you make.

10. Install the Trim
Finally, add the trim, screwing or nailing it to the jamb and door studs. Once this stage is complete, you’ve finished installing your pocket door.

Conclusion
Pocket doors look good and, although you can’t add wall outlets on the wall where the pocket resides, you can hang shelves or place cupboards and take advantage of the extra space that a pocket door creates in this way. The process does require pulling down drywall, and it can get dusty when you’re sanding it down, but despite this, it is a relatively simple DIY task that most people can achieve.
Featured Image Credit: Kawin Ounprasertsuk, Shutterstock
Contents
