

If you’re looking to add a unique touch to your home décor, why not try creating your own picture frame collage? It’s fun, easy, and best of all, it’s cheap on the wallet!
With these three frames and a few creative ideas, you can turn your ordinary living space into an eye-catching masterpiece. Here are some ideas for creating the perfect DIY collage picture frame that will transform any room in minutes. Let’s get crafting!

The Top 4 DIY Collage Picture Frames
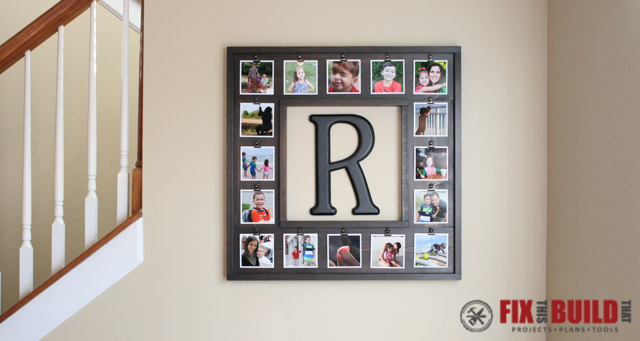
1. Instagram Collage Frame
| Materials: | 1×6 pine, 1×2 pine, wood glue, pocket hole screws, bulldog clips |
| Tools: | K4 master system, face clamp, miter saw, random orbital sander, brad nailer |
| Difficulty Level: | Beginner to intermediate |
Now it’s time to get creative! This Instagram Collage Frame is perfect for displaying all your favorite memories. Start by cutting the 15-inch 1x6s into four 6-inch pieces and two 4-inch pieces.
Then use a miter saw to angle the edges of each piece to match the width of the bulldog clips. To complete construction, secure them together with wood glue and brad nails. Finally, sand down any rough edges and stain for an extra touch of style.
Those who’ve had experience using tools will find this project relatively simple. But don’t worry if you’re a beginner; simply follow the instructions, and you’ll be finished in no time!
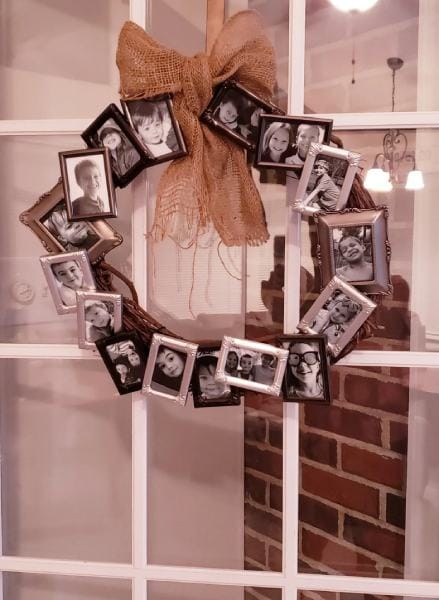
2. Collage Wreath Frame
| Materials: | Mini 2×3 frames, grapevine wreath, floral wire, burlap |
| Tools: | Face clamp, cordless drill |
| Difficulty Level: | Beginner |
This wreath frame is the perfect way to showcase a collection of your favorite photos. Start by drilling two holes in each 2×3 picture frame, then attach the frames to the wreath using floral wire.
Once all your frames are attached, tie a bow around the wreath using burlap for a touch of rustic charm. Now you can hang your new picture frame collage masterpiece and admire it for years to come.
This project is great for those who are just starting out with DIY projects. With a few simple supplies and some basic tools, you’ll have a one-of-a-kind picture frame collage in no time.
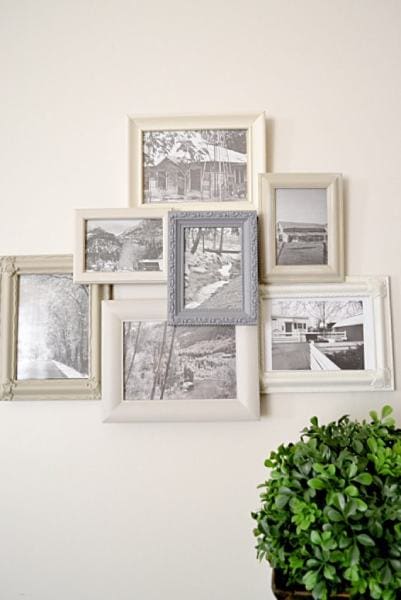
3. Multi-Frame Collage
| Materials: | Cheap picture frames |
| Tools: | Strong epoxy or glue |
| Difficulty Level: | Beginner |
Designed for any level of expertise, this collage frame project needs no tools and minimal expense. Transform your space with a personal touch—begin by collecting some inexpensive frames, then connect them together using powerful epoxy or glue to create the perfect unified collage.
Now that you’ve arranged the frames in your preferred pattern, it’s time to give them a place on your wall and take pride in your job well done.
What makes this project so delightful is that there are no hard-and-fast rules—you can choose just how large or small each frame should be. In addition, don’t hesitate to mix different sizes for an alluring yet one-of-a-kind look!
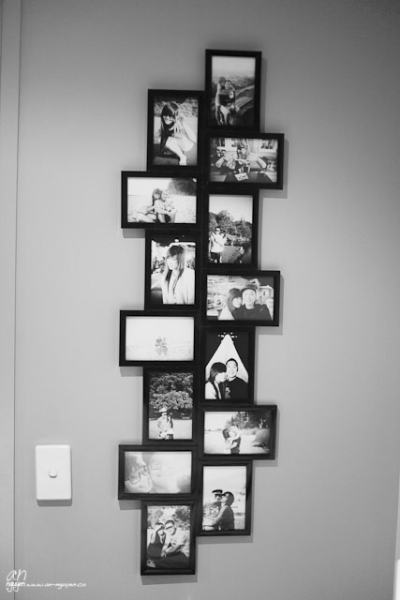
4. Layered Frames
| Materials: | Old picture frames, different colors of paint, piece of wire, some screws |
| Tools: | Hot glue gun and glue sticks, screwdriver |
| Difficulty Level: | Beginner |
If you want to have some depth to your collage, consider making this DIY Layered Frames project. This is ideally done with 5–7 frames but you can get creative and use more if you have the space on your wall.
The process is pretty straightforward. Once you have cleaned and repainted the frames, remove the glass and backings. Then, practice arranging them in a pattern you like. It is recommended you take a photo to help you remember how you arranged them. Next, take your trusty hot glue gun and get to gluing! Once the glue has set, you attach screws and a wire on the frame that will be closest to the wall so you can hang up your creation.
Tips to Make the Perfect Collage Picture Frame
If you are just starting out on your DIY journey or if you consider yourself a master crafter, these tips will help make sure your picture frame collage is perfect!
- Always think about the overall design before you start
- Use a level to make sure everything is aligned correctly
- Pre-drill any holes before using screws
- Use sandpaper to smooth down any rough edges
- Apply a coat of wood stain for a finished look
- Have fun and get creative with your designs!
Unleash your creative side and assemble beautiful picture frame collages to showcase your most cherished memories. All that’s required is some crafting supplies and a few basic tools—so let the fun begin!
 Conclusion
Get ready to create stunning collage picture frames that showcase your cherished memories! These projects are incredibly easy to put together, regardless of whether you’re a beginner or an experienced DIYer.
Simply gather the necessary materials and tools, tap into your creative side, and patiently assemble—before long, you’ll have something truly unique on display in no time!
See also:
Featured Image Credit: jakkapan, Shutterstock
Contents
