
Since different rooms require different floors, every doorway needs to have a transition strip that will divide the space. Of course, transition strips are not always necessary, but if that transition is between different kinds of flooring, you will certainly need it. Visible floor transitions are also critical for safety because the person walking on them will notice and anticipate the change of the floor feel or elevation.
In this article, we’ll provide you with a step-by-step guide for where to put a transition strip in a doorway.

Materials and Tools

Before we begin, we will provide you with a list of materials and tools you will need, along with the different types of transition strips.
| Tools | Materials |
| Impact driver | Transition strip |
| Bandsaw | Pencil |
| Drill | Marker |
| Miter or Circular saw | Nails |
| Tape measure | Hammer |
Once you have all the required materials, you will need to know which kind of transition strip will suit your needs.
These are the available transition strips on the market:
- Tile to laminate transition strip
- Vinyl to tile transition strip
- Wood floor transition strip
- Carpet to ceramic tile transition strip
- Transition strip between hard surfaces
- 4-in-1 transition strip
Where to Put a Transition Strip in a Doorway (4 Steps)
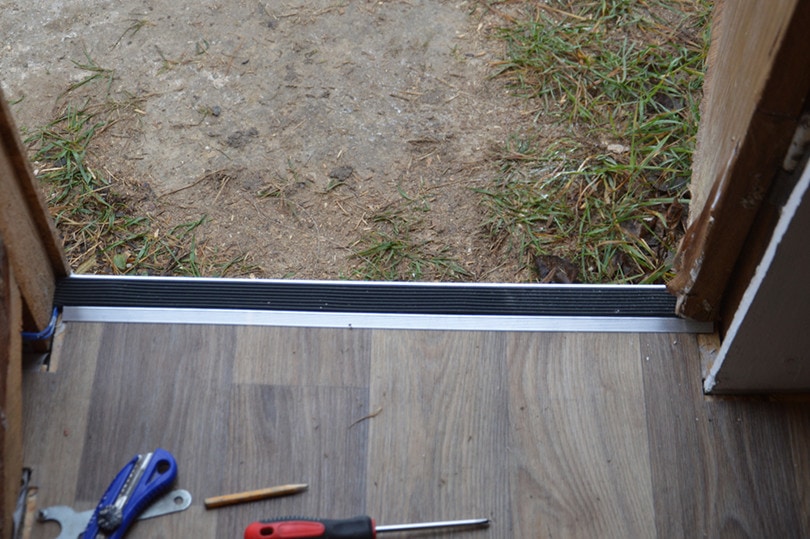
Once you have your materials and tools ready and have purchased the transition strip you need, you can install it. The transition strip should be placed in the center of the door opening, preferably where the opening is the smallest. That way, the functionality of the door will not be impacted. For the exact placement and installation, follow the steps below.
1. Find the position and measure

As we mentioned above, you should place the strip in the center of the door opening, where it’s the smallest. It’s best to leave a ⅛ inch gap between the stops on the doorjamb. That way, the strip will be aesthetically pleasing while allowing the door to function correctly. Take a tape measure and measure the inside of the door opening to know what size transition strip you’ll need.
2. Cut the strip
Once you have the required measurements, you’ll need to cut the strip to fit in. Take a Miter or a Circular saw and carefully cut the transition strip. If needed, you can use a reducer for transition between different thickness floors or between floors from other materials.
3. Cut the metal rail and screw it in
You will need to cut the metal rail of the transition strip and screw it in. Measure the distance between the stops to decide where to cut, and use a bandsaw to cut the metal rail. The bandsaw will help you make a clean cut, and it will easily slice through metal. When you finish cutting, screw the metal rail to the subfloor. The attachment will vary depending on the subfloor your home has.

Wood Subfloor
If you have a wood subfloor, the installation will be pretty straightforward. You would use the screws that come with the transition strip to screw the rail into the wood subfloor. Attaching a transition strip is much easier on wood subfloors than on concrete subfloors.
Concrete Subfloor
If the subfloor is concrete, the installation will be more complex. You will need to place the metal rail on the floor and mark where the screws should be placed. The next step is to drill the concrete in the marked areas. Since the subfloor is concrete, you must buy concrete anchors and insert them into the holes. You can put the metal rail back and screw it into the concrete anchors when that is done.
4. Cut the decorative strip and snap it into the metal rail
Last but not least, you will need to cut the decorative part of the transition strip and snap it into the metal rail. Measure the doorway again, mark the lines on the decorative strip, and cut with a circular saw. When you finish, snap it into the metal rail, and the process is done.
More About Different Types of Transition Strips
4-in-1 Transition Strip
A 4-in-1 transition strip is a strip with interchangeable parts, so you can use it for different types of floors. This strip type commonly includes a metal channel with T-molding that fits into the channel. They are used alone if you’re mounting floors of the same height. For different situations, various pieces (carpet strip, hard surface reducer, end molding) are used in conjunction with T-molding.
Carpet to Ceramic Tile Transition Strip
Carpet to tile transition strip is designed to join a ceramic tile floor to a low-pile carpet. This transition strip has an invisible aluminum strip that gets tucked in under the edge of the rug. It has upward spikes that grip the carpet and hold the strip in place. The ceramic tile butts up against the track, but it’s not attached. In the end, the main strip should be snapped into the aluminum strip on the floor.
Tile to Laminate Transition Strip
As the name says, a tile-to-laminate transition strip is designed to join a laminate floor to a tile floor. It’s commonly unfinished, so you can paint it to match the color of the flooring. This transition strip type comes with molding with offset grooves to match floors of different thicknesses.
Vinyl to Tile Transition Strip
Vinyl to tile transition strip creates a perfect transition from a thick tile floor to a lower vinyl floor. It’s also paintable, so you can match it with the color of your floor. To install this type of transition strip, you will need anchors and screws to snap the top strip into the channel later.
Wood Floor Transition Strip
People often refer to wood floor transition strips as seam binders. They are used to bridge two wood equal heightened floors together. It’s pretty simple to install. Position the strip over the stream and dive the screws into the pre-drilled holes. It will allow the floors to breathe without cracking the strip.
Transition Strip Between Hard Surfaces
A transition strip between hard surfaces is commonly a T-shaped, aluminum strip. It’s perfect for same-height hard surfaces. To install this strip, you would need to seal the joint between floors with a sealant and then force the vertical portion of the strip into the gap. That way, it will bond with the sealer and secure the strip.
 Conclusion
As you can see, finding the spot for the transition strip and installing it is pretty simple, and there are transition strips for any type of flooring you may have. Check out the article one more time, gather the required tools, and buy the strip. You will complete the project without any issues by following the steps we provided for you.
Featured Image Credit: Apx.org.ua, Shutterstock
Contents
